Apache Airflow 기반 Google Analytics 4 API를 통한 블로그 사용자 정보 전달 자동화

Introduction

Google Analytics 4 (GA4): Google의 최신 웹 및 앱 분석 플랫폼으로 GA4는 이전 버전인 Universal Analytics (UA)와 여러 가지 중요한 차이점이 있으며, 이는 기능, 보고서 구조, 데이터 모델링 및 추적 방법에 큰 변화를 불러왔습니다.

  • 이벤트 중심의 모델: 대부분의 상호작용이 이벤트로 처리되며 사용자 정의 이벤트 구현 간소화
  • 기계 학습 및 예측: 사용자 행동 분석과 예측에 기계 학습 알고리즘을 활용, 이탈률이 높거나 구매 가능성이 있는 사용자 예측
  • 세분화된 사용자 분석: 사용자의 전체 수명 주기에 기반한 분석 제공. ‘사용자’, ‘세션’, ‘액티베이션’, ‘이벤트’ 등의 보고서 확인 가능
  • 코드 없는 이벤트 추적: 인터페이스를 통해 코드 변경 없이 이벤트 생성 및 수정 가능
  • 향상된 크로스 플랫폼 추적: 웹과 앱 간 사용자 경험 추적 개선
  • 데이터 보존 및 삭제: 데이터 보존 기간 설정 및 자동 삭제 기능 제공
  • Audiences와 Segments: ‘세그먼트’ 대신 ‘Audiences’를 사용하여 사용자 그룹 정의
  • 향상된 사용자 프라이버시: GDPR, CCPA 등의 규정 대응을 위한 데이터 제거 및 조정 기능 강화
  • BigQuery 통합: 모든 속성에 대한 무료 BigQuery 연동, 원시 데이터 분석 용이
  • 새로운 보고서 및 인터페이스: 보고서와 인터페이스의 구조 변경

하지만 GA4는 여러 정보를 내포하고 있다보니 매 페이지의 로딩 시간이 매우 길다.
따라서 Apache Airflow를 통해 정기적으로 GA4의 API를 호출하고 Discord로 메시지를 보내는 DAG를 구성해보자!


Setup

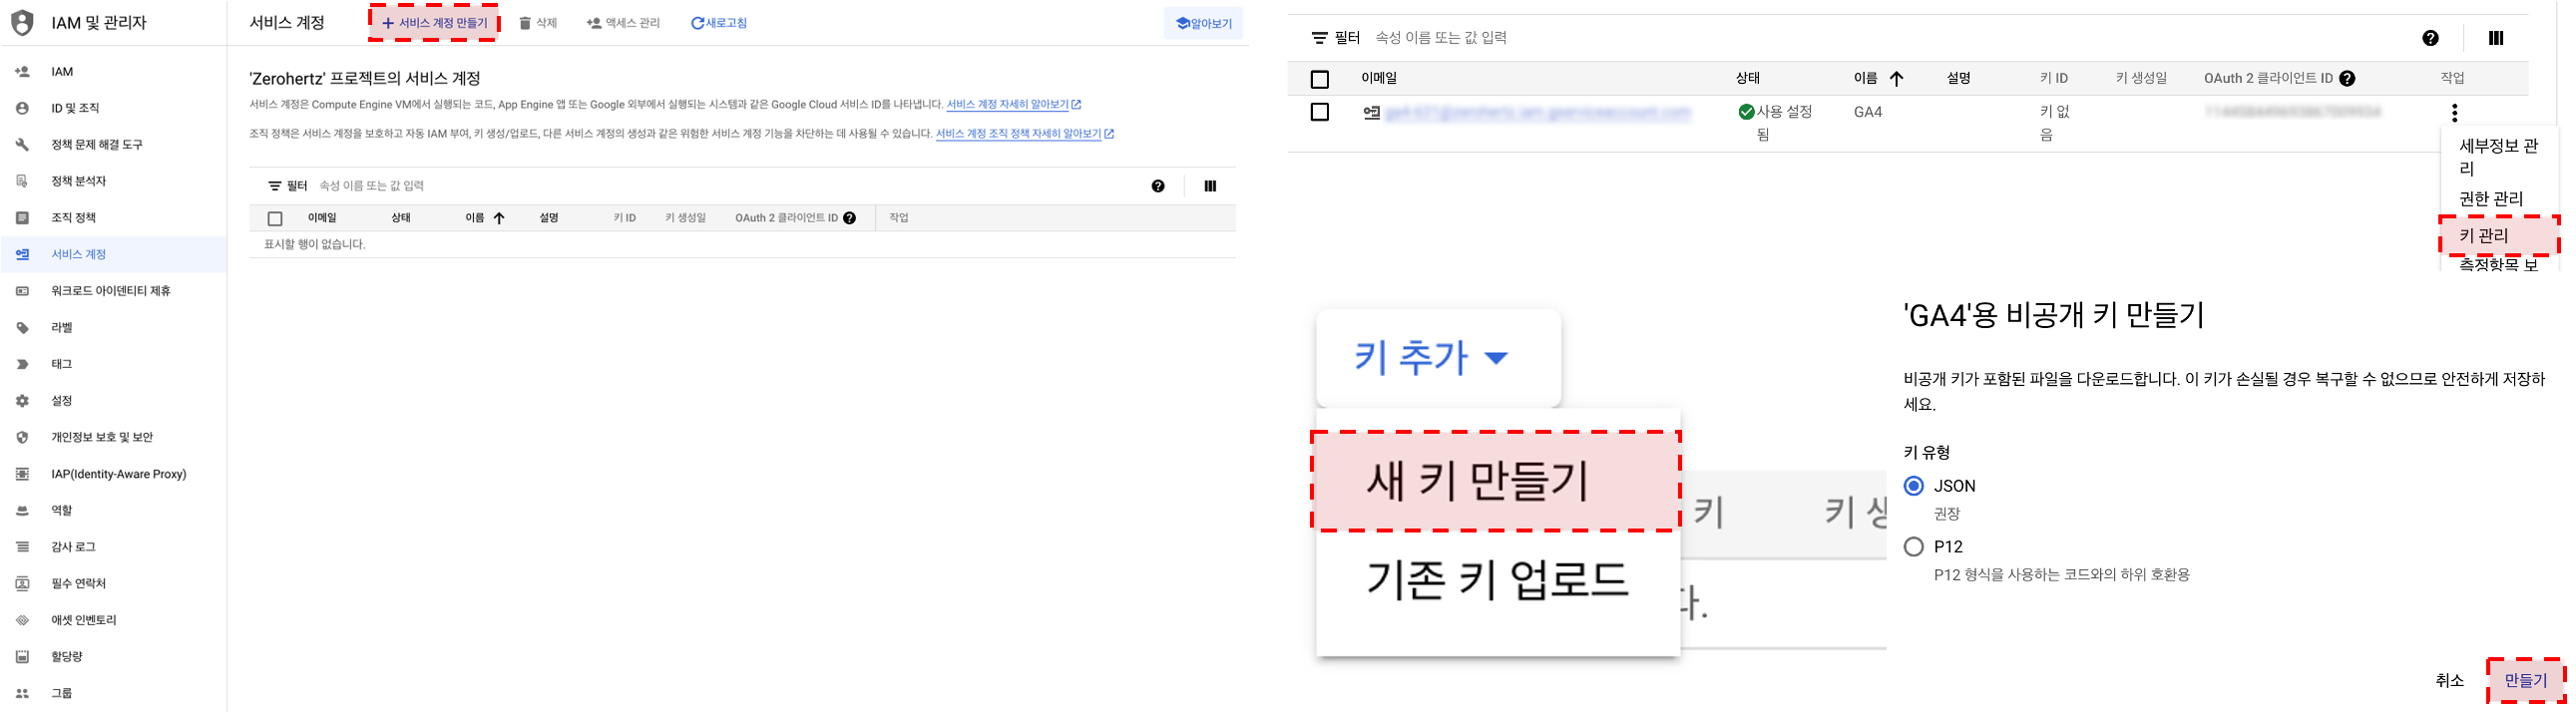
GCP에서 아래 과정을 수행하여 비공개 키 .json를 잘 보관한다.

GCP

Google Analytics 4 페이지로 이동하여 자신의 계정 외에 위에서 추가한 서비스 계정을 추가한다.

GA4

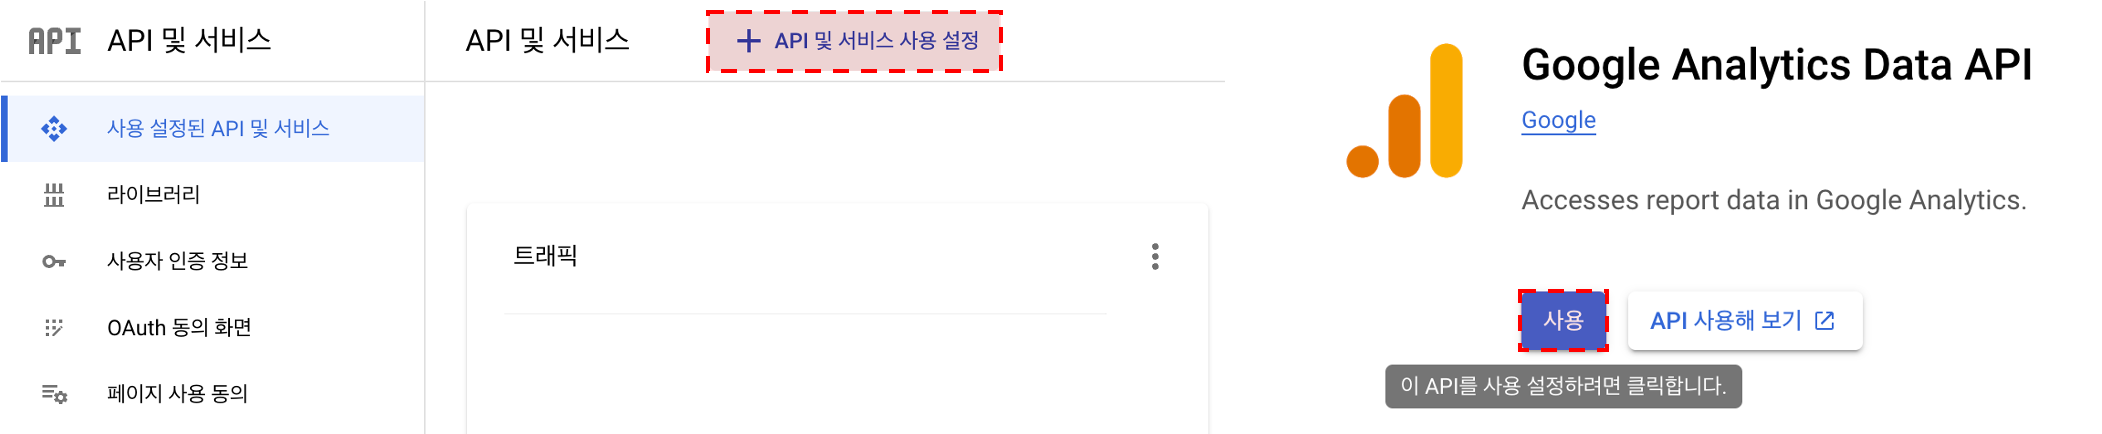
다시 GCP로 이동 후 아래와 같이 Google Analytics Data API를 활성화한다.

API

마지막으로 API를 사용할 환경에서 라이브러리를 설치한다.

1
2
$ pip install --upgrade google-api-python-client
$ pip install oauth2client

Hands-on

쉽게 query를 생성하기 위해 GA4 Query Explorer의 도움을 받을 수 있다.
최근 30일 동안의 총 사용자 수를 요청하는 방법은 아래와 같다.

1
2
3
4
5
6
7
8
9
10
11
12
13
14
15
16
17
18
19
20
21
22
23
24
25
26
27
28
29
30
31
from google.oauth2.credentials import Credentials
from googleapiclient.discovery import build
from oauth2client.service_account import ServiceAccountCredentials


def get_ga4_service(key_file_location):
scope = "https://www.googleapis.com/auth/analytics.readonly"
credentials = ServiceAccountCredentials.from_json_keyfile_name(
key_file_location, scopes=[scope]
)
service = build("analyticsdata", "v1beta", credentials=credentials)
return service


key_file_location = "./${PRIVATE_KEY}.json"
ga4_service = get_ga4_service(key_file_location)
property_id = "${GA4_ID}"

response = (
ga4_service.properties()
.runReport(
property=f"properties/{property_id}",
body={
"metrics": [{"name": "totalUsers"}],
"dateRanges": [{"startDate": "30daysAgo", "endDate": "yesterday"}],
},
)
.execute()
)

print(response)

이렇게 구성한 코드를 실행시키면 아래와 같은 응답을 확인할 수 있다.
응답을 확인해보면 최근 30일 동안의 총 사용자는 345명인 것을 알 수 있다.

1
2
3
4
5
6
7
{
"metricHeaders": [{"name": "totalUsers", "type": "TYPE_INTEGER"}],
"rows": [{"metricValues": [{"value": "345"}]}],
"rowCount": 1,
"metadata": {"currencyCode": "USD", "timeZone": "Asia/Seoul"},
"kind": "analyticsData#runReport",
}

각 사용자들의 접속 위치를 확인하기 위한 query는 아래와 같다.

1
2
3
4
5
6
7
8
9
10
11
12
13
14
15
16
17
response = (
ga4_service.properties()
.runReport(
property=f"properties/{property_id}",
body={
"dimensions": [{"name": "city"}],
"metrics": [{"name": "totalUsers"}],
"dateRanges": [{"startDate": "30daysAgo", "endDate": "yesterday"}],
},
)
.execute()
)

for row in response.get("rows", []):
print(
f"City: {row['dimensionValues'][0]['value']}, Total Users: {row['metricValues'][0]['value']}"
)

응답의 결과로 지역에 따른 총 사용자 수를 확인할 수 있다.

1
2
3
4
5
6
City: Seoul, Total Users: 159
City: (not set), Total Users: 25
City: Seongnam-si, Total Users: 21
City: Busan, Total Users: 14
City: Daejeon, Total Users: 14
...

더 다양한 dimensions는 여기에서 확인할 수 있다.


DAG

이를 매일 자동화하기 위해 Apache Airflow를 사용하고, 정보를 수신하기 위해 Discord webhook을 사용한다.
Airflow의 KubernetesPodOperator를 사용하기 위해 requirements.txt와 실행될 Python 파일 GA4.py를 아래와 같이 구성한다.

requirements.txt
1
2
3
requests
google-api-python-client
oauth2client
GA4.py
1
2
3
4
5
6
7
8
9
10
11
12
13
14
15
16
17
18
19
20
21
22
23
24
25
26
27
28
29
30
31
32
33
34
35
36
37
38
39
40
41
42
43
44
45
46
47
48
49
50
51
52
53
54
55
56
57
58
59
60
61
62
63
64
65
66
67
68
69
70
71
import json

import requests
from google.oauth2.credentials import Credentials
from googleapiclient.discovery import build
from oauth2client.service_account import ServiceAccountCredentials

KEY_FILE = "./KEY_FILE.json"
PROPERTY_ID = ${PROPERTY_ID}
WEBHOOK = ${WEBHOOK}


def get_ga4_service(KEY_FILE):
scope = "https://www.googleapis.com/auth/analytics.readonly"
credentials = ServiceAccountCredentials.from_json_keyfile_name(
KEY_FILE, scopes=[scope]
)
service = build("analyticsdata", "v1beta", credentials=credentials)
return service


def get_data(tar):
response = (
ga4_service.properties()
.runReport(
property=f"properties/{PROPERTY_ID}",
body={
"dimensions": [{"name": tar}],
"metrics": [{"name": "totalUsers"}],
"dateRanges": [{"startDate": "1daysAgo", "endDate": "yesterday"}],
},
)
.execute()
)
return response


def get_message(title, response):
message = f"# :rocket: {title}\n```"
for row in response["rows"]:
message += (
row["dimensionValues"][0]["value"].replace("https://", "")
+ ":\t"
+ row["metricValues"][0]["value"]
+ "\n"
)
message += "```"
return message


def send_discord_message(webhook_url, content):
data = {"content": content}
headers = {"Content-Type": "application/json"}
response = requests.post(webhook_url, data=json.dumps(data), headers=headers)
return response


def main(tar):
for t, tit in tar.items():
response = get_data(t)
message = get_message(tit, response)
send_discord_message(WEBHOOK, message)


if __name__ == "__main__":
ga4_service = get_ga4_service(KEY_FILE)
tar = {
"city": "City",
"firstUserSource": "First User Source",
}
main(tar)

준비된 파일들을 Dockerfile에 명시한다.

Dockerfile
1
2
3
4
5
6
7
8
9
10
FROM python:3.8

WORKDIR /app
COPY GA4.py .
COPY KEY_FILE.json .
COPY requirements.txt .

RUN pip install -r requirements.txt

CMD ["python", "GA4.py"]

docker build -t airflow-ga4:v1 .을 통해서 Docker image를 구성하고 아래와 같이 Airflow의 DAG를 최종적으로 정의한다.

GA4.py
1
2
3
4
5
6
7
8
9
10
11
12
13
14
15
16
17
18
19
20
21
import airflow
from airflow.decorators import dag
from airflow.providers.cncf.kubernetes.operators.kubernetes_pod import (
KubernetesPodOperator,
)


@dag(
dag_id="GA-4",
start_date=airflow.utils.dates.days_ago(0),
schedule_interval="0 1 * * *",
max_active_runs=1,
catchup=False,
)
def GA4():
GA4 = KubernetesPodOperator(task_id="GA4", name="GA4", image="airflow-ga4:v1",)

GA4


DAG = GA4()

결과적으로 Discord를 통해 전날 사용자의 접속 위치 및 방문 경로를 파악할 수 있다!

Result