Manufacturing Process
Introduction
Optimization - 시험
- Define manufacturing and describe the technical and economic consideration : A kind of optimization
- Relationship among product design(functionality & costs) and engineering(processes) and factors(materials)
- Important trends in modern manufacturing and minimizing of production costs(optimization)
Manufacturing(production)
- The process of converting raw materials into products
- Design of desires
- Realization of goods
- Through various production methods
- Raw material became a useful product : Maximizing Added value
Product Design & Concurrent Engineering
- Product design(제품 설계)
- 70~80%의 개발 비용
- 제품에 대한 기능 및 성능의 이해 필요
- CAD, CAM, CIM을 통해 설계와 제작이 순차적으로 이루어짐
- 하지만 현대는 즉각적으로 이뤄짐 : 동시 공학
- Concurrent engineering(동시 공학)
- 설계 및 제조를 통합하는 즉각적이고 체계적인 접근
- 제품의 수명주기와 관련된 모든 요소 최적화
Design for manufacture, assembly
시험
- Design For Manufacture(DFM)
- 제품 설계 공정을 재료와 통합
- Manufacturing methods
- Process planning
- Assembly, testing, and quality assurance
- Design For Assembly(DFA)
- 전반적인 제조 운영
- 특히, 주요 부품 간의 조립 공차 관리
- Design principle
- Simple design
- Appropriate material
- Permissible accuracy
- Optimized manufacturing processes considering cost down
Enviromental issues
- Design For Recycling(DFR) & Design For Enviroment(DFE)
- 버려지는 재료 감소
- 위험한 재료 사용의 감소
- 모든 폐기물의 적절한 처분
- 폐기물 처리 및 재활용의 개선
- Product Life Cycle(PLC) - 시험
- 설계, 개발, 제작, 판매, 사용, 처분, 재활용 모두 포함 - 설계자가 고려
- Product Life Cycle Management(PLCM) - 시험
- 설계, 개발, 제작, 판매, 사용, 처분, 재활용 모두 고려한 제작 전략 - 경영자가 고려
Manufacturing processes
- Casting(주조)
- Forging(단조)
- Extrusion(압축)
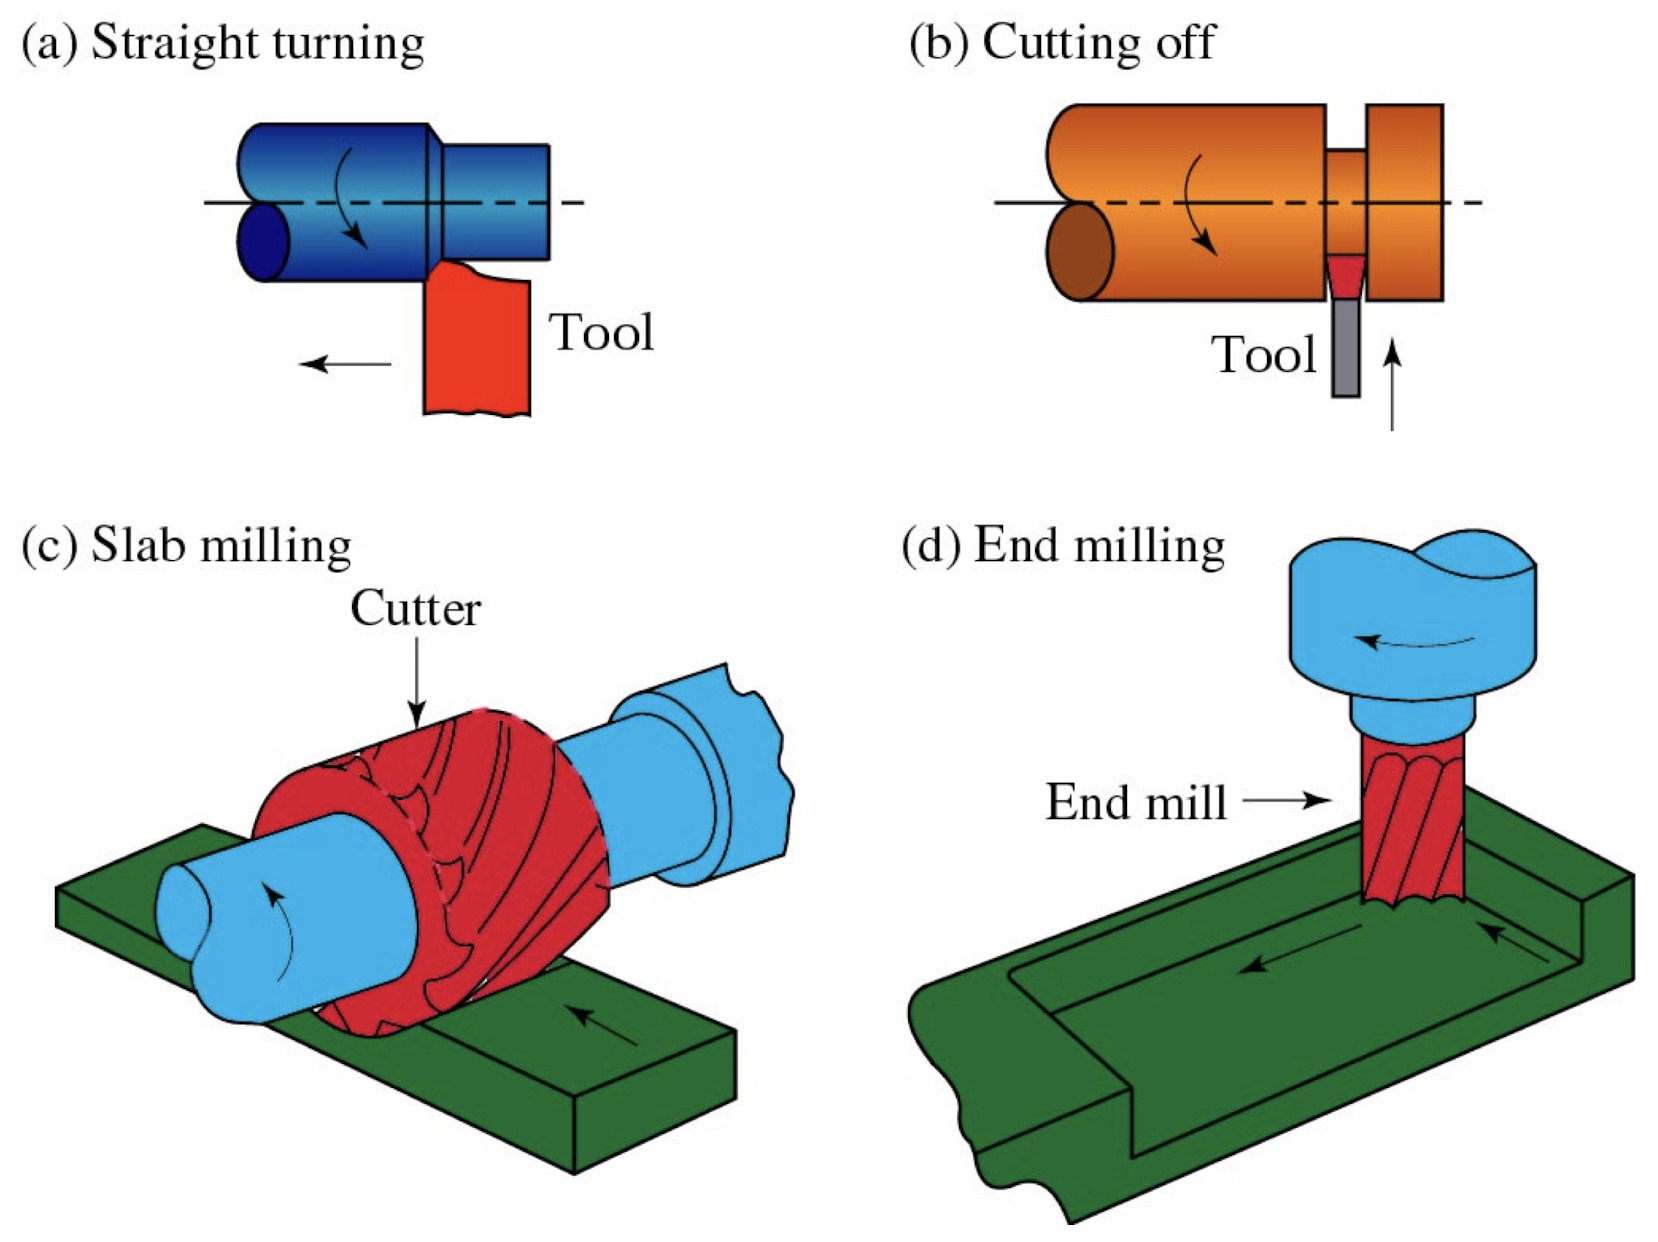
- Cutting(절삭)
- Welding(용접)
Traditional manufacturing processes
- Casting(주조)
- Forming(성형) : Forging and Extrusion
- Machining : Turning and Drilling and Milling
Advanced manufacturing processes
- Laser beam cutting
- MEMS(Micro Electro Mechanical Systems)
CIM(Computer Integrated Manufacturing)
- Computer Numerical Control
- Adaptive Control
- Computer-Aided Process Planning
- Group Technology
- Just-In-Time production : Inventory management
Fundamentals of the Mechanical Behavior of Materials
Review of Eng. Materials
- Deformation($\delta$) : 변형
- Displacement : 변위
- Force($F$)
- Stress($\sigma$)
- Strain($\epsilon$)
Thermal deformation - 시험
$$
E=\frac{\sigma}{\epsilon}
$$
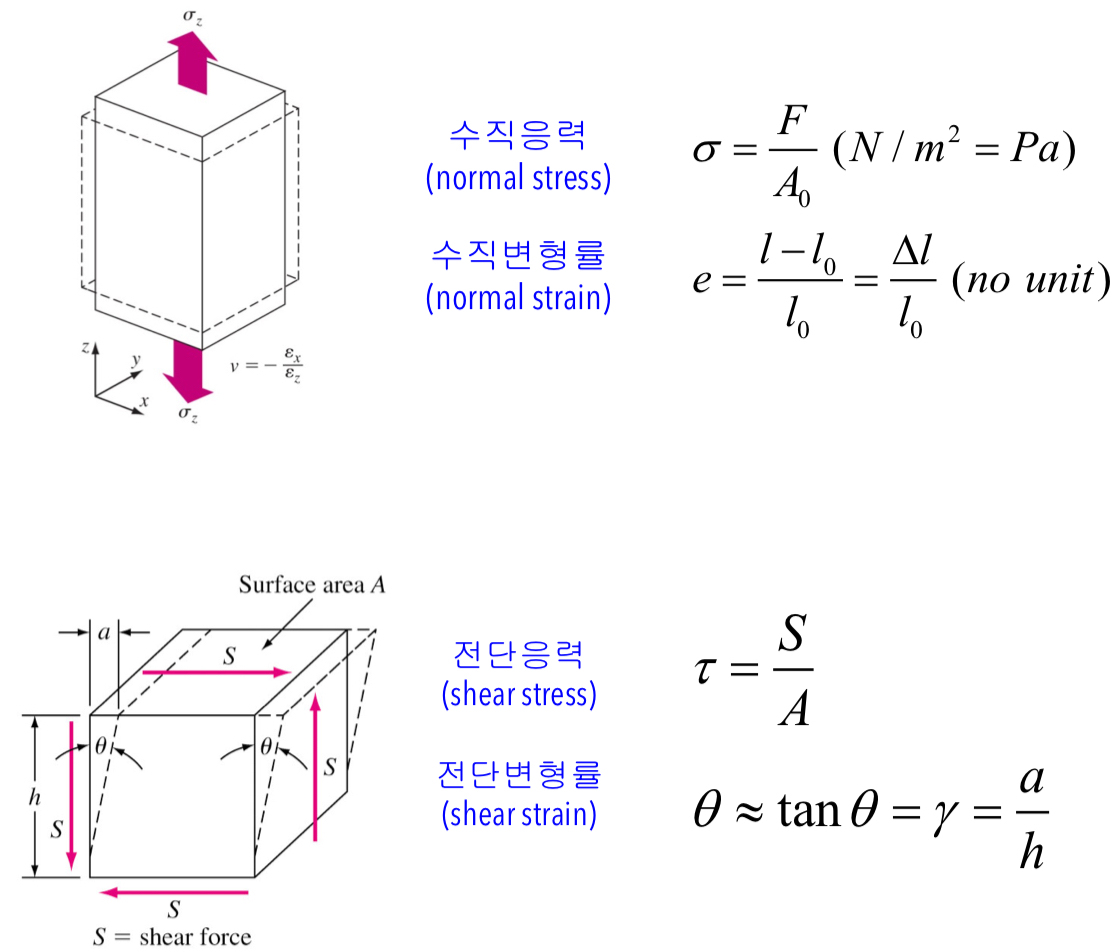
Tension test
아래 그림 시험
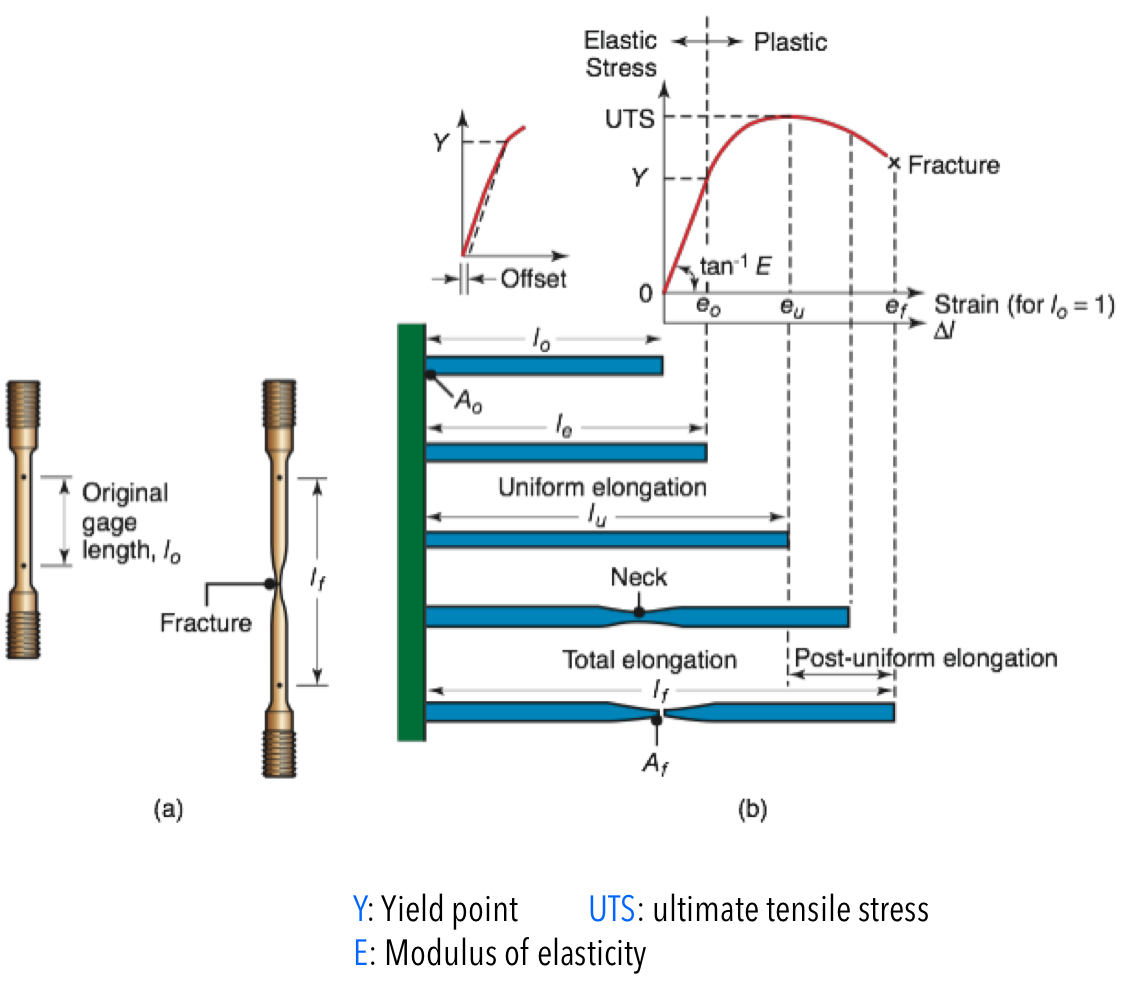
- 강도-변형의 특성 확인
- 실험적인(경험적인) Data
- load cell로 힘 측정
- Specimen(시편) 사용 - Dog bone
- Instron gauge
시험
- E는 탄성구간의 기울기
- E가 크면 동일한 힘에 대해서 변형율 작음
- E가 작으면 동일한 힘에 대해서 변형율 큼
$$
Poisson’s\ ratio\ :\ \nu=-\frac{\epsilon(lateral)}{\epsilon(longitudinal)}=-\frac{\epsilon_y}{\epsilon_z}
$$
- 분모는 힘이 가해지는 방향(길이 방향)
- $\nu<0.5$ : Elastic(탄성)
- $\nu=0.5$ : Plastic(소성)
- 소성을 주로 다룸
Ductility(연성)
How large a strain the material withstands before fracture
- Ductile material
- Most metals
- Elastic and plastic region
- Same performance in tensile / compressive force
- Deformation due to tension(normal) and torsion(shear)
- Brittle(취성) material
- Glass, chalk, etc
- Elastic region(without plastic region)
- Good performance in compressive force comparing with tensile force
Effect of temperature in manufacturing process
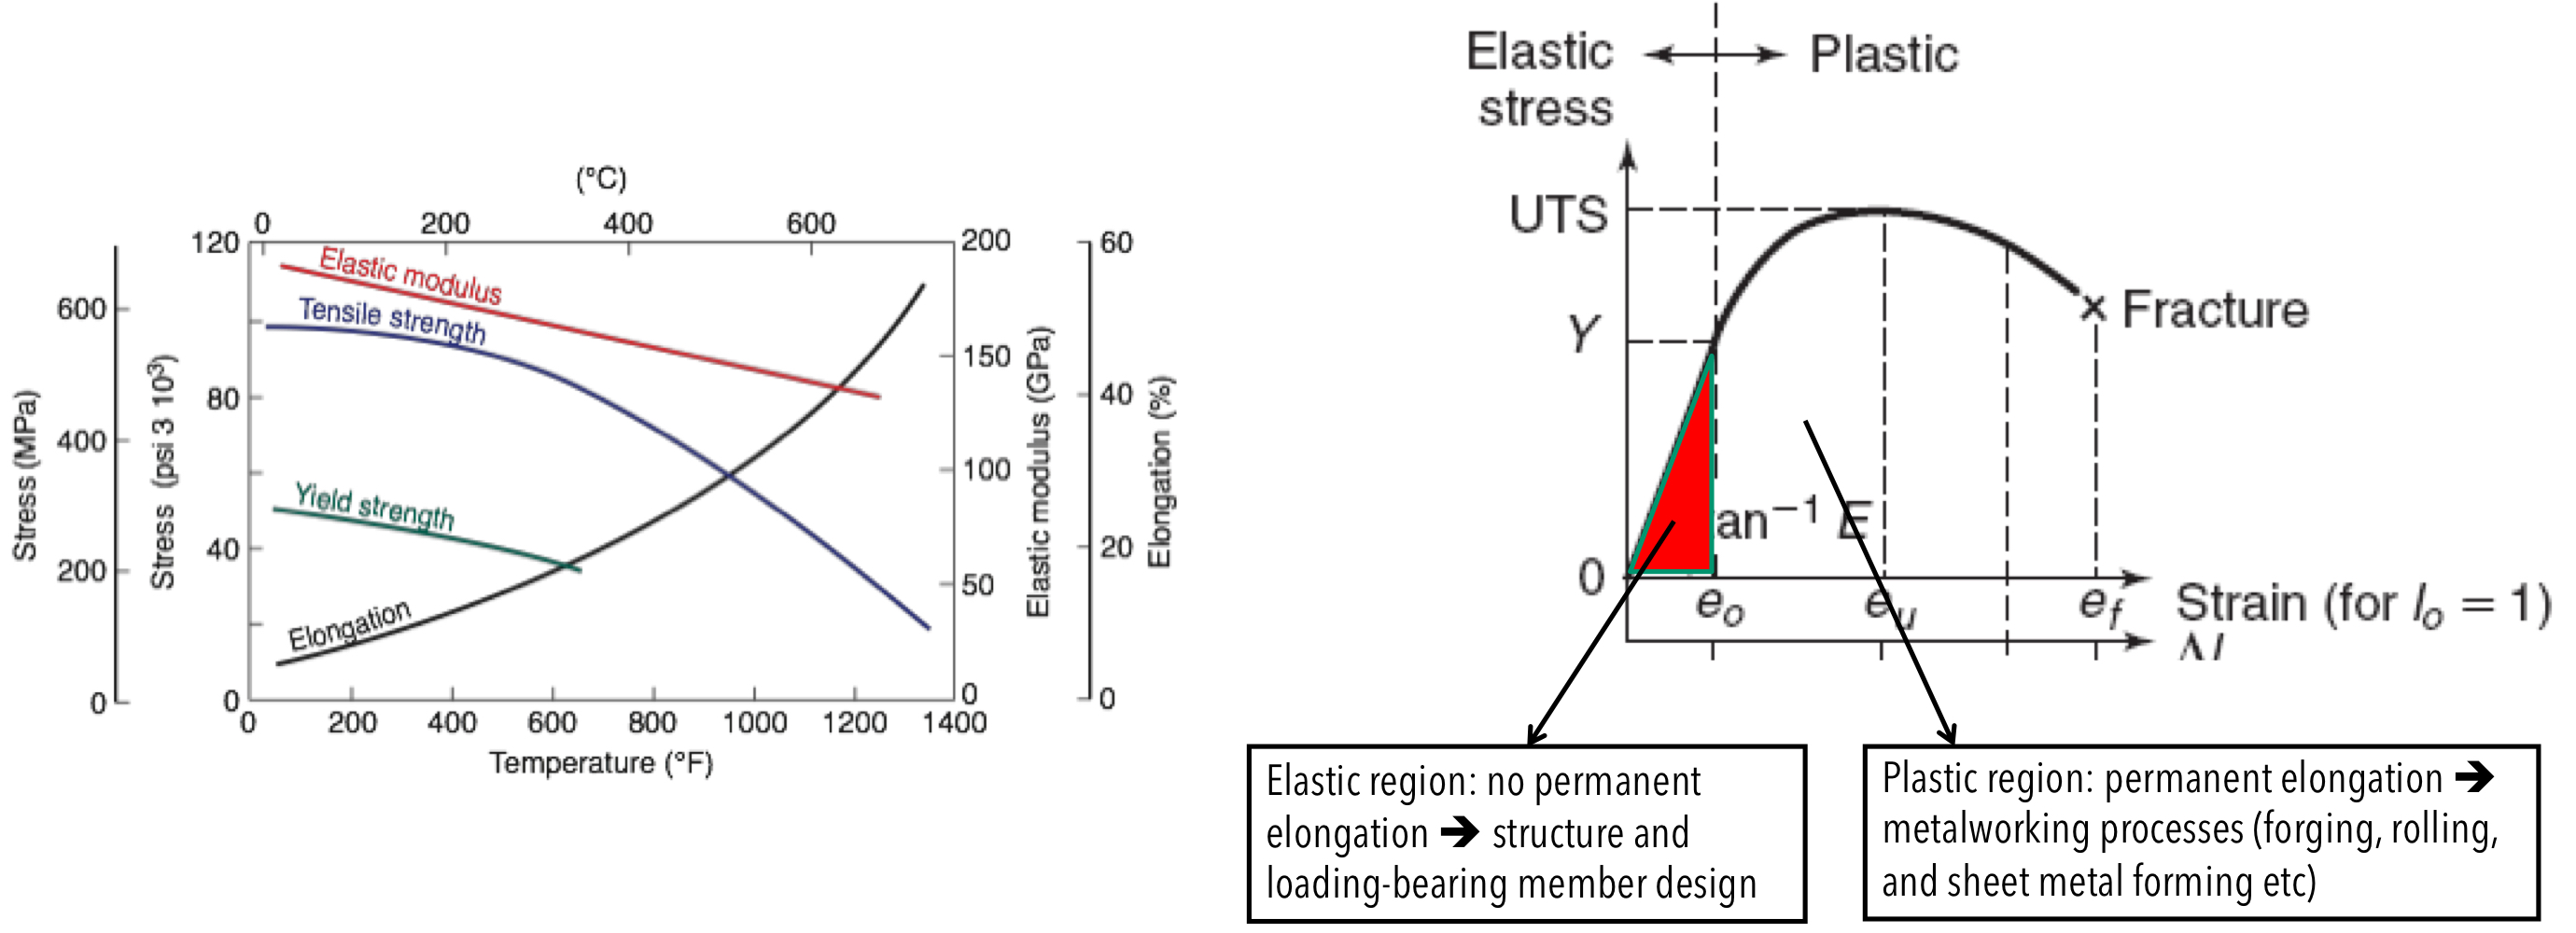
Temperature : Major parameter in Manufacturing
- 온도가 오른다면
- Elastic(Young’s) modulus - Decreasing
- Tensile strength(UTS) - Decreasing
- Yield strength - Decreasing
- Elongation(연신율), Ductility(연성) - Increasing
- 하지만 연신율이 약 60퍼 이상의 온도일 경우 보통 액체 상태로 존재
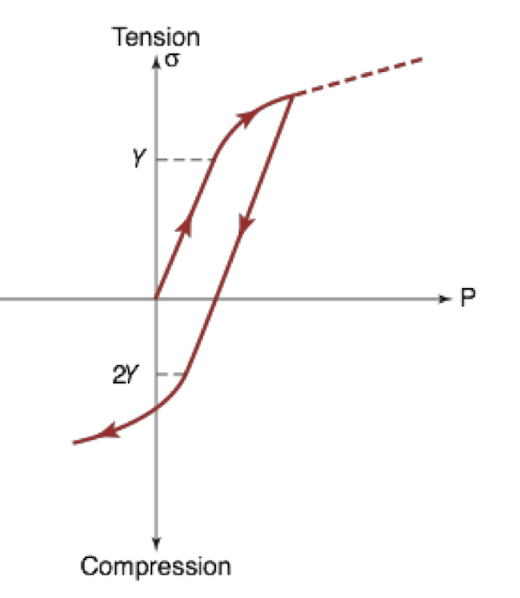
Bauschinger effect
- Tension and then compression or vice versa; Yield stress decrease
- Strain softening(변형연화)
- Work softening(가공연화)
Fatigue & Creep
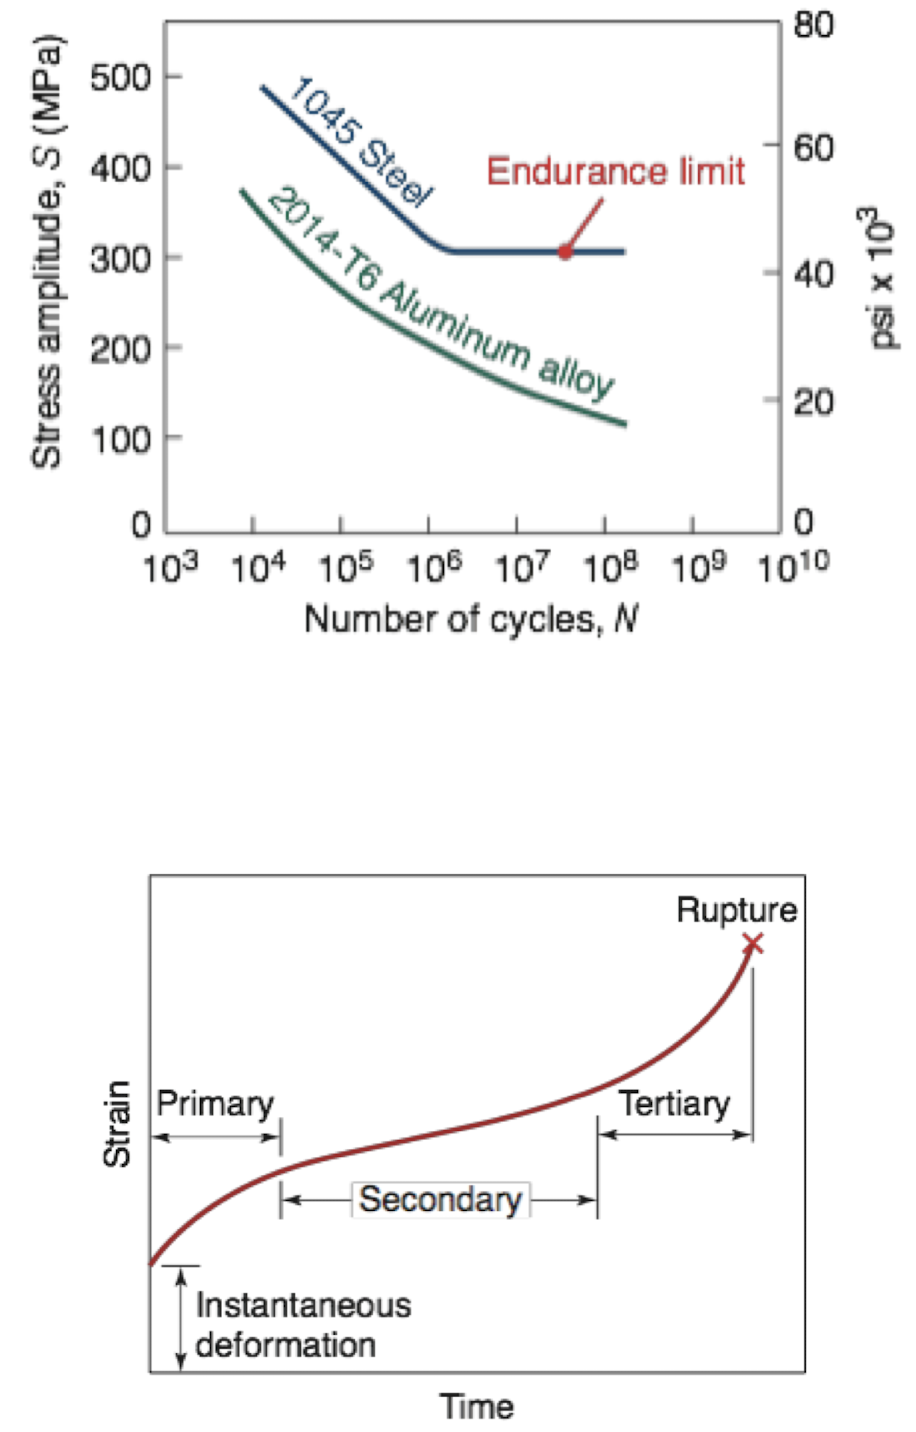
- Fatigue(피로)
- S-N curve(Stress - Number of cycles)
- Cycle or Periodic stress
- Fluctuating mechanical loads
- Thermal stresses
- Aluminum better regarding vibration/chattering
- Creep
- Permanent elogation of material
- Static load maintained for a period of time
- High temperature application(Ex. Turbine blade)
- A kind of inertia effect
Residual stresses
- 잔류응력
- Remaining stresses after material deformation
- Critical reason of an instability of dimensions and shapes
- Annealing process(온도를 천천히 올리고 내림, 풀림 공정) for stress-relief
Structure and Manufacturing Properties of Metals
The crystal structure of Metals
- Structure greatly influences their properties and behavior
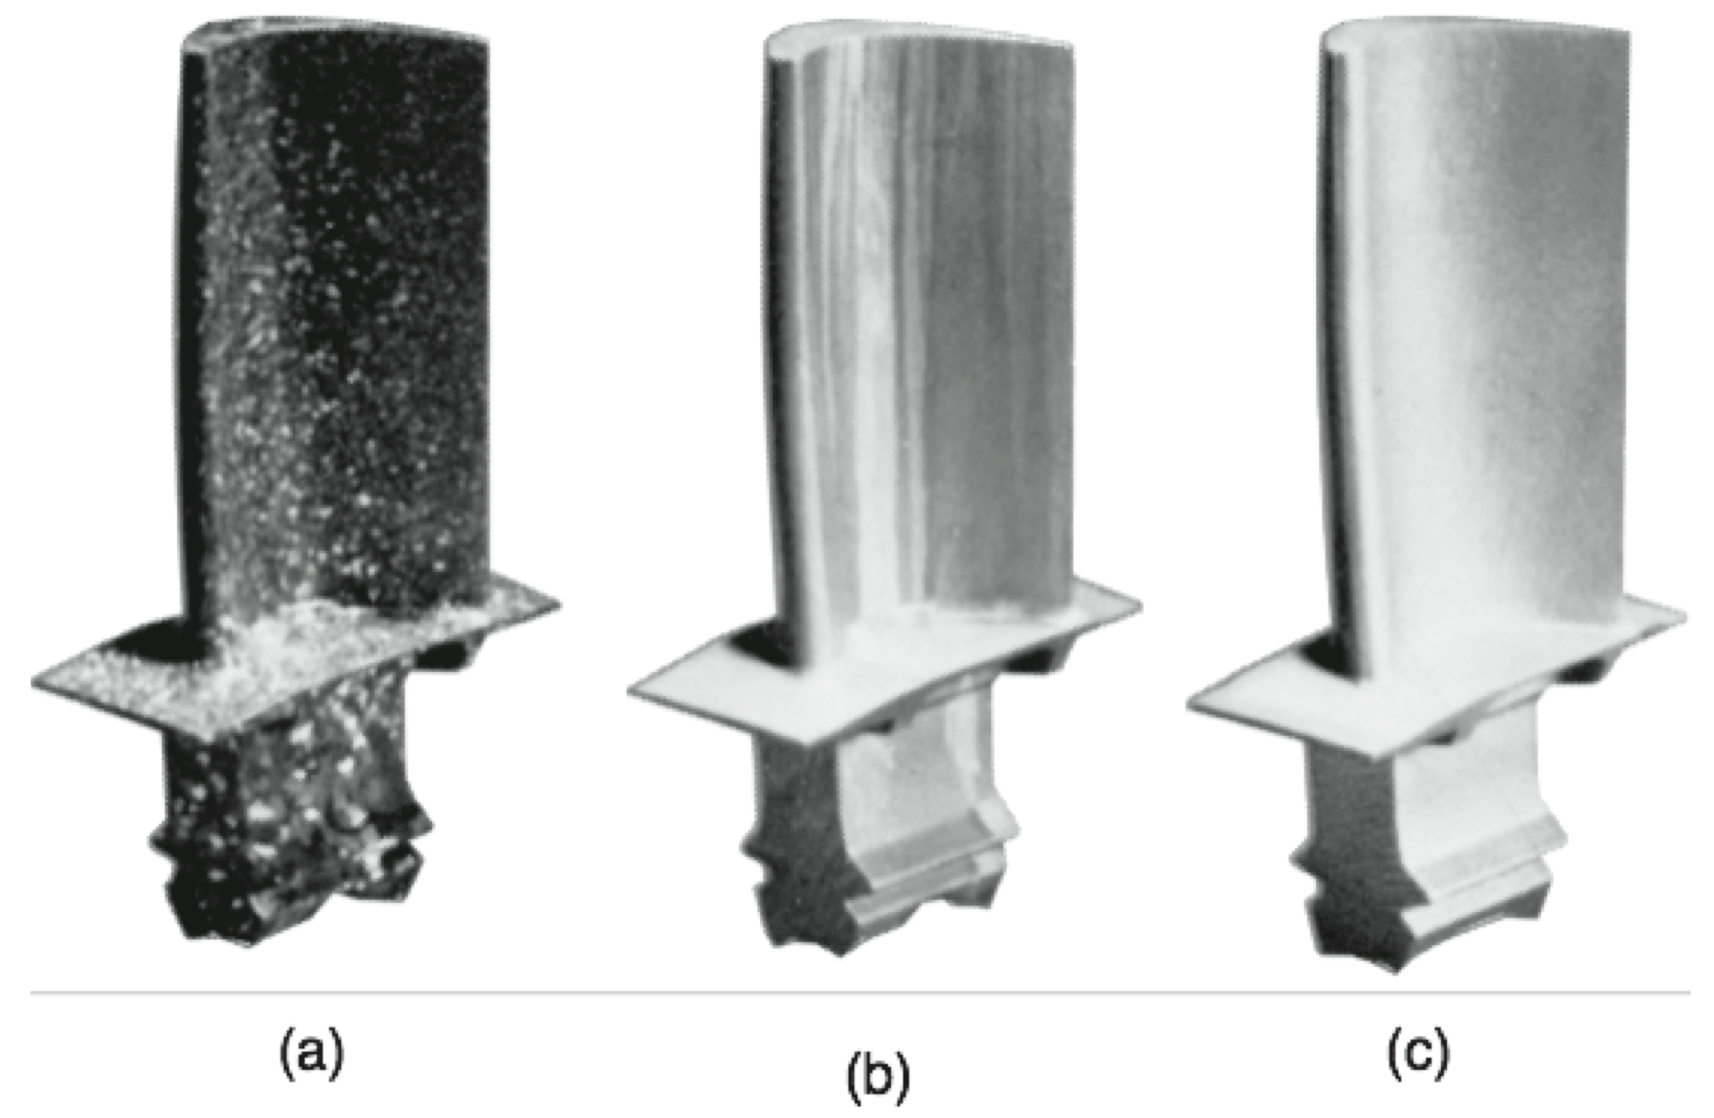
- Normal casting(a), Directionally solidified(b), Single crystal(c)
- Single crystal(단결정) : 고온에서 강도 유지
- 밀도가 높을수록 강도가 높지만 연성이 낮아짐
- 밀도가 낮을수록 강도가 낮지만 연성이 높아짐
Deformation and Strength of Single Crystals
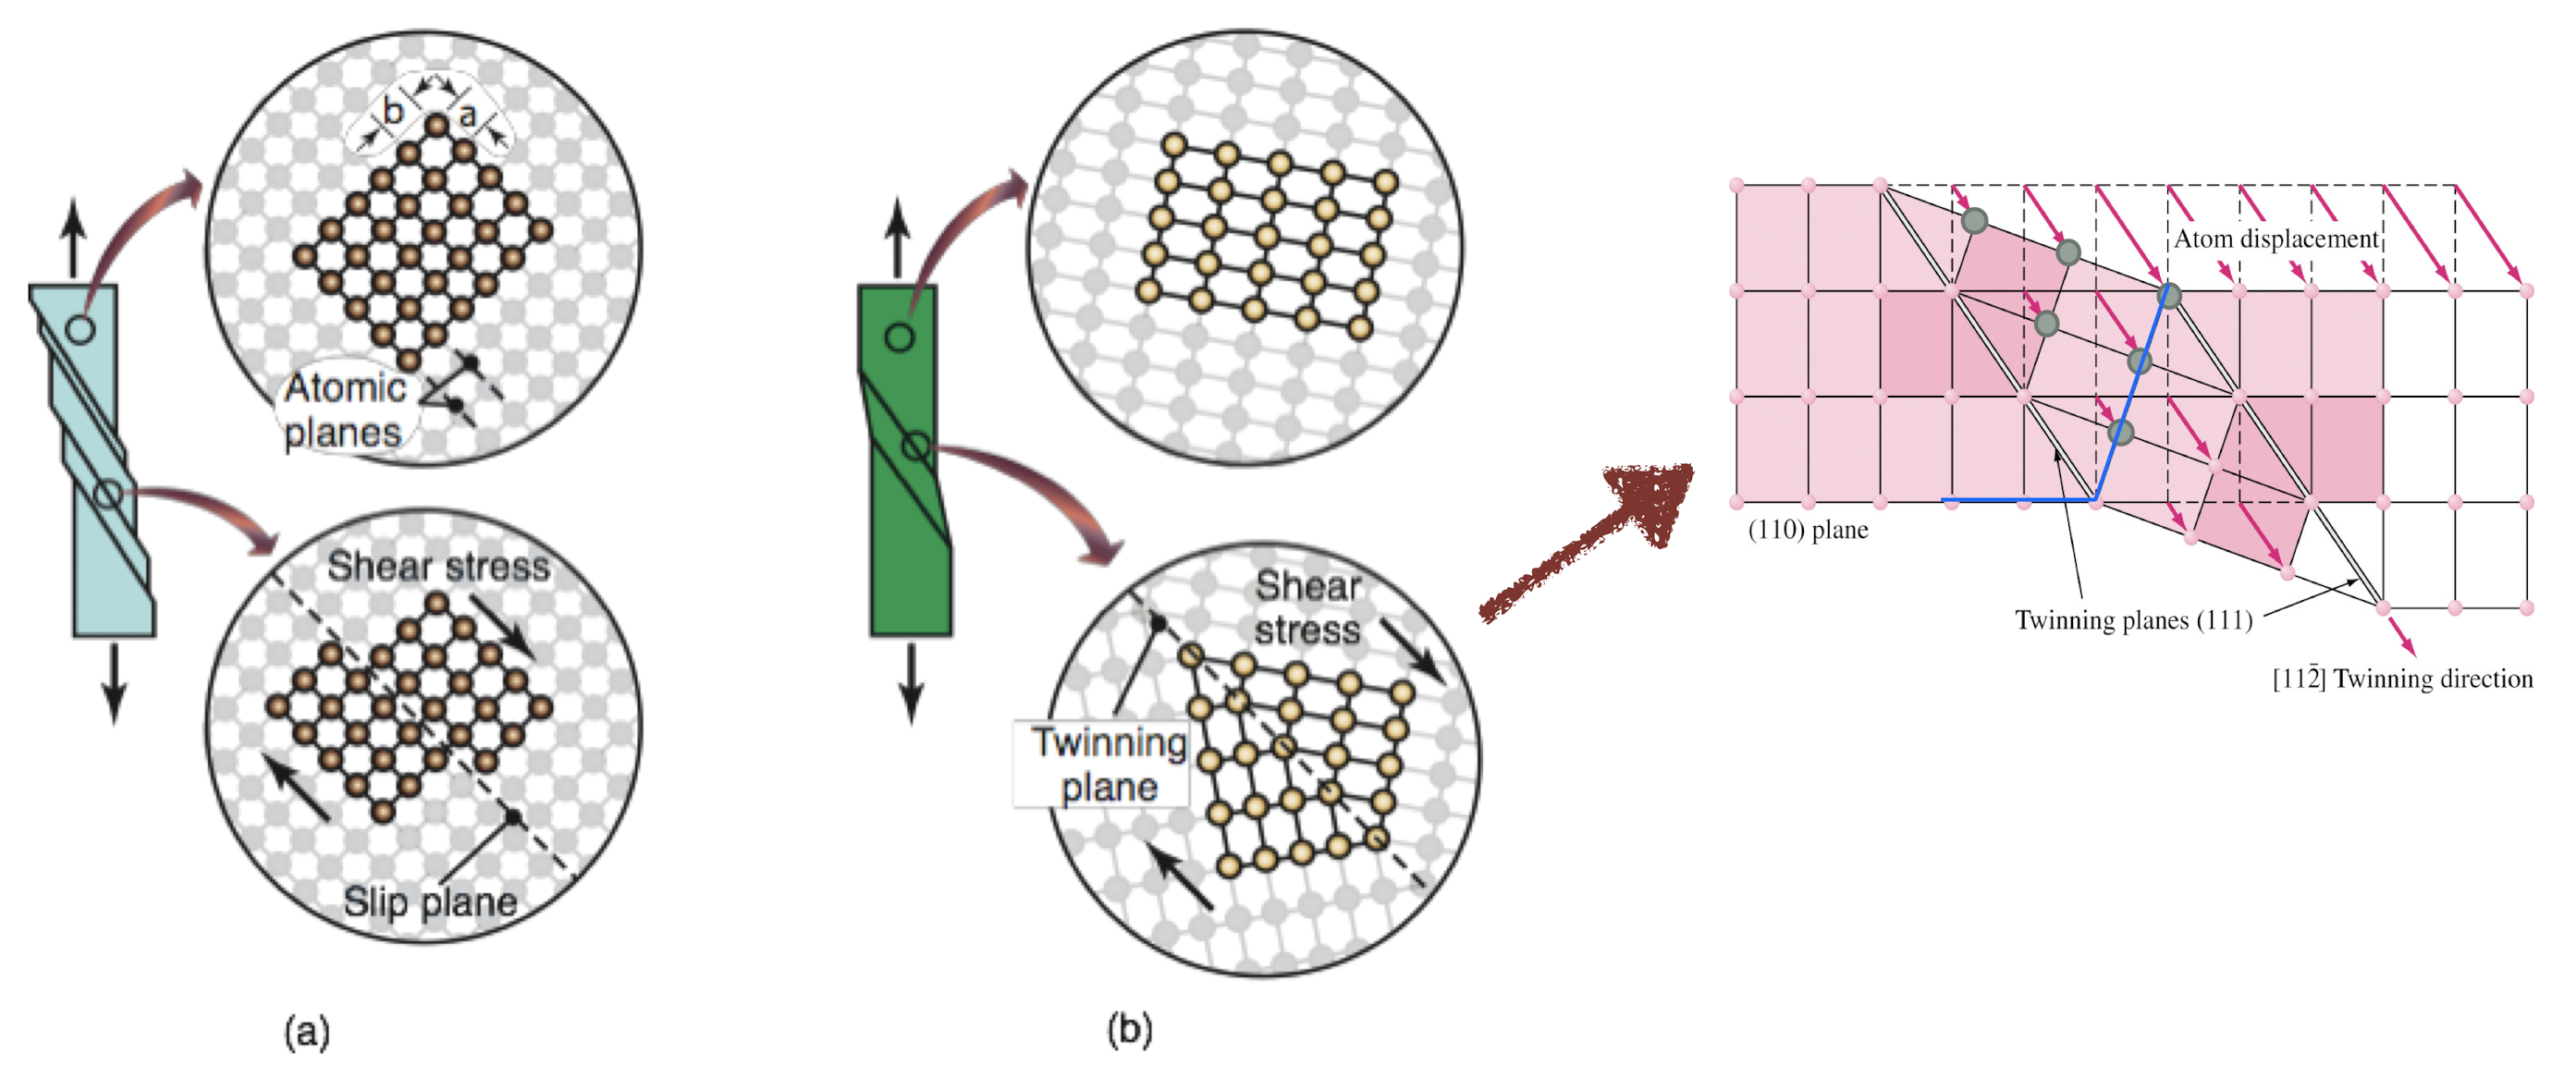
Two basic mechanisms of plastic deformation(소성영역은 Slip과 Twinning이 발생하는 영역)
- (a) Slip : One plane of atoms slips over an adjacent plane under shear stress
- 임계전단응력 : 소재에 영구변형을 발생시키는 전단응력
- (b) Twinning : Portion of the crystal forms a mirror image of itself across the plane of twinning
Mechanical fibering
시험
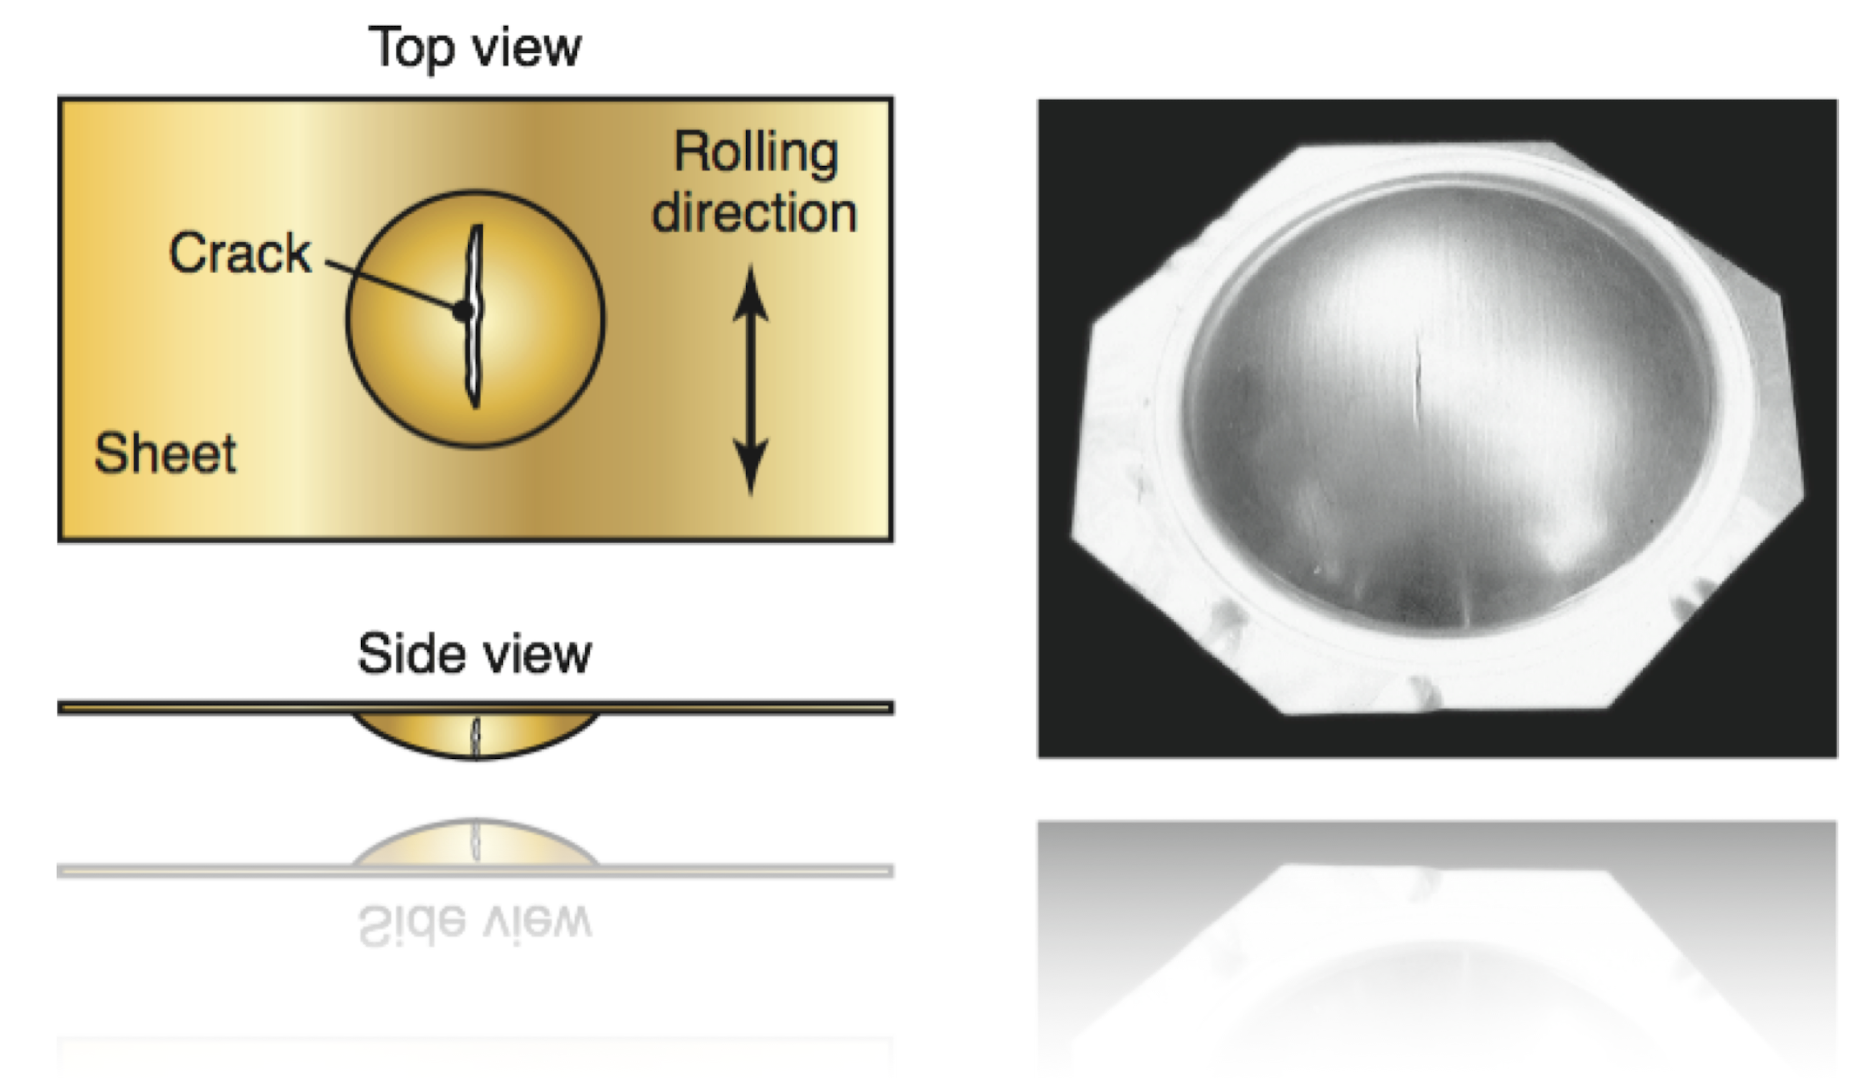
- 기계적 섬유화 : 특정한 방향으로 강도나 연성이 낮아져 발생하는 현상
- Anisotropy(이방성) (<-> 등방성 : 균일한 성질)
- Preferred orientation(선택적 방향성) : strength, hardness, etc.
- Example : Plywood - strong in planar direction but weak in thinkness direction
- Rolling
- 소재의 강도를 높임(밀도 증가)
- 얇은 두께의 고강도 철판 제작
- 기계적 섬유화 발생
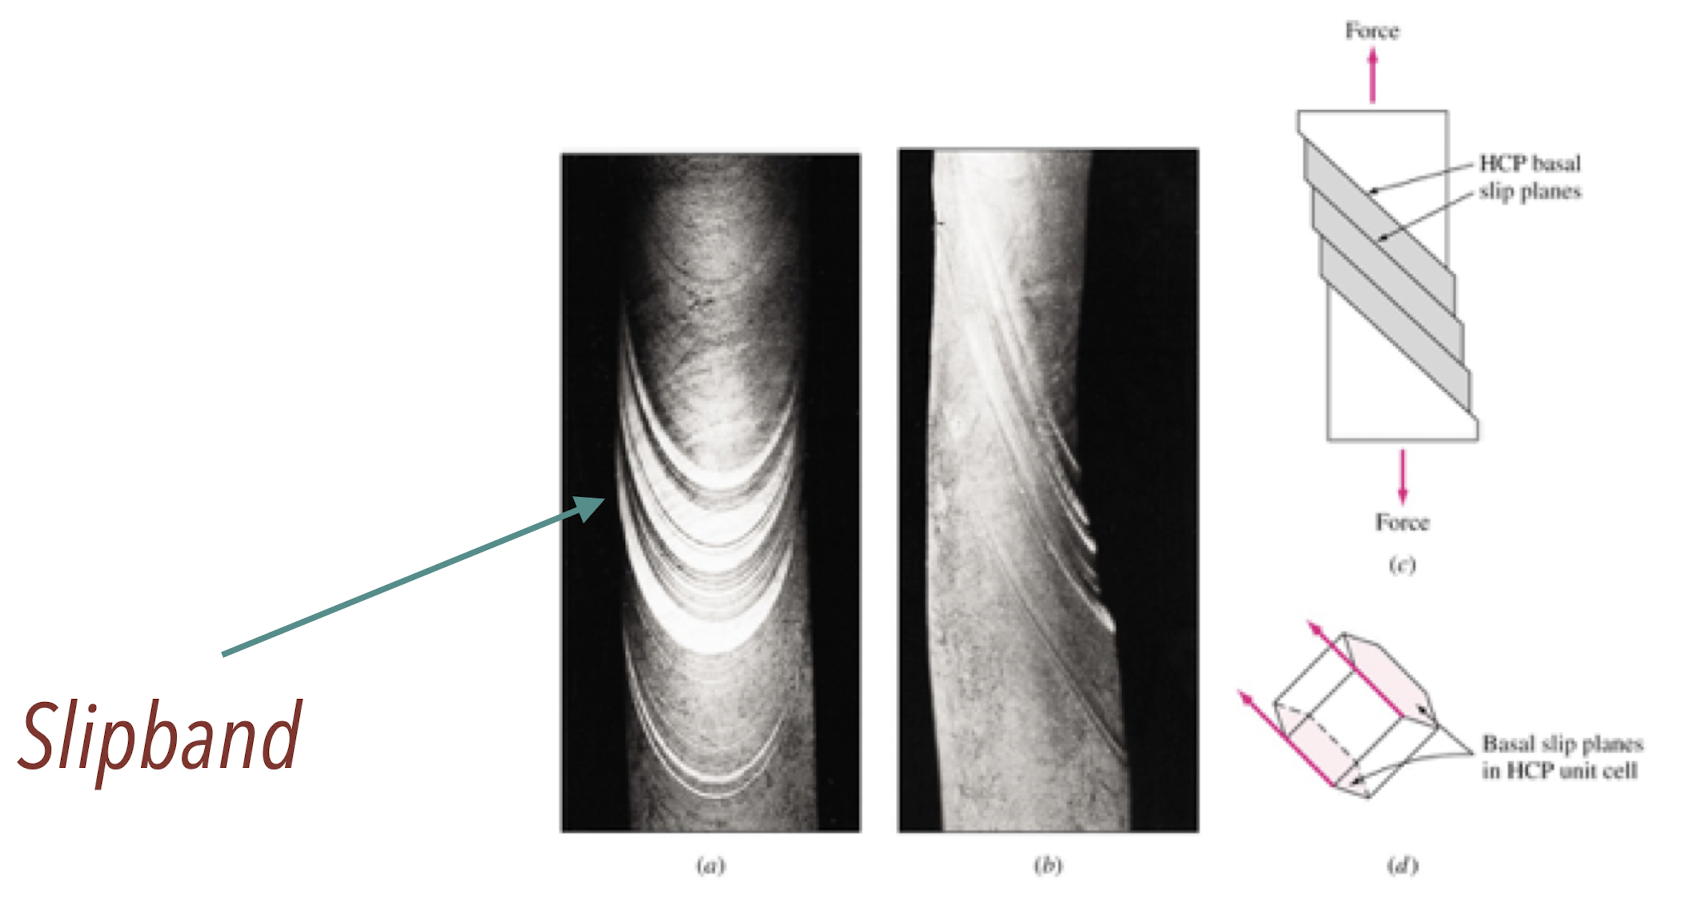
Plastic deformation due to shear stress
- Slip under critical shear stress
- Generation of Slipband(소성변형) in single crystal
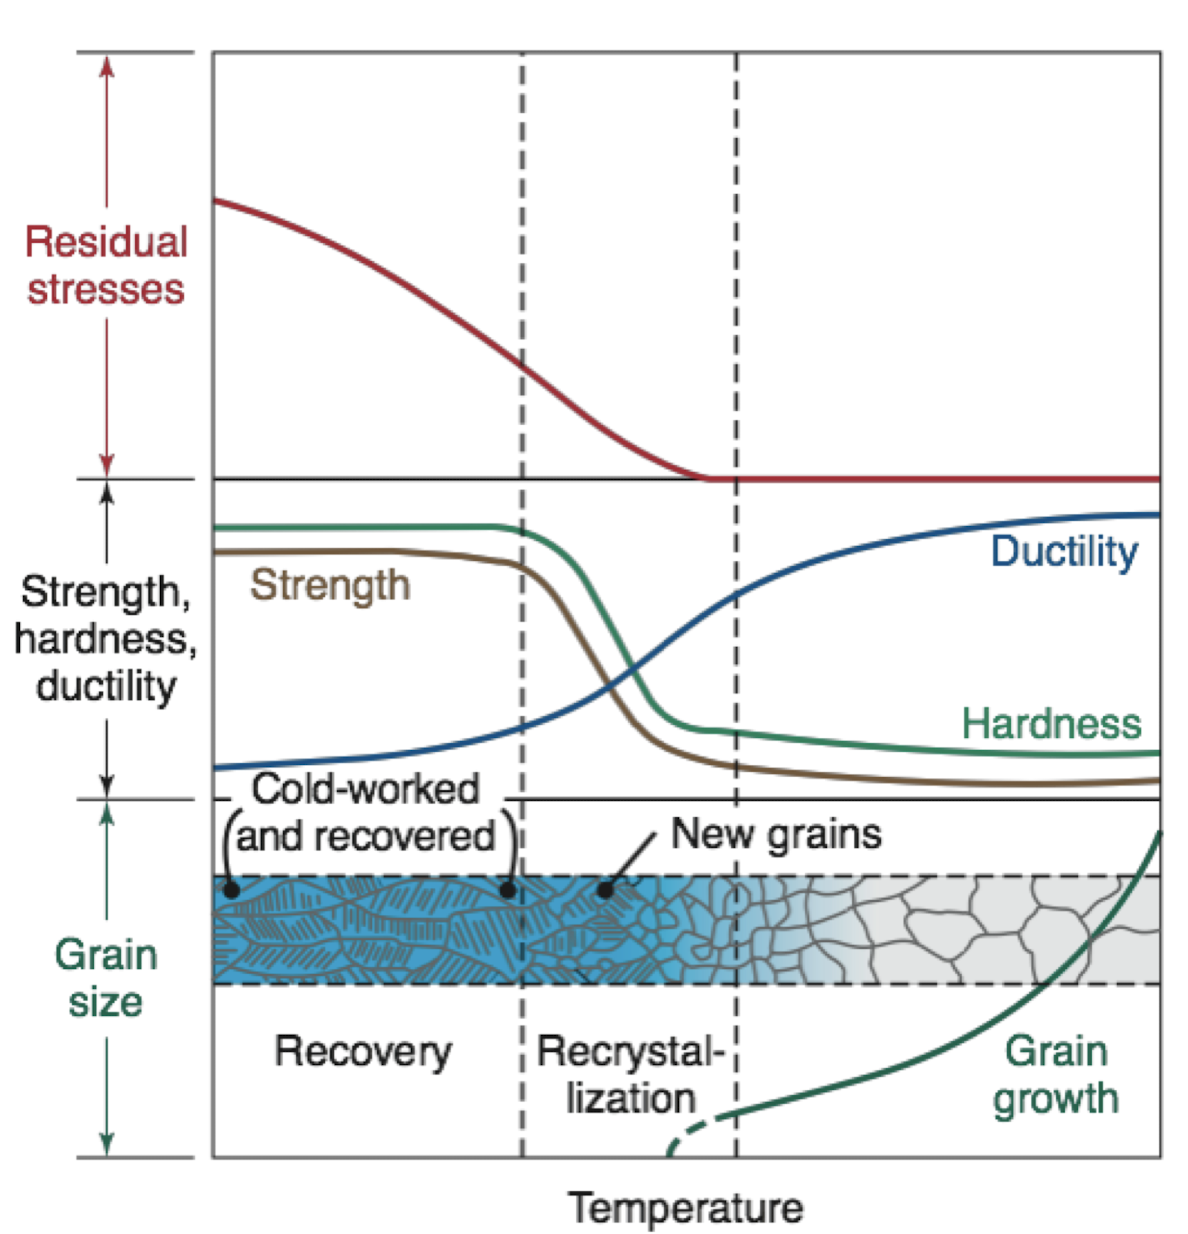
Correlation between temperature and mechanical properties
시험
- In plastic deformation : Temp & Time(소성변형의 주요한 두 제어변수)
- Recovery(< recrystallization temp.)
- 기계적 성질은 큰 변화 없음
- 연성 약간 증가
- Recrystallization(= 0.3 ~ 0.5$T_m$)
- $T_m$은 Melting temp.
- 기계적 성질 변화
- 새로운 결정 생성
- 강도 감소
- 경도 감소
- 연성 증가
- 소재내의 저장된 에너지가 많으면 recrystallization temp. 감소
- Grain growth(> recrystallization temp.)
- Orange-peel effect - Grain이 커지므로 표면이 거칠어지는 현상
- Grain size가 커지면 등방성이 아닌 이방성에 가까워지며 일반적으로 기계적 성질에 좋지 않음
- Recovery(< recrystallization temp.)
- High temperature and cooling slowly
- Decrease : Residual stresses, Strength, Hardness
- Increase : Ductility, Grain growth
Cold, Warm, and Hot working
- Homologous temperature(상사온도) : $T/T_m$
- $T_m$ : 용융온도
- Plastic deformation : Hot working
- Less dimensional accuracy due to thermal expansion
- Rough surface due to oxide layer
- 작은 힘으로 성형할 수 있음
- 온도변화가 잦으면 산화층에 의해 금속표면 부식
| Process | $T/T_m$ |
|---|---|
| Cold working(냉간가공) | < 0.3 |
| Warm working(온간가공) | 0.3 to 0.5 |
| Hot working(열간가공) | > 0.5 |
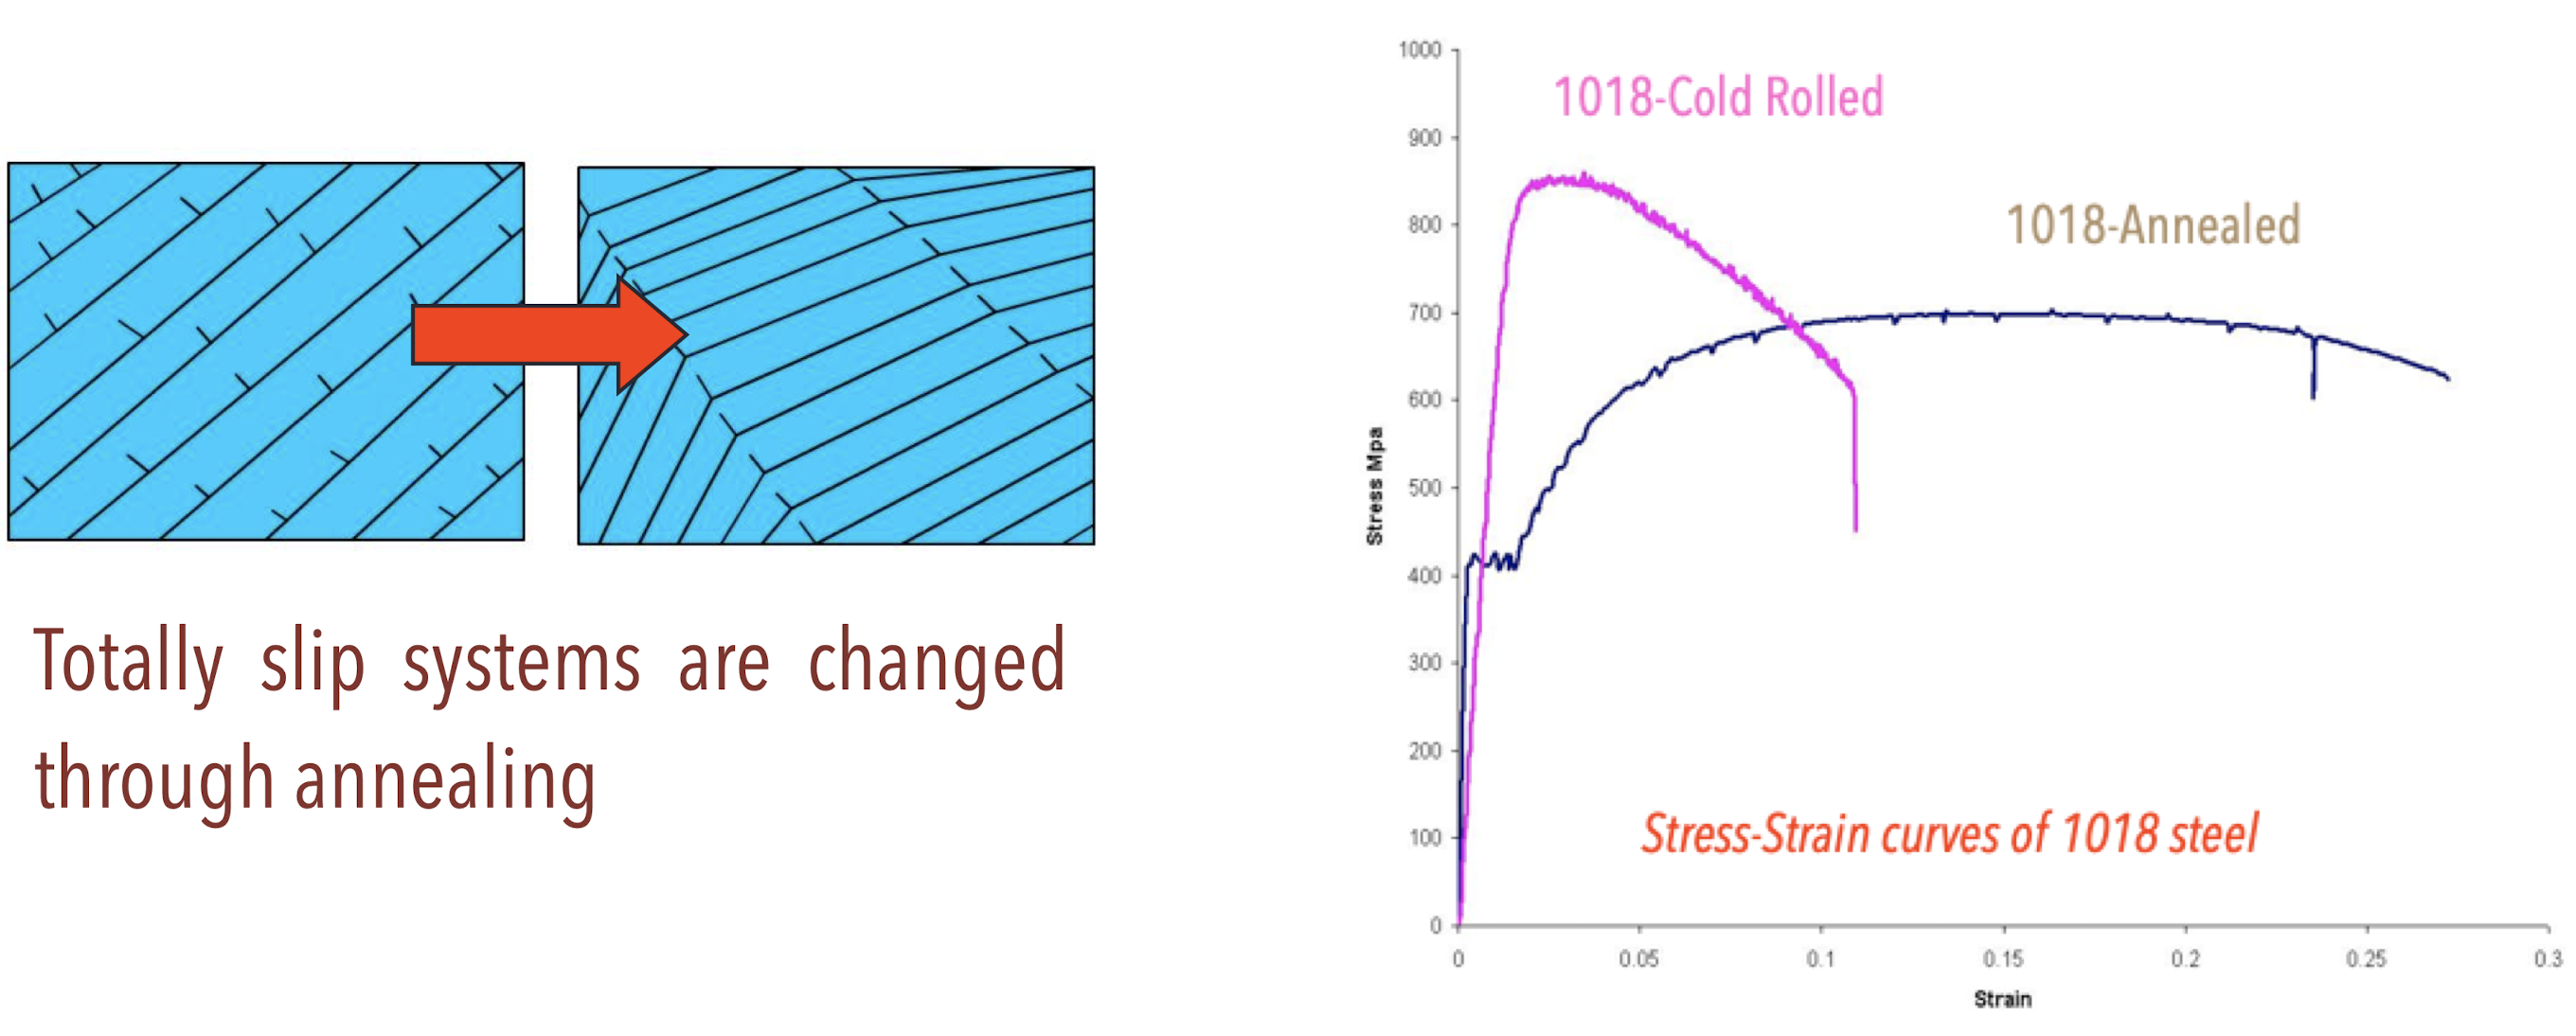
Annealing process for Metals
시험
- 풀림 공정
- Totally structure and characteristic are changed
- Control porperties of metals
- 탄성계수(크면 덜 변형, 작으면 잘 변형)
- 포아송비
- 강도
- 경도
- 강성
- 연성
- 인성
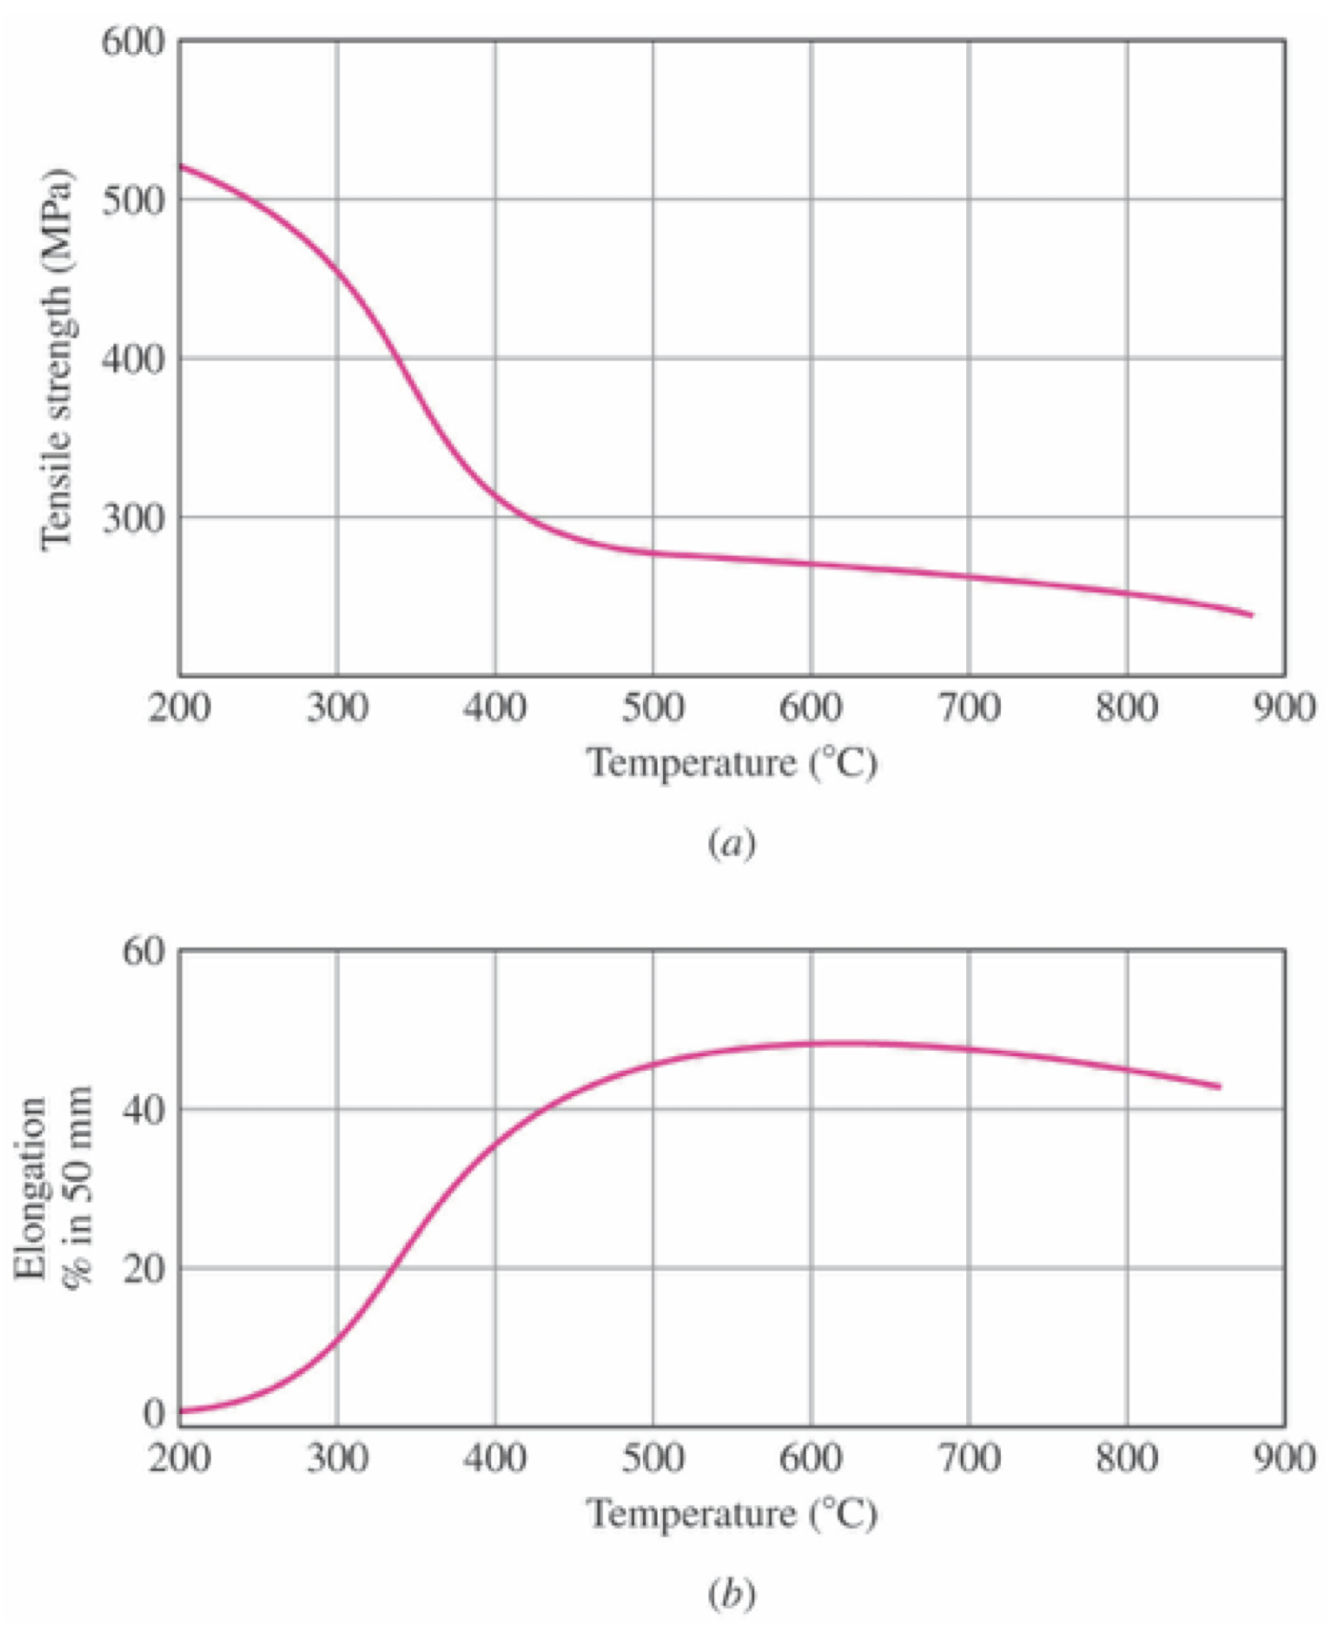
- 일반적으로 온도 증가 :
- Increasing of ductility(연성 증가)
- Decreasing of tensile strength(강성 감소)
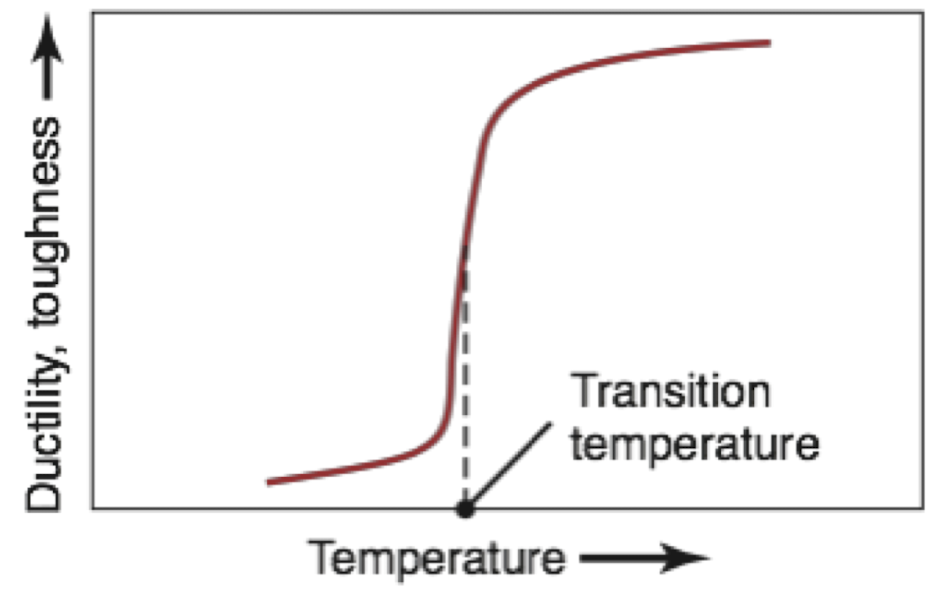
Transition temperature
- 천이 온도
- Sharp change in ductility and toughness across a narrow temperature(소재의 특성이 아주 급격하게 변하는 온도)
- Transition temperature is increased
- High rate(fast deformation)
- Abrupt change in shape
- Surface notch - 결함(표면 가공 필요)
Physical properties
- 경도(Hardness)
- 물체의 단단한 정도
- 강도(Strength)
- 끊어지지 않고 버티는 정도
- 인성(Toughness)
- 소재나 재료가 지닌 점성의 강도
- 소성(Plastic)
- 재료에 외력을 가하면 원형으로 복귀되지 않는 성질
- 탄성(Elastic)
- 재료에 외력을 가하면 원형으로 복귀되는 성질
- 취성(Brittle)
- 재료에 외력을 가하면 변형되지 않고 부서지는 성질
- 연성(Ductility)
- 재료를 늘일 때 파괴되지 않고 계속 늘어나는 성질
- Example - 시험
- 유리 - 경도는 높고 강도는 낮음
- 나무 - 경도는 낮고 강도는 높음
- 꿀 - 인성(점도)이 높음 : 충격에 가해졌을 때 파단이 아닌 휘어짐
- 물의 점도는 1
- Density(밀도)
- Density depends on weight, radius and packing of the atoms
- Lower density is important for air craft or aerospace structure, automobiles and high speed equipment(minimizing inertia effect)
- Melting point(용융점)
- Depends on the energy required to separate all atoms
- Tool wear in machine tools(frictional heat)
- Apparently important in casting process
- Specific heat(비열)
- Specific heat is the energy required to raise the temperature of a unit mass(단위질량) of a material by 1’C
- Thermal conductivity(열전도도)
- The rate at which heat flows within and through the material
- Thermal stress(열응력)
- Thermal deformation(열변형)
- Shrink fit(열박음, using thermal expansion phenomenon)
- Thermal fatigue(열피로)
- Fatigue - 주기적인, 반복적인 무언가
- Results from thermal cycling repetitive heating and cooling
- Particularly important in Forging / Cutting process
- Thermal shock(열충격)
- Development of cracks after a single thermal cycle
- Superconductivity(초전도성)
- Zero resistivity below critical temperature
- Piezoelectric effect(압전효과)
- Reversible interaction between an elastic strain and an electric field used in making transducers(mechanical strain <-> electric current)
Surface, Tribology, Dimensional characteristics, Inspection, and Product quality assurance
Objectives of this chapter
- Important considerations
- Surface structure(표면 구조), texture(표면 조직), and surface properties(표면 특성)
- Friction(마찰), Wear(마멸), and lubrication(윤활) - tribology(윤활공학)
- Surface treatment(표면 가공)
- Inspection methods(destructive(파괴검사) / nondestructive(비파괴검사))
- Statistical techniques for quality assurance of products
Introduction
- Surface directly influences several important properties:
- Friction(마찰) and wear(마멸) properties
- Effectiveness of lubrication(윤활)
- Appearance and geometric features
- Initiation of cracks due to surface defect
- Thermal and electrical conductivity of contacting bodies
- Tribology : Surface phenomena of friction, wear and lubrication
- Surface treatment(표면 처리) : Method to improve surface properties (mechanical, thermal, electrical, chemical, etc.)
Surface structure of metals
- Depending on the composition and processing history
- Oxide layer(산화층) : Harder than the base metal(brittle & abrasive)
- Beilby(amorphous) layer : Melting, surface flow and rapid quenching(급속 냉각 담금질)
- Work-hardened layer(가공-경화층) : Processing and extent of frictional sliding(잔류응력 존재)

Surface texture
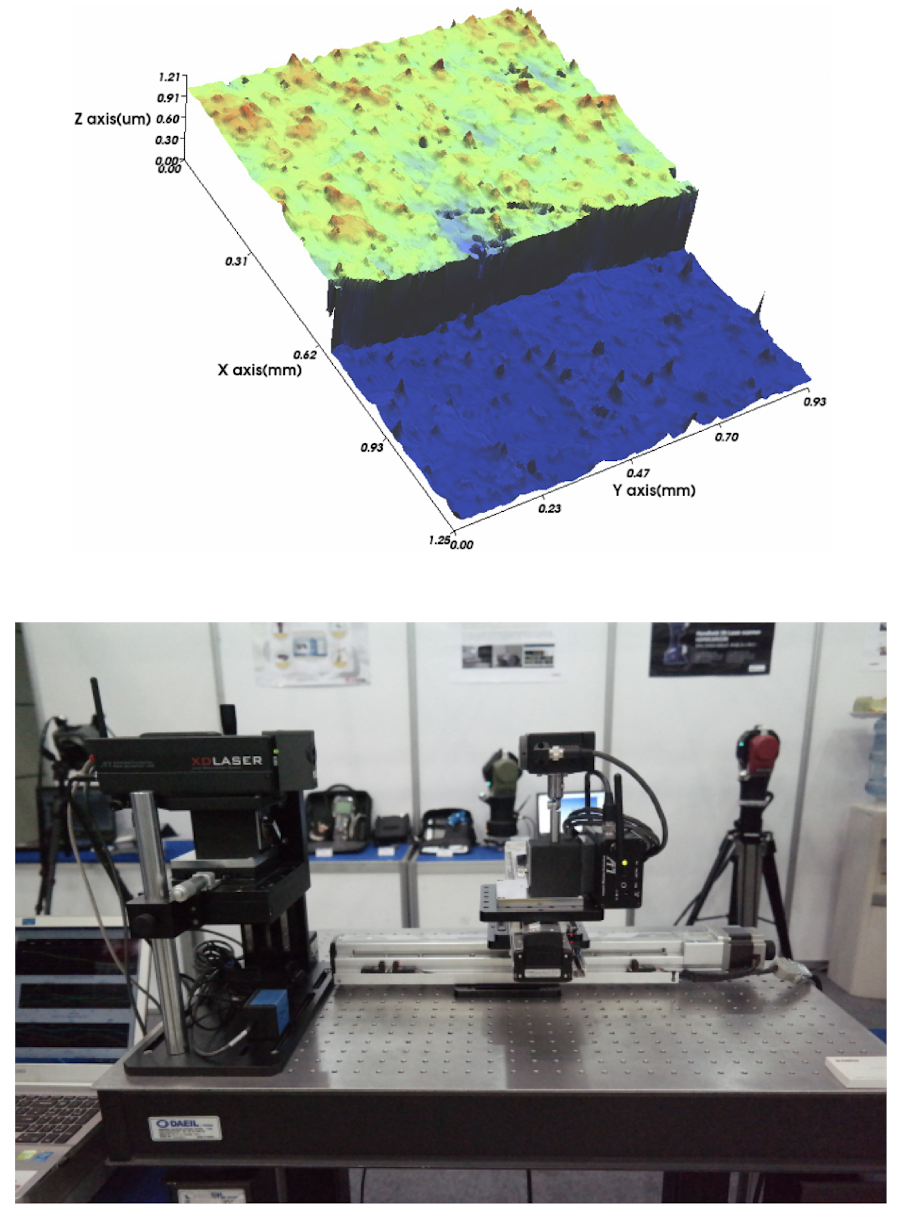
- Waviness(파상도) : Low frequency - recurrent deviation from a flat surface
- Deflection of tools, dies, and of the workpiece
- Warping from forces or temperature
- Uneven lubrication
- Periodic vibration(mechanical & thermal)
- Surface roughness(표면 거칠기) : High frequency irregular deviation
- Arithmetic mean value : $R_a$
- Root-mean-square : $R_{rms}$
- Maximum roughness height : $R_t$(peak-valley)
Tribology : Friction, Wear, and Lubrication
Tribology : Science and technology of interacting surfaces
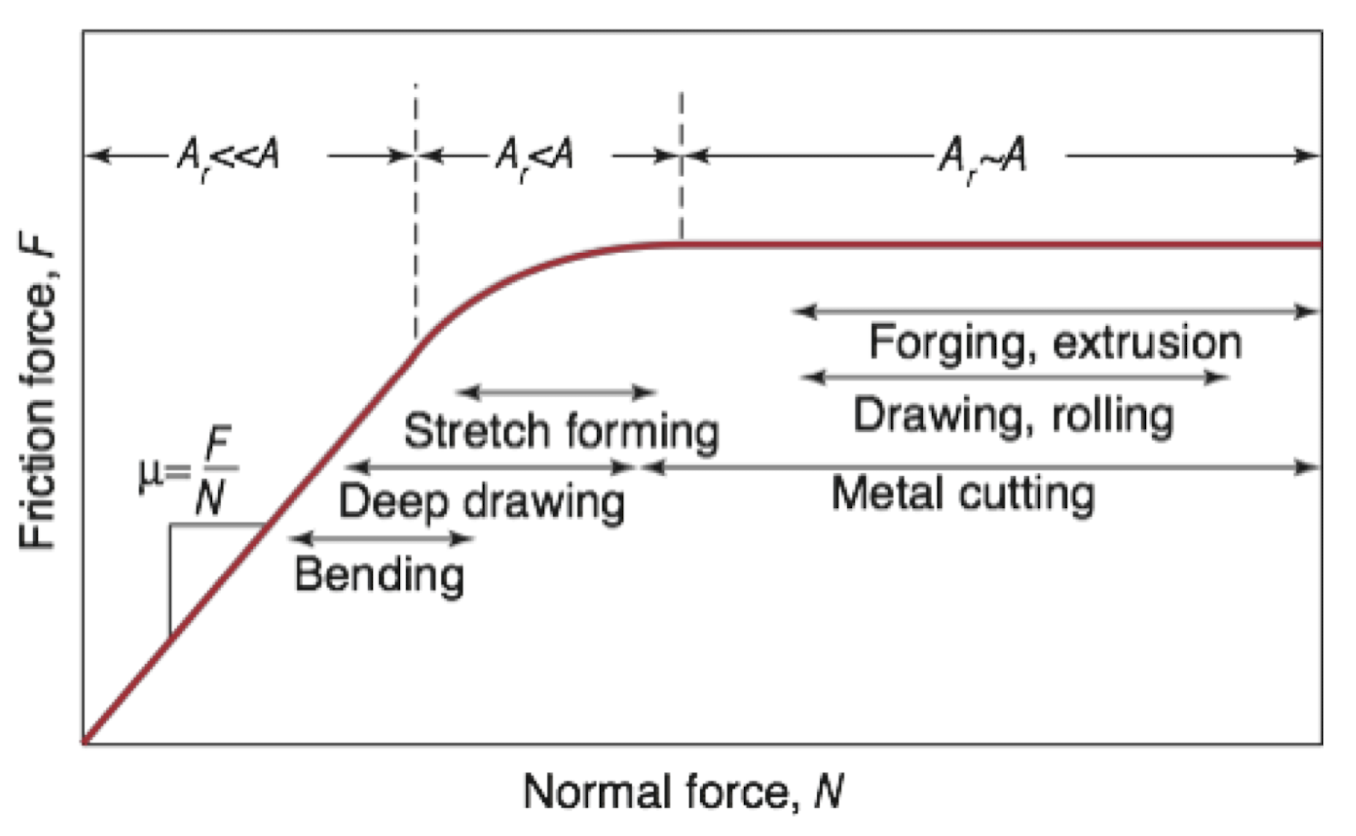
- Friction : Resistance to relative sliding between two contacting bodies under normal load(thermal deformation can be induced)
- Coefficient of friction(friction force = uN)
- Wear : Progressive loss or undesired removal of material from a surface
- Surface damage(loss)
- Reducing surface roughness(benefit)
- Adhesive wear(응착 마멸) : Shearing of the junctions takes takes at the original interface between two bodies under tangential force
- Scuffing defects
- Smearing defects
- Tearing defects
- Galling defects
- Lubrication : Interface between tools, dies, molds, and workpieces is subjected to a wide range of variables
- Contact pressure(elastic to plastic deformation)
- Speed
- Temperature
- Friction and wear will be increased under high pressure, high speed, and high temperature : Minimization of friction, wear with lubrication
- Functions of metal working fluids(금속 가공용 윤활제)
- Reduce friction : Reduction of force or energy requirement(production cost)
- Reduce wear
- Improve material flow
- Act as thermal barrier : Prevention of cool-down of workpiece in hot working process
Surface treatment
- Improve resistance to wear, corrosion, oxidation, and indentation
- Control friction
- Reduce adhension(응착)
- Improve lubrication
- Improve fatigue resistance
- Rebuild surfaces on components
- Improve surface roughness
Dimensional tolerances(치수 공차)
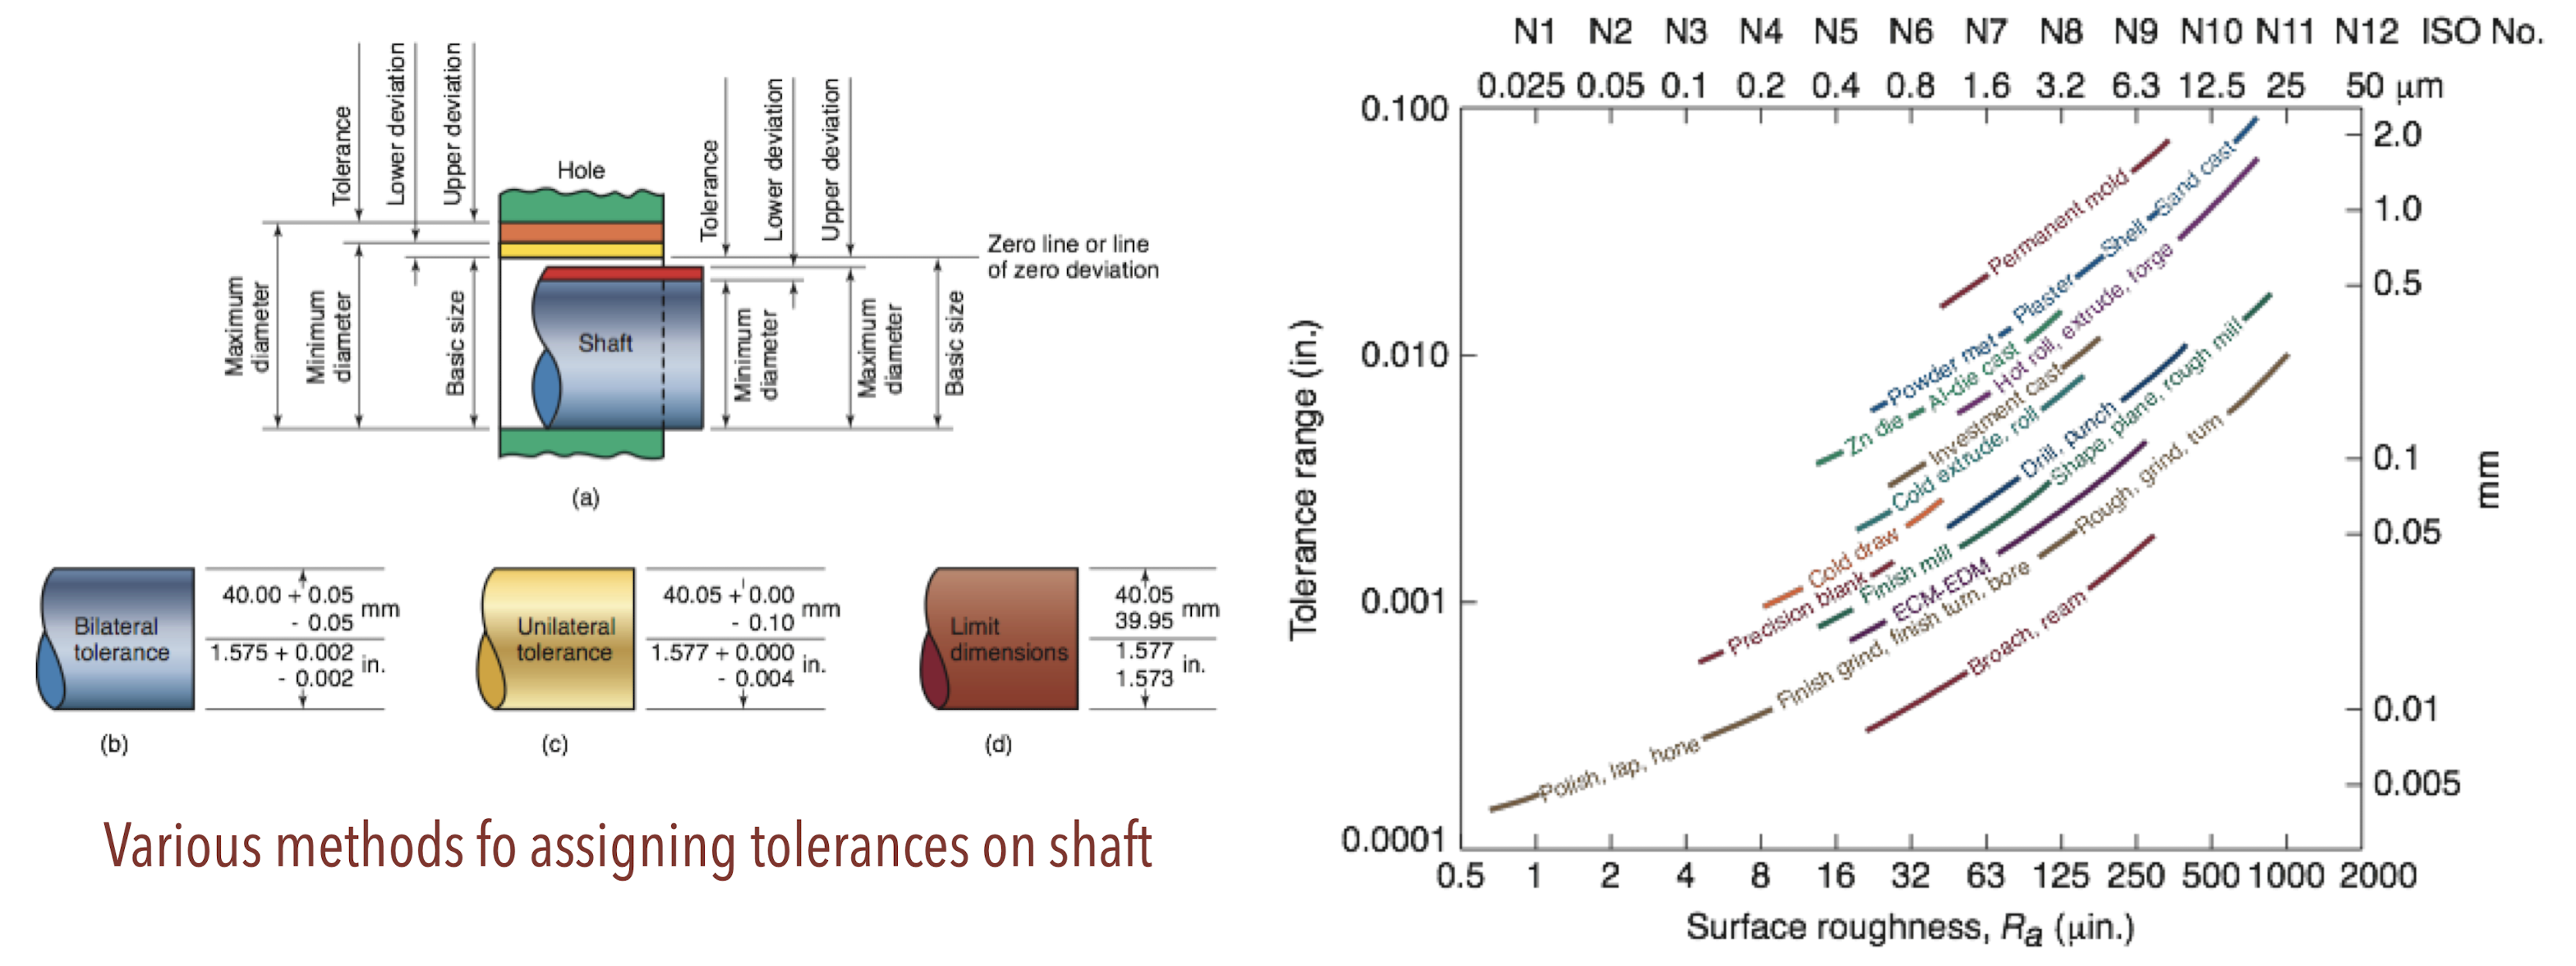
- Tolerance is the acceptable variation in the dimensions of a part
- height
- width
- depth
- diameter
- angles
- etc.
- Tolerance is unavoidable and important when parts are to be assembled
Metal-Casting Processes and Equipment; Heat Treatment
냉각 속도 중요 - 금속의 성질이 다르지 않게
Important Factor(주요 인자)
- Solidification(응고)
- 치수의 변화 주의
- Flow of molten metal into the mold cavity(용탕의 주형으로의 유입)
- 용탕이 얼마나 잘 내부 공간을 채우는지 - 사형 가열로 해결
- 주형(Mold)에서 금속의 응고 및 냉각 시 발생하는 열전달(Heat transfer) 정도
- Mold material
Casting examples
- Typical gray cast iron castings
- Transmission valve body, hub rotor with disk-brake cylinder in automobile
Solidification of Metals
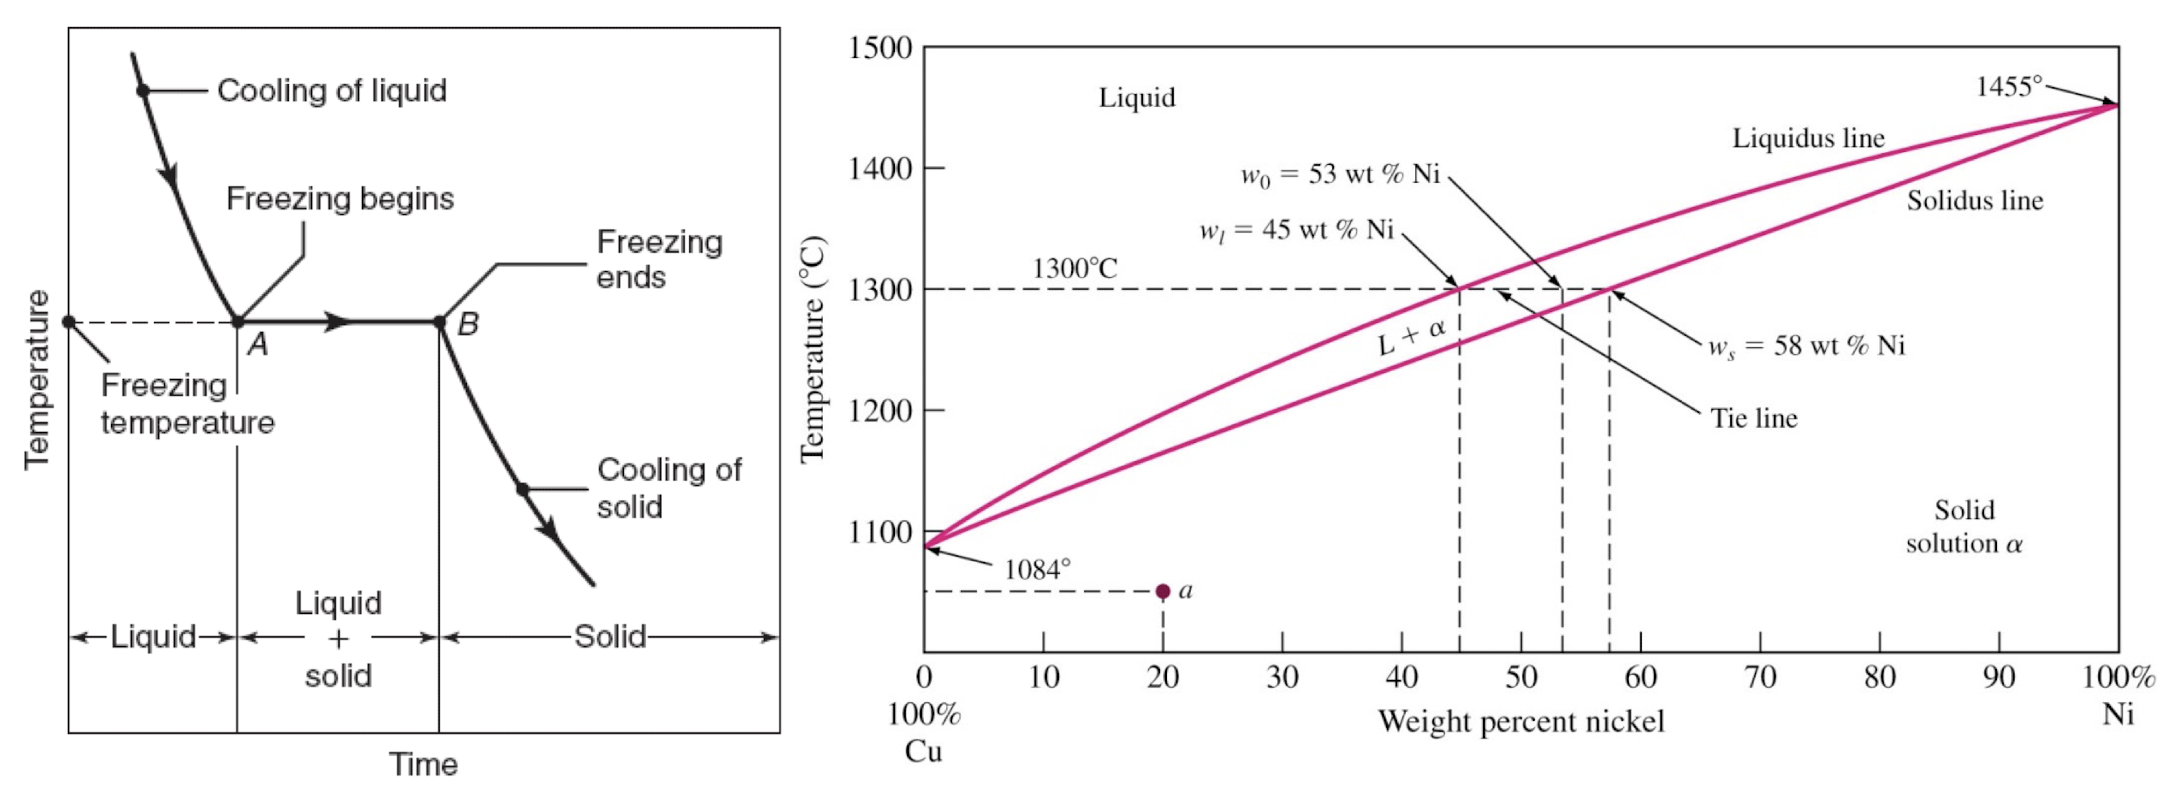
- Pure metals have defined melting points and solidification takes place at a constant temperature
- When temperature is reduced to the freezing point, latent heat(잠열) of fusion is given off
- A -> B
- Alloys(합금) solidify over a range of temperatures
- Solidification begins below liquidus and is completed at solidus
- Two phases are co-exicst between solidus and liquidus
Cast Structure
- Solid solution(고용체) - 시험
- Solute(용질, Minor) is added to the solvent(용매, Major) to form a solution
- Cast structure developed during solidification of metals and alloys depends on
- Composition rate
- Heat transfer rate
- Flow of the liquid metal
- Pure metals
- Chill zone(칠영역)
- Columnar zone(주상정영역)
- Alloys
- Chill zone(칠영역)
- Columnar zone(주상정영역)
- Equiaxed zone
Alloy
시험
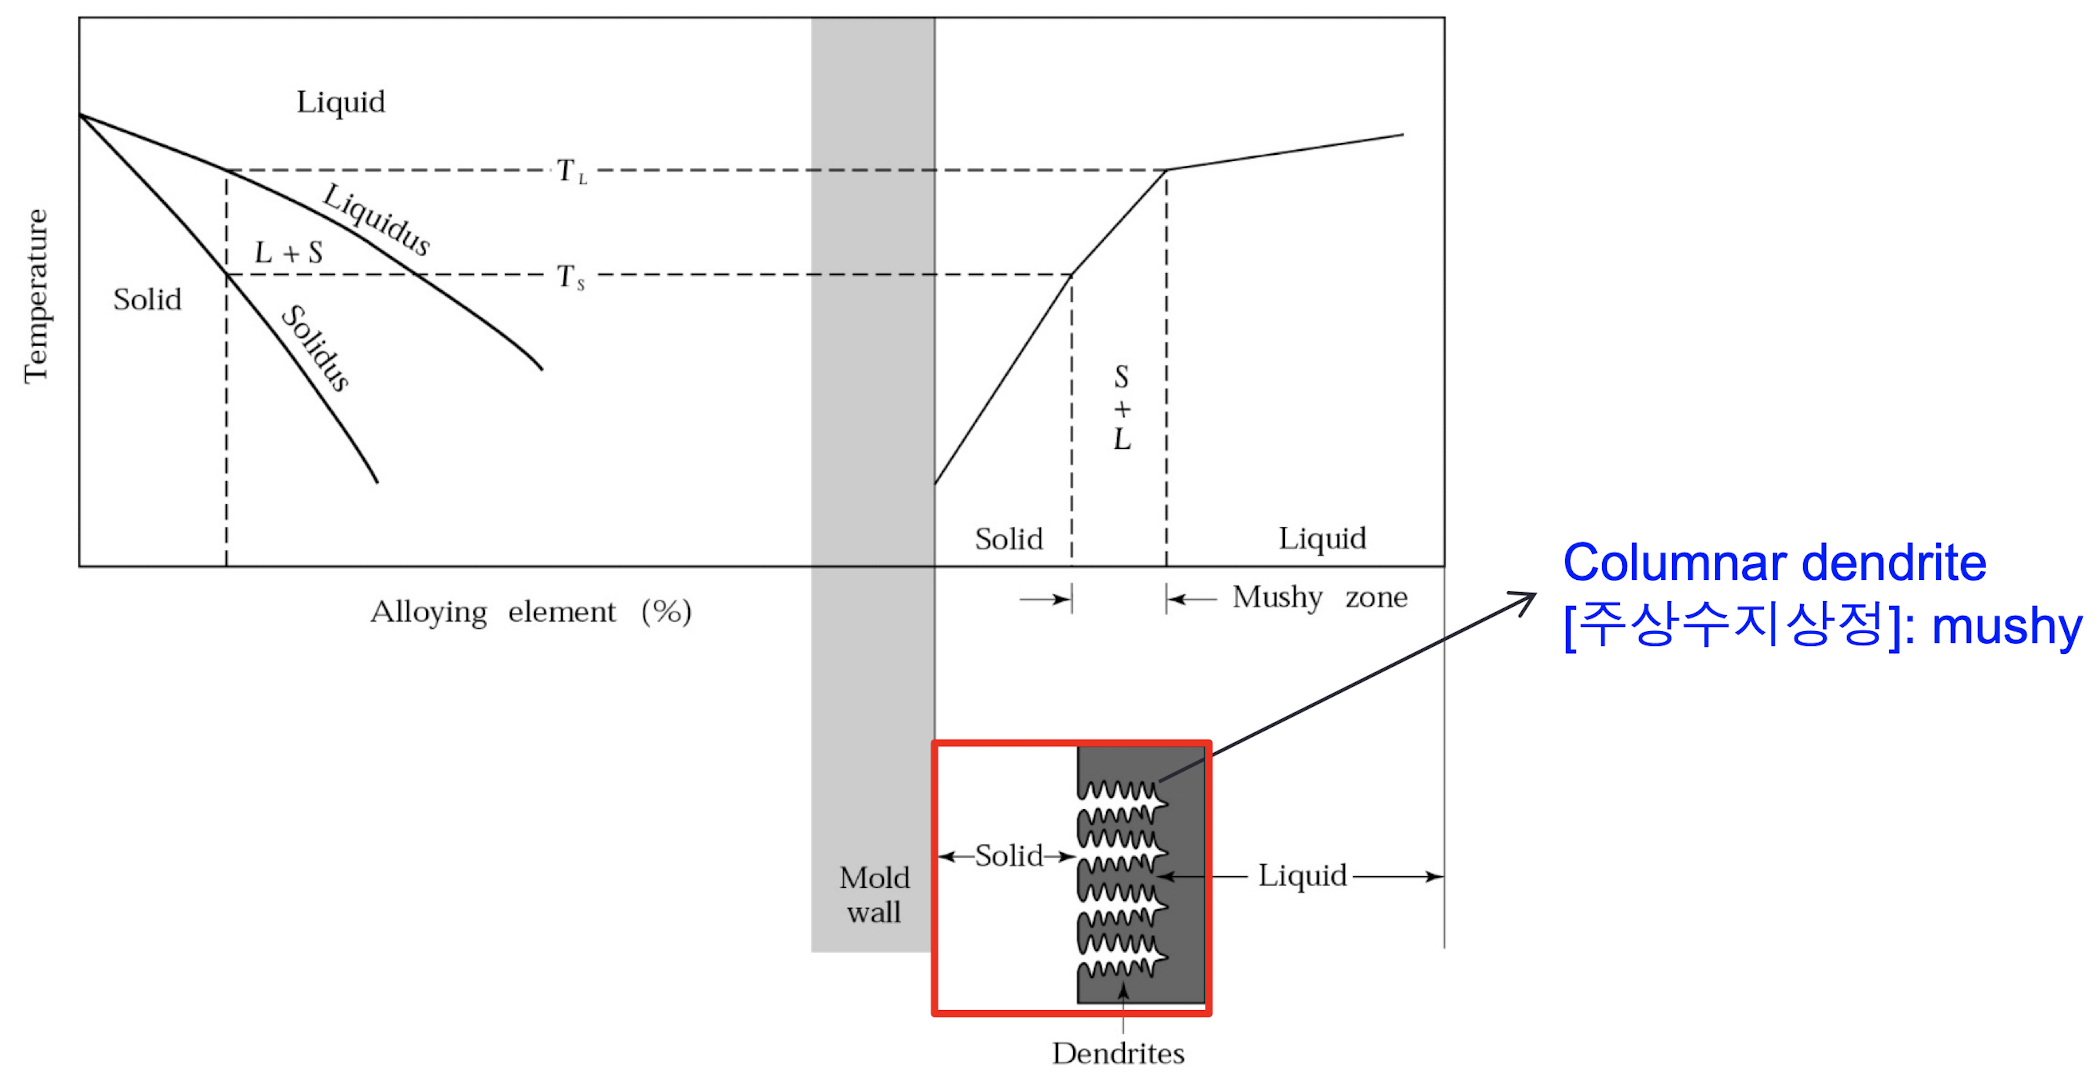
- Solidification begins when temperature drops below the liquidus($T_L$), and is completed at solidus($T_S$)
- Freezing rage(응고범위) : $T_L-T_S$
- Determines with of murshy zone
- Columnar dendrite(주상수지상정)
- Mushy zone
- 고상과 액상이 공존하는 영역
- 합금은 응고범위가 존재하기 때문에 존재
- 응고범위가 작으면 Mushy zone 작음
- 응고범위가 크면 Mushy zone 큼
- 냉각 속도 빠르면
- 조직이 미세해짐
- 가지사이의 간격이 좁아짐 - 잘 휘지 않음
- 강도 증가
- 냉각 속도 느리면
- 조직이 커짐(조대입자)
- 가지사이의 간격이 넓어짐
- 연성 증가
Fluid Flow and Heat Transfer
- Bernoulli’s theorem : Conservation of energy in a fluid system
- $h_1+\frac{p_1}{\rho g}+\frac{v_1^2}{2g}=h_2+\frac{p_2}{\rho g}+\frac{v_2^2}{2g}+f$
- Law of mass continuity : The rate of flow is constant for an incompressible liquid
- $Q=A_1v_1=A_2v_2$
Flow chracteristics
- Reynolds number($R_e$)
- Prescence of turbulence is an important consideration in fluid flow
- Reynolds number, $R_e$, is used to characterize this aspect
- $R_e<2000$ : Laminar flow
- $2000<R_e<20000$ : Mixture of laminar and turbulence
- $R_e>20000$ : Severe turbulence
- Erosion of mold
- Air entrainment
- Dross formation(Undesirable aspects in casting system)
$$
R_e=\frac{intertia}{friction}=\frac{vD\rho}{\eta}
$$
- $v=velocity\ of\ the\ liquid$
- $D=diameter\ of\ the\ channel$
- $\rho=density$
- $\eta=dynamic\ viscosity\ of\ the\ liquid(Ns/m^2)$
Fluidity of Molten Metal
- Fluidity : The ability of molten metal to fill the mold cavities
- Characteristics of molten metal
- Casting parameters
- Characteristics of molten metal
- Viscosity(점도)
- Surface tension(표면장력)
- Inclusions(개재물)
- Solidification pattern of the alloy : Inversely proportional to the freezing range
Casting parameters
- Mold design(주형설계)
- Mold material and its surface characteristics : The higher thermal conductivity of the mold and the rougher its surface, the lower the fluidity
- Superheat improves fluidity
- Rate of pouring : The lower it is, the lower fluidity because of high cooling rate
- Heat transfer
- Regarding metal shirink(Dimensional changes and cracking) during solidification and cooling
Casting Processes
- Ingot casting
- Ingot : 초기의 후속 가공을 위해 만들어지는 금속 부품
- Continusous casting
- Sand casting(사형주조) : Expendable mold(소모성 주형)
- Sand mold
- Inexpensive and resistance to high temperatures
- Silica($SiO_2$) sand is used
- Sand with fine and round grain is closely packed and forms a smooth mold surface(High strength and low permeability)
- A good permeability allows gases and steam evolved during casting to escape easily
- Pattern
- Shape of the casting
- Material selection depends on size and shape, dimensional accuracy, accuracy, quantity of casting
- Draft angle 고려
- 미세한 주물사를 사용한 주형을 통해 만들어진 금속
- 주형 강도 증가(결합 면적 증가) - 형태 잘 유지(좋은 표면)
- 통기도 감소(가스 배출 어려움) - 금속 내부 공간(균일하지 않은 강도)
- Sand mold
- Shell-mold casting : Expendable mold(소모성 주형)
- Close dimensional tolerances and good surface finish at low cost
- Light and thin(usually 5~10mm) : Thin shell allow gases to escape during solidification of the metal
- Smooth wall of the mold wall : Low resistance to molten metal flow - shaper corner, thinner sections, and smaller projections
- Precision(정밀) casting : Expendable mold(소모성 주형)
- Plaster-mold casting
- Precision casting method : High dimensional accuracy, good surface finish
- Low thermal conductivity(Slow cooling) : Uniform grain structure, Less warpage, Better mechanical properties
- Ceramic-mold casting
- Somewhat expensive
- Good dimensional accuracy and surface finish
- Wide range of size, intricate shapes
- Suitable for high-temperature application(Stainless steel, tool steels, etc.)
- Plaster-mold casting
- Investment casting : Expendable mold(소모성 주형)
- Labor and materials are costly but no finishing is required
- Suitable for casting high-melting-point alloys with good surface finish and close dimensional tolerances
- Mecahnical components : Gears, Cams, Valves, ratchet, etc.
- Permanent mold casting processes
- Molds are used repeatedly and are designed so that the casting can easily be removed
- Metal molds
- Better heat conductor - High rate of cooling - Microstructure and grain size
- Maintain strength under high temperature
- Expensive
- Controlling of the rate of cooling speed with graphite(흑연) / refractory(내화액)
- 코팅 두께로 조절
- Good mechanical properties and surface finish
- Die casting : Permanent mold
- Molten metal is forced into the die cavity at high pressures(~ 700MPa)
- The machines are large comparing with the size of the product
- Dies are cooled by circulating water or oil to improve die life and rapid cooling : Maximizing productivity
- Mass production thorough automation
- Centrifugal / Squeeze casting : Permanent mold
- Centrifugal casting(원심주조법)
- Force the molten metal into the mold cavities by the inertial force(Rotation)
- Good dimensional tolerance and surface
- By centrifugal force : Inner surface of the casting remains cylindrical, Lighter elements(Dross, Impurities) on the inner surface
- Squeeze casting
- Combination of forging and casting
- The higher cooling rate results in fine microstructure and good mechanical properties
- Minimization of microporosity
- Centrifugal casting(원심주조법)
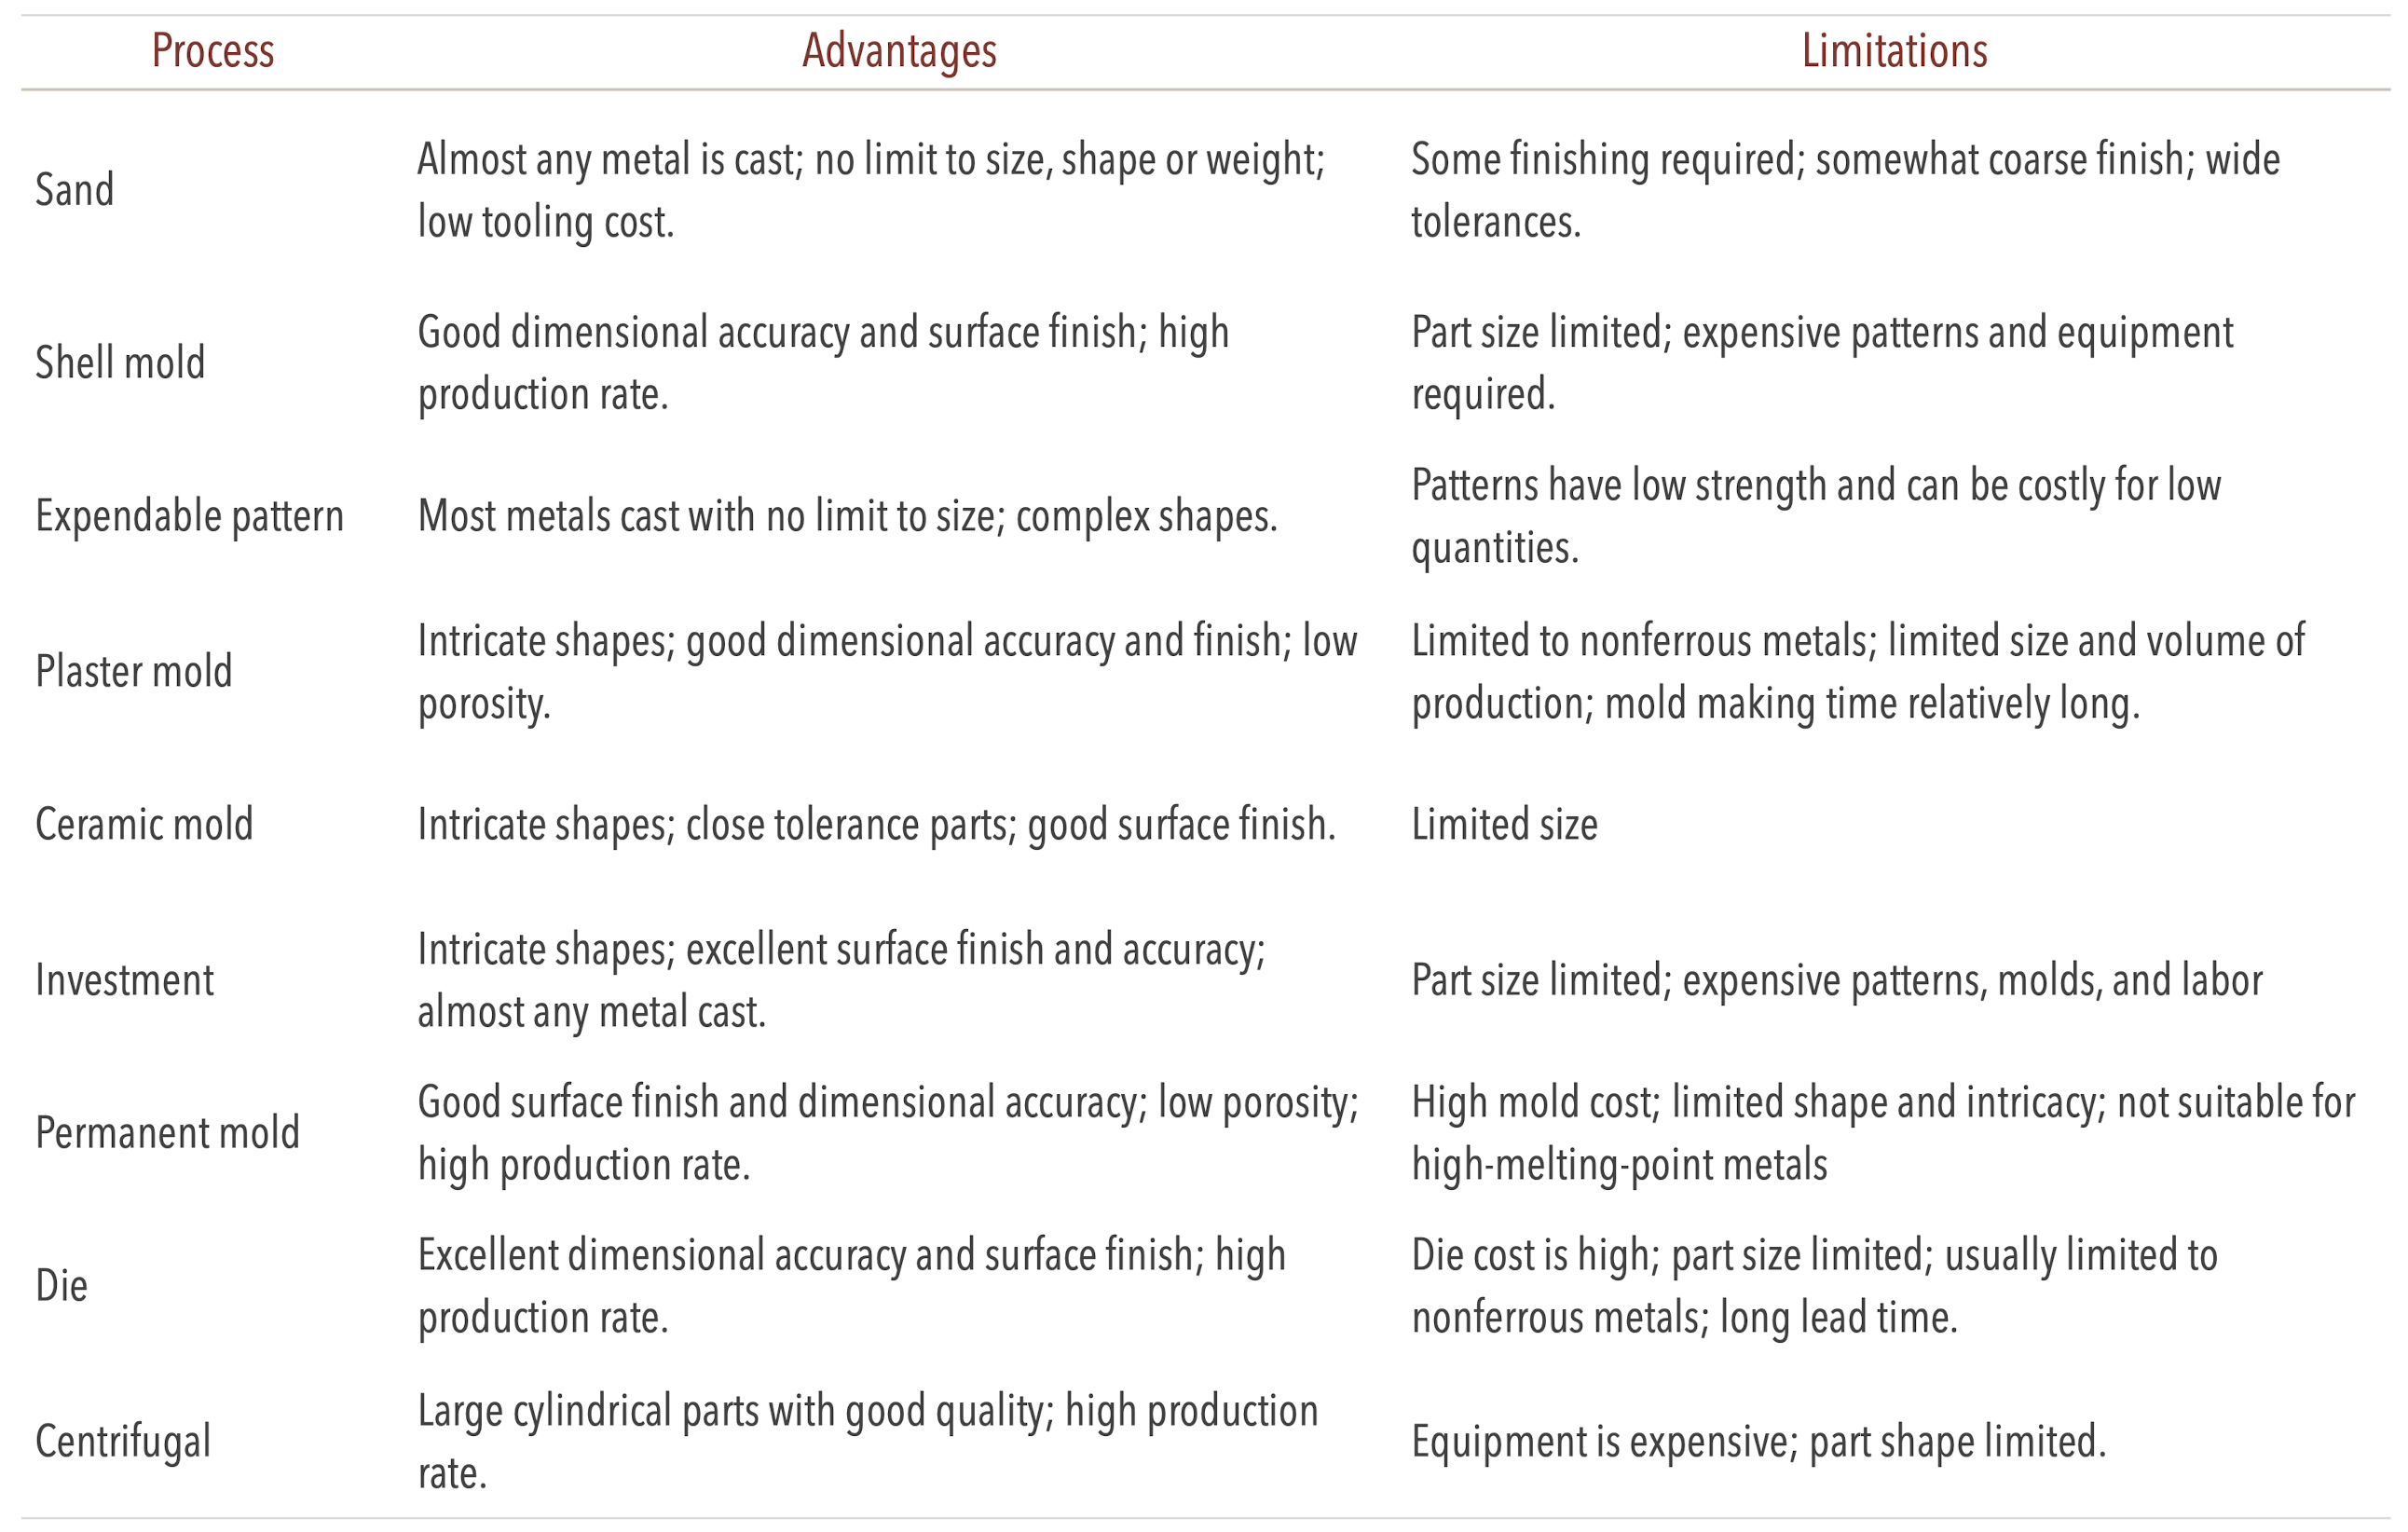
표 5.8 - 시험
Post processes
- Annealing
- Reduce hardness and strength
- Modify its microstructure
- Relieve resiual stress
- Improve dimensional stability and machinability
- Annealing sequence
- Heating the workpiece to a specific range of temperature
- Holding it at that temperature for a period of time
- Cooling it slowly(Minimization of surface oxidation)
- Tempering
- Increase ductility and toughness
- Reduce residual stress and brittleness
- Heating a specific temperature and cooled at a prescribed rate
Defects in castings
Seven basic categories
- Metallic projections(금속돌출)
- Ex) Rough surface or massive projection such as swell
- Cavities(기공)
- Ex) Blow hold, Pin hold
- Discontinuities
- Ex) Crack, Tearing, Coldshut
- Defective surface
- Ex) Surface fold, Laps, Scars
- Incomplete casting
- Ex) Misruns(Premature solidification), Runout(Due to loss of metal after pouring)
- Incorrect dimensions of shape
- Ex) Improper shrinkage allowance, Uneven contraction
- Inclusion(개재물)
- Stress raisers and reduce the strength of the casting, break tools during machining operation
Porosity(기공)
- Detrimental to the ductility and surface finish
- Develop when the liquid metal solidifies and shrinks between dendrites
- Microporosity is from gases expelling
- Macroporosity(Shrinkage cavities) is from shirinkage
- Chills(냉각쇠) are used in castings to eliminate macroporosity caused by shrinkage
- Porosity due to gases(Microporosity)
- Spherical and smooth walls(Normally)
- Porosity due to shrinkage(Macroporosity)
- Rough and angular(Normally)
Bulk Deformation Processes
- Metal forming process
- Bulk deformation(팽창 변형) : Involves the plastic deformation of materials under various force / power conditions
- Forging(단조)
- Rolling(압연)
- Extrusion(압출)
- Drawing(인발)
- Swaging
- Sheet-metal forming
- Bulk deformation(팽창 변형) : Involves the plastic deformation of materials under various force / power conditions
Forging(단조)
강성 증가
- Forging is the manufactruing process where plastic deformation of material takes place by compressive forces
- Cold or hot working : can be carried out at room or at elevated temperature
- Open-die forging(자유 단조)
- Involves placing a solid cylindrical workpiece between two flat dies and reducing its height by compressive force(it’s called “upsetting”)
- Die : may be flat or have cavities of various shape
- Barreling(배부름) - 시험
- Caused by frictional forces at the die-workpiece interfaces and upsetting of hot workpieces between cool dies
- Non-uniform deformation
- Minimized by lubricant or ultrasonic vibration of the platens
- Impression-die(Closed-die forging)
- 형 단조
- Workpiece acquires the shape of the die cavity while deformed between the closing dies
- Flash : high frction encourages the filling of the die cavities - 시험
- Qualities depending on operational performance and control
- Precision forging(정밀 단조) : Near net shape with Aluminum, Magnesium
- Closed-die forging(폐쇄 단조) : No flash, completely filled
- Isothermal forging(등온 단조) : Hot die forging, same Temp. workpiece-die, expensive
- Incremental forging(점진 단조) : Several small steps(Incremental), low force-low noise
- Coining : Closed-die forging coin / medal, no lubricant, improving qualities
- Heading : Upsetting operation
- Cogging : Drawing out, thickness is reduced by sucessive steps
- Roll forging(압연 단조) : Passing workpiece through set of grooved rolls
Forging defects
시험
- Due to improper the material flow patterns in the die cavity
- Buckling defect(겹침 결함) : The excess material in the web
- Internal crack(내부 크랙) : Due to oversized billet
- Effect of radius
- Die radius(다이의 모서리 형상) significantly affect formation of forging defects
- Material flows better around large radius
- Cold shut : Material can fold over itself with smaller radius
- These defects can lead to fatigue failure during the service life of the forged component
- 설계변수 : 다이의 모서리 형상
Forgeability
Capability to be shaped without cracking and requiring low forces
- Upsetting test
- Upset of cylindrical specimen
- Measure reduction in height prior to cracking
- The higher reduction, the greater the forgeability of the metal
- As the friction increases, the specimen cracks at a lower reduction in height
- Upset of cylindrical specimen
- Hot-twist test
- A torsion test of a long and round specimen
- Twisted continuously until it fails
- Performed at various temperatures and the number of turns in observed
- Useful for determining the forgeability of steel
- A torsion test of a long and round specimen
단조성이 높다 : 균열 없이 크게 변형, 동일한 변형량을 유지할 때 소요되는 하중 작음
Die design parameters
General considerations for die design
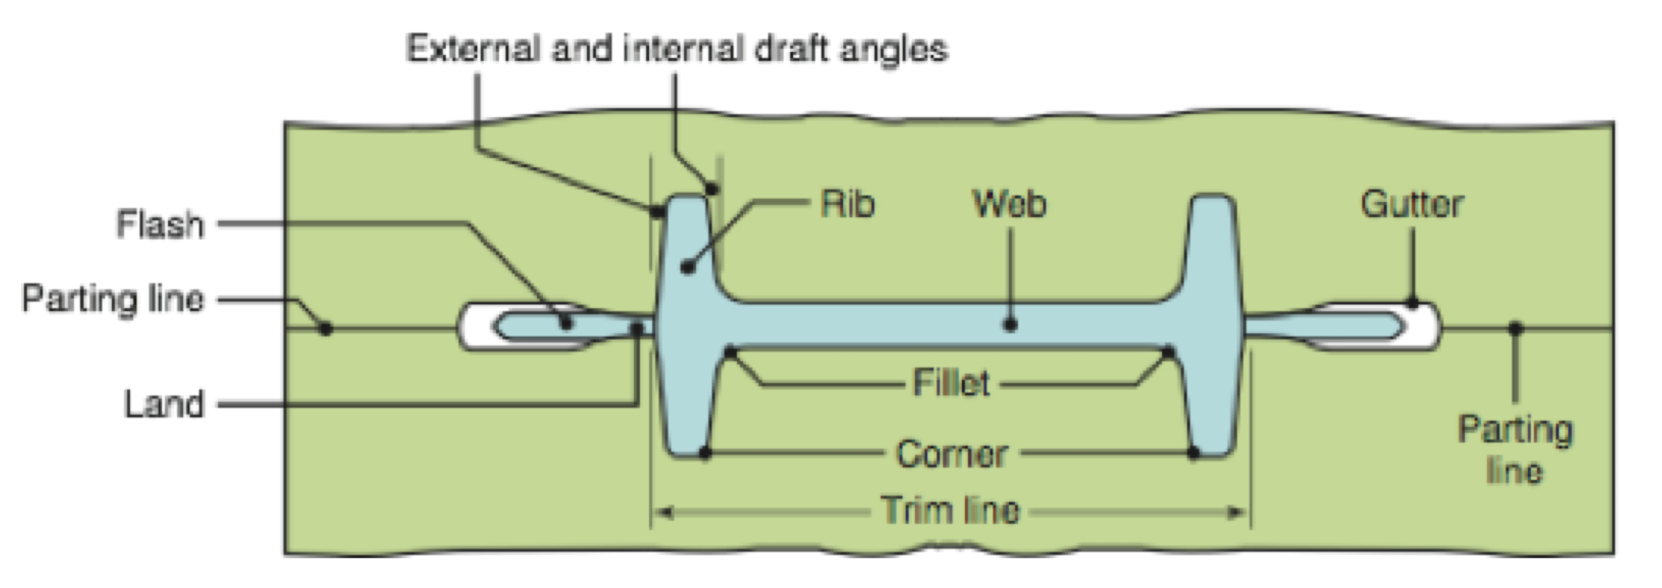
- Parting line : Two dies meet
- Flash : 3% of the maximum thickness of the forging
- Draft angles : Removal of the part from the die(Internal > External)
- Die radius for conrners and fillets
- Smooth flow of the metal in the die cavity
- Improvement of die life
- Small radius : Stress concentration
- Small radius in fillets : Fatigue cracking
- Land의 길이는 Falsh 두께의 5배
Rolling(압연)
- Process of reducing the thickness of long workpiece by compressive forces applied through a set of rolls
- Good strength and ductility : Reduce grain size and refine the microstructure - 시험
- 90% of all metals produced by metalworking processes

Mechanics of Flat Rolling
- For constant volume rate of metal, velocity of strip must increase as it moves through roll gap
- No slip point : The two velocities (Strip / Roll) are the same

- Roll forces in hot rolling
- Two difficulties in calculation of forces and torque
- Proper estimation of the coefficient of friction at elevated temperature(Generally 0.2 ~ 0.7)
- Strain-rate sensitivity of materials at elevated temperature
- Two difficulties in calculation of forces and torque
- Roll deflections and roll flateening
- Roll forces will bend the rolls and results in a strip that is thicker at its center than at its edges(Crown)
- Flattening of roll with camber
- Camber : Curvature in diameter variation, typically less than 0.5mm on the roll diameter - 시험
- Spreading
- Rolling plates and sheets with high strip width-to-thickness ratios is essentially a process of plane strain
- Width increases during rolling, known as spreading
- Spreading decrease with
- Increasing width-to-thickness ratios of the strip
- Increasing of friction
- Increasing ratios of roll radius to strip thickness
Defects in Rolling
- Structural defects(구조적 결함)
- Wavy edges(파도형 결함)
- Roll의 손상
- Zipper cracks in the center of strip(중앙부 터짐)
- Ingot 내부의 기공
- 연성 부족
- 과한 Camber
- Edge cracks(측면 터짐)
- 연성 부족
- 적은 Camber
- Alligatoring
- 넓은 기공
- Wavy edges(파도형 결함)
- Residual stresses
- Due to inhomogeneous plastic deformation
- Small rolls / Small reduction in thickness
- 소재의 표면만 소성변형
- 표면 : 압축잔류응력
- 중앙부 : 인장잔류응력
- Large rolls / Large reduction in thickness
- 소재의 내부 위주의 소성변형
- 표면 : 인장잔류응력
- 중앙부 : 압축잔류응력
- Small rolls / Small reduction in thickness
- Due to inhomogeneous plastic deformation
Roll arrangement
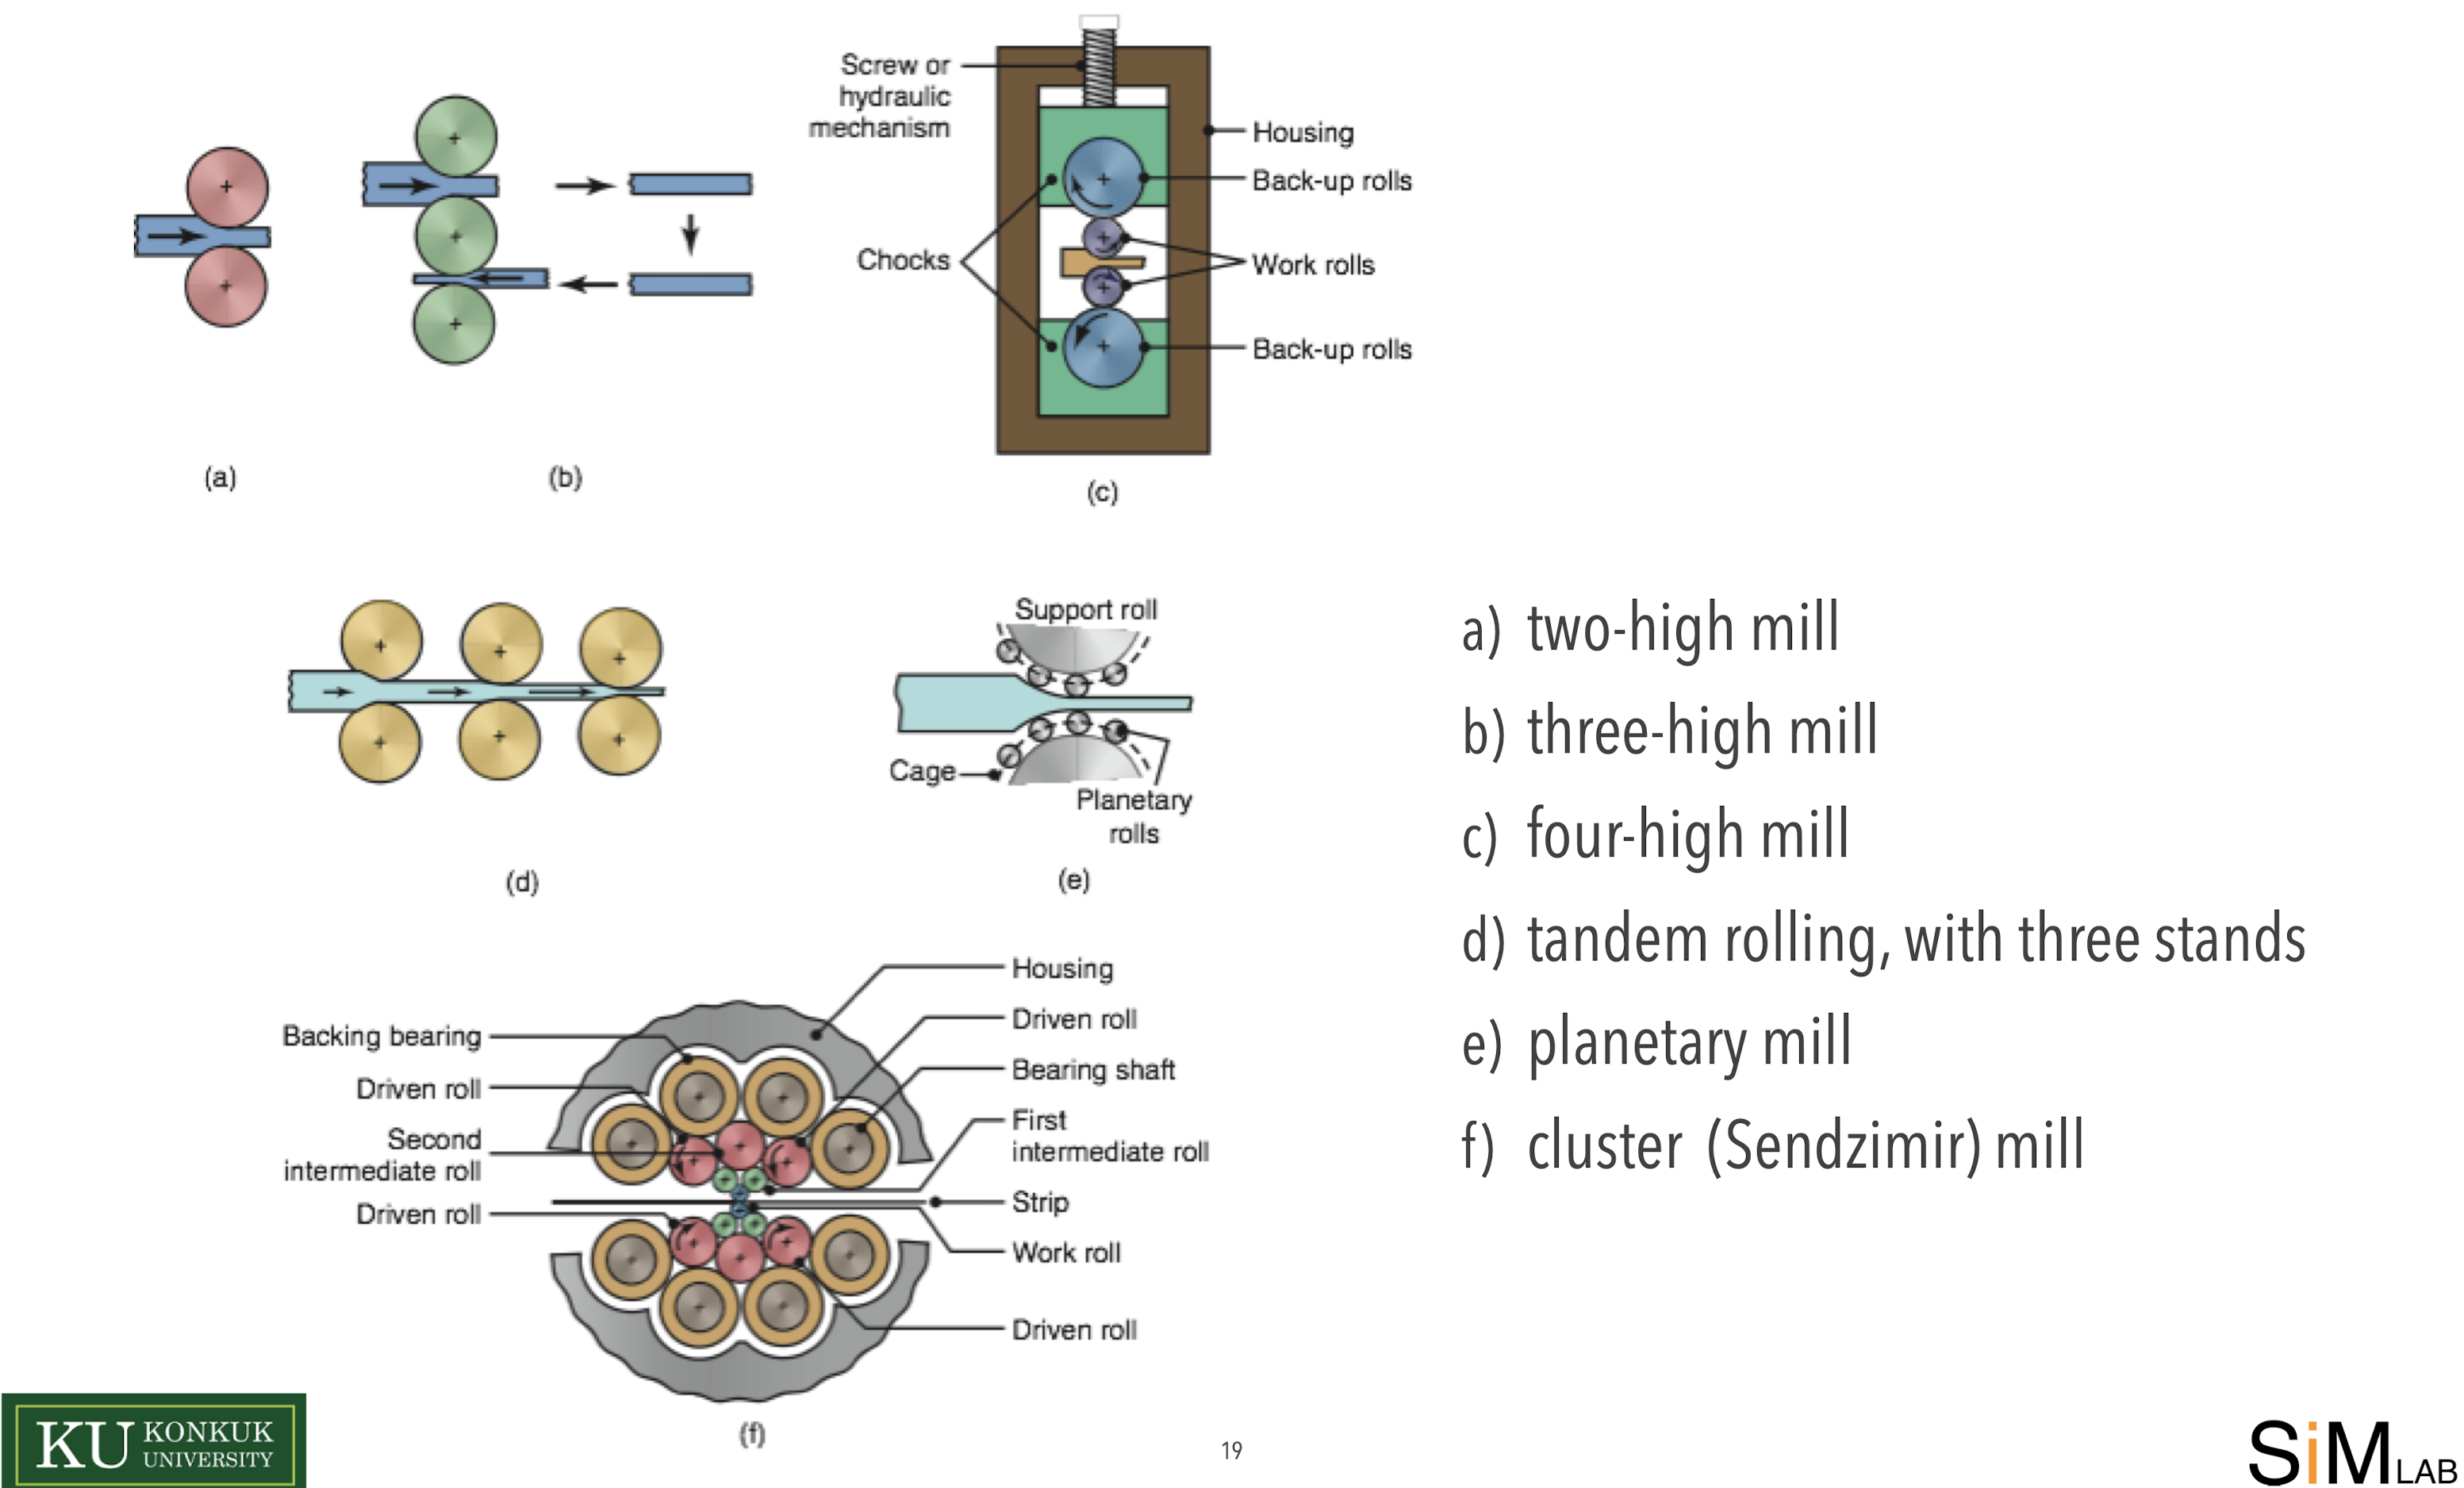
Miscellaneous rolling operations
- Shape rolling
- Ring rolling
- Thread rolling
- Cold-froming process
- Good strength
- Requested sufficient ductility
- Requested good lubrication
Extrusion(압출)
- Cold and hot working process
- Four basic types of extrusion
- Direct extrusion(직접, 전방 압출)
- Indirect extrusion(간접, 후방 압출)
- Hydrostatic extrusion(정수압 압출)
- Impact extrusion
Metal flow in extrusion
- Main factors in metal flow
- Friction at billet-container and billet-die interface
- Thermal gradients within the billet
- The most homogeneous flow pattern under no friction at the interfaces
- Dead-metal zone develops under high friction
- High-shear zone extends farther back(“Pipe defect” - 내부에 공간 존재)
Cold extrusion
- Combination of processes particularly extrusion combined with forging
- Cold extrusion advantages
- Improved mechanical properties(Minimize thermal defects)
- Good control of dimensional tolerances
- Improved surface finish
- High production rates and low cost
Defects in extrusion
- Surface cracking(표면균열)
- High extrusion temperature under high speed and friction
- Cracks are inter-granular
- Cracks are the results of hot shortness(적열취성)
- Minimization of surface cracking by using lower temperature and low speed
- Extrusion defect(= Pipe defect = Tailpipe = Fishtailing)
- Type of metal flow will draw surface oxides and impurities toward the center of billet
- Minimization of pipe defect by modifiying the flow pattern, machining the billet surface
- Internal cracking(= Chevron cracking)
- Develop at the center of an extruded product
- Major factors are die angle, extrusion ratio, friction
Drawing(인발)
- A bar or tube is reduced or changed in shape by pulling through a converging die under tension(Extrusion is carried out with compressive force)
- Rod and wire drawings are finishing processes and are further processed into other shapes
Defects in drawing
- Internal defects increases with increasing
- Die angle
- Friction
- The presence of inclusion in the material
- Seam defect(솔기결함)
- A type of surface defect in only drawing
- Longitudinal scratches or folds in the material
- Major reason of alligatoring defect
Sheet-Metal Forming Process
- Sheet metal forming involves the workpiece with high ratio of surface area to thickness
- Plate(후판) : Thicker than 6mm
- Sheet(박판) : Less than 6mm
- Sheet metal is produced by rolling process
- If thin : Coiled after rolling(Wound roll form)
- If thick : Available as sheet or plate
- Forming of sheet metals is carried out by tensile forces in the plane of the sheet
- Compressive force -> Buckling, Folding and Wrinkling of the sheet
- Thickness change due only to Poisson’s effect unlike bulk deformation
Shearing(판재의 전단작업)
- Cutting sheet metal, plates, bars, and tubing into pieces using punch and die
- Workpiece is subjected to shear stress
- Important variables are punch force, speed, edge condition of the sheet, materials, corner radii of punch and die, punch-die clearance(간극) and lubrication
- As clearance increases, edges become rougher and deformation zone is larger : Generally 2-8% of sheet thickness, and 1% of it for fine blanking
- The ratio of the burnished-to-rough area on the sheared edge increases with increasing ductility of the sheet metal and decreases with increasing sheet thickness and clearance
- As clearance increases, the material tends to be pulled into the die, rather than being sheared
- Burr height increases with increasing clearance and increasing ductility of the metal
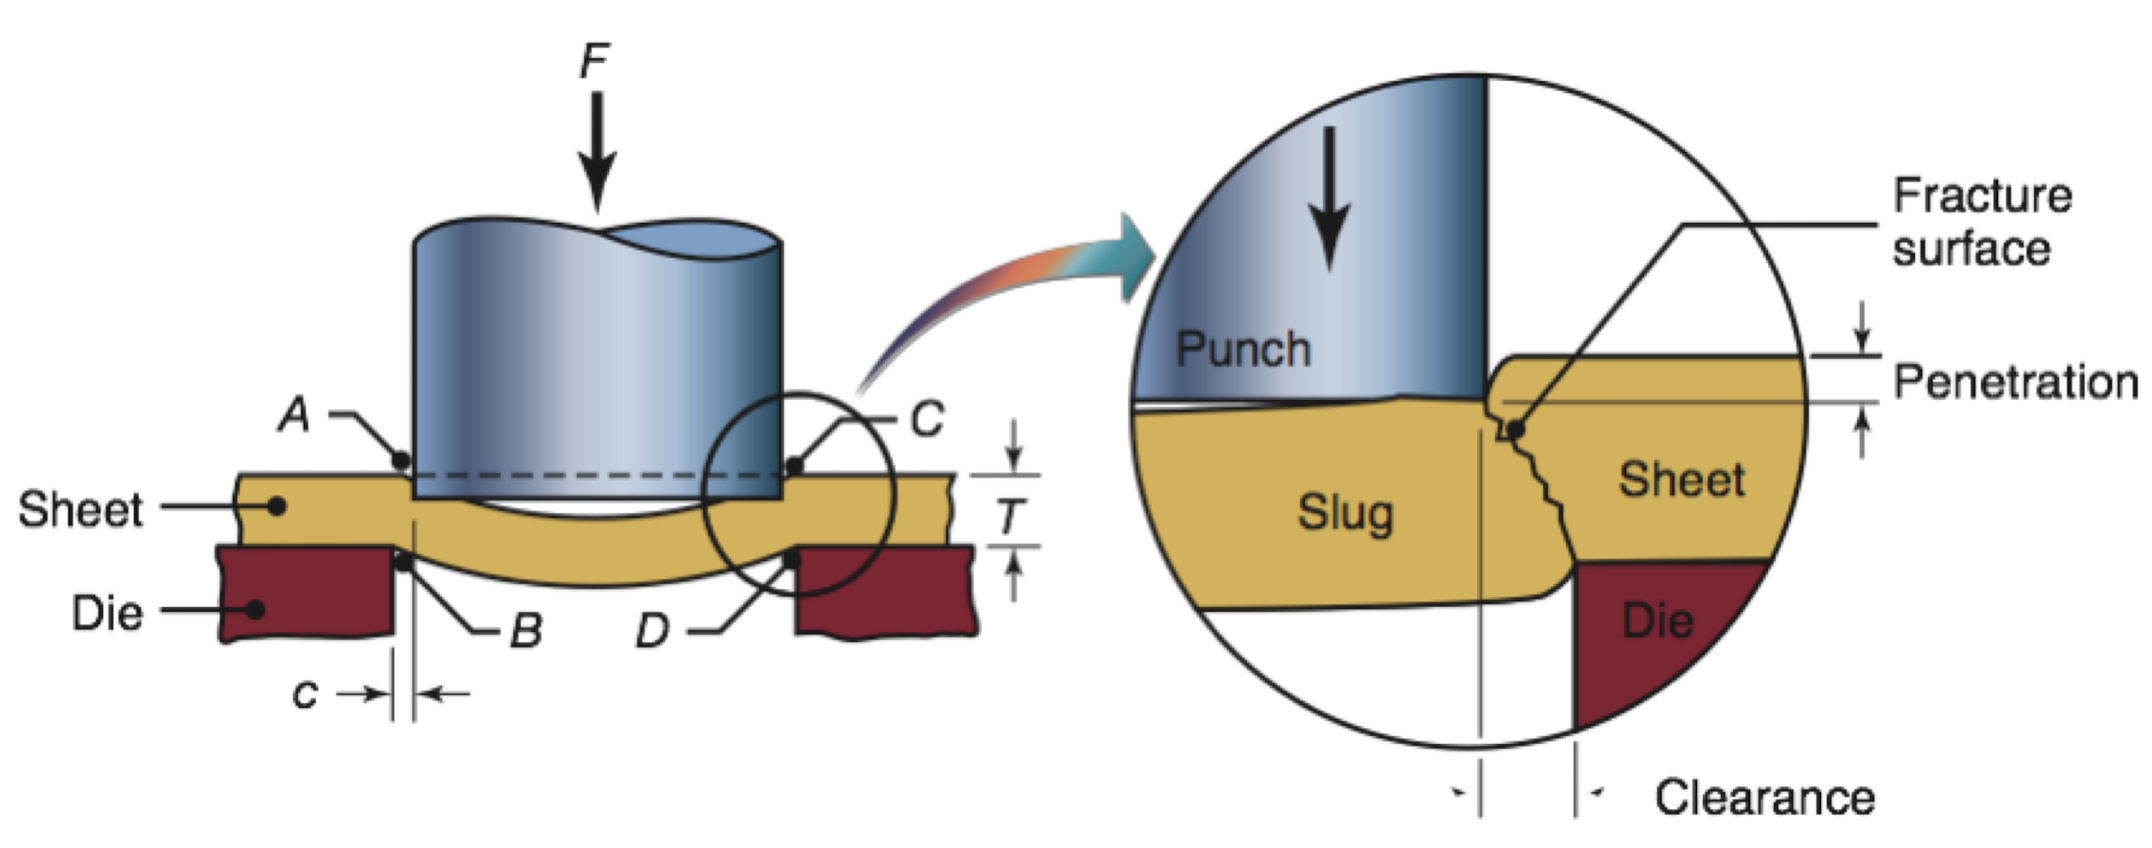
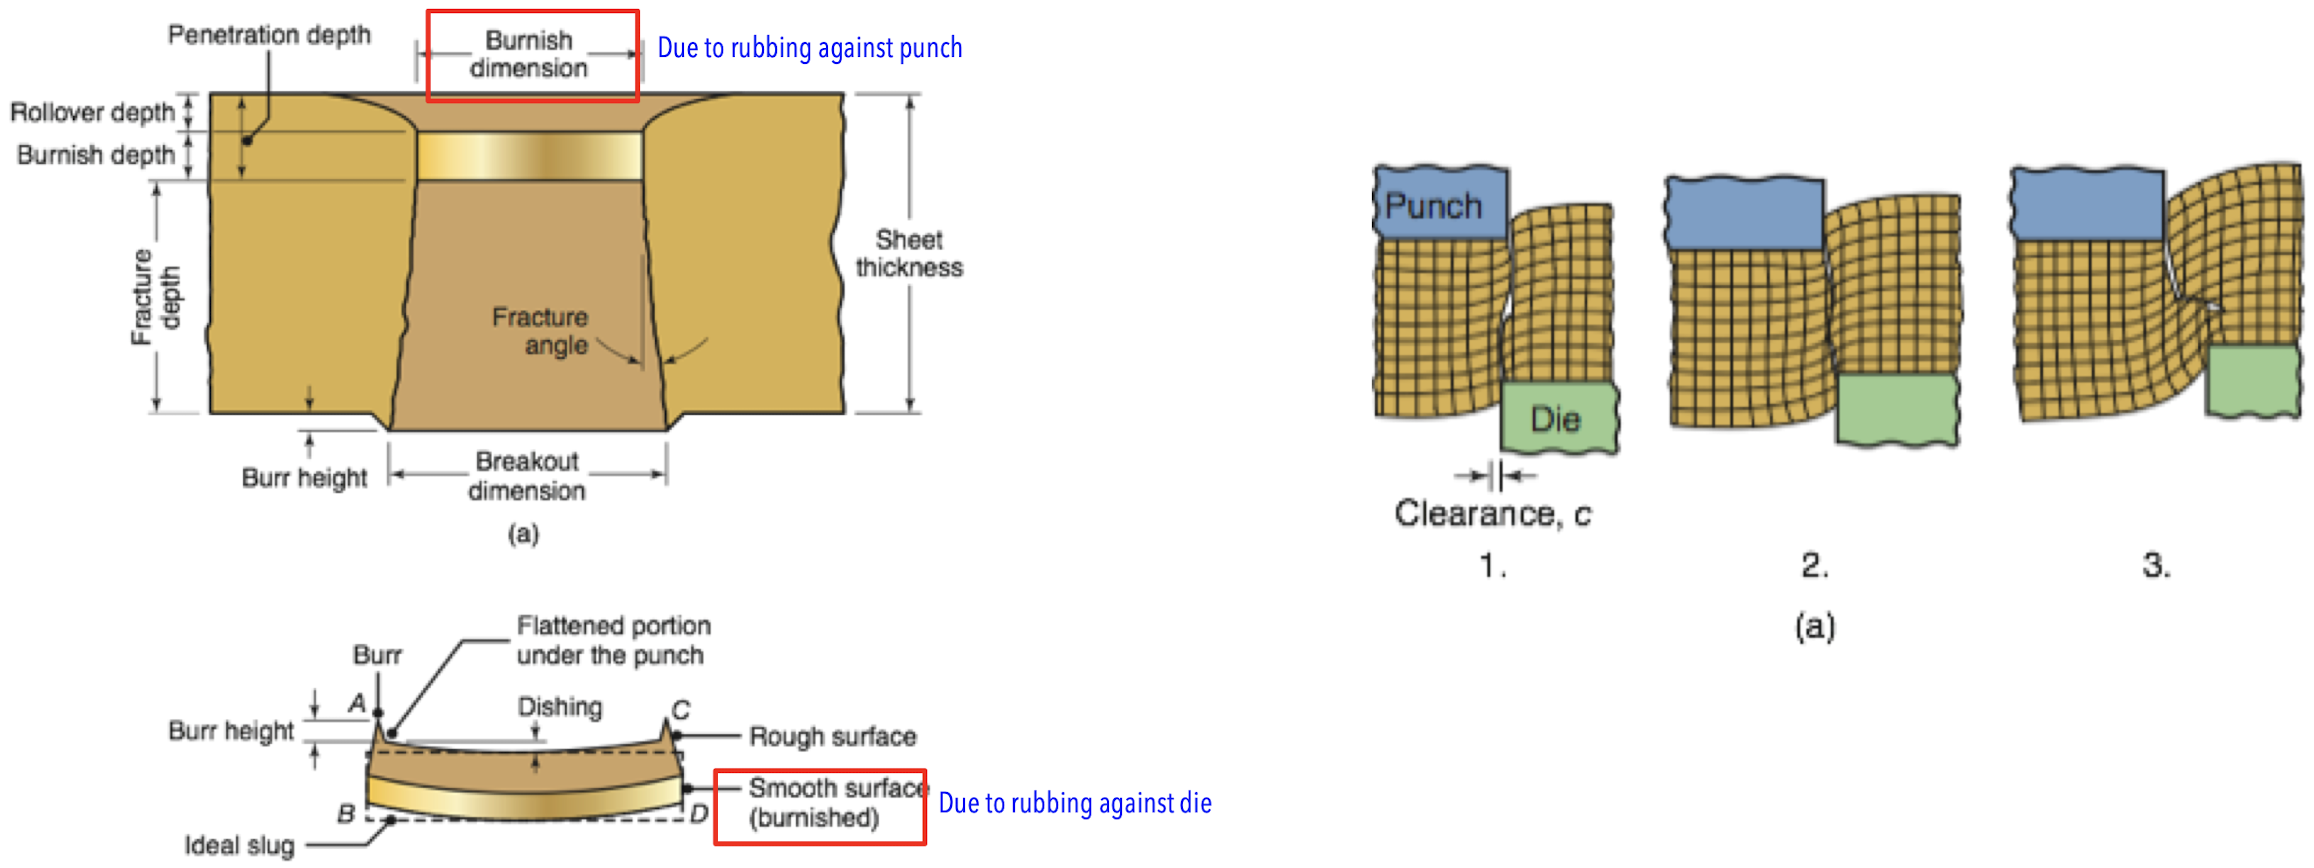
Die Cutting
- Punching : The sheared slug is discarded
- Blanking : The slug is the part itself, and the rest is scrap
- Parts produced have various uses
- Perforating : Punching holes
- Parting : Shear into two or more pieces
- Notching : Remove the material at edge
- Slitting
- Lancing : Leave a tap without removing material

Fine Blanking
- Very smooth and square edges
- V-shaped impingement(Stinger) grabs the sheet tightly in place
- Clearances on the order of 1% of the sheet thickness with sheet thickness of 0.5 ~ 13mm(8% in ordinary shearing operation)
- Suitable sheet hardness : 50 ~ 90HRB
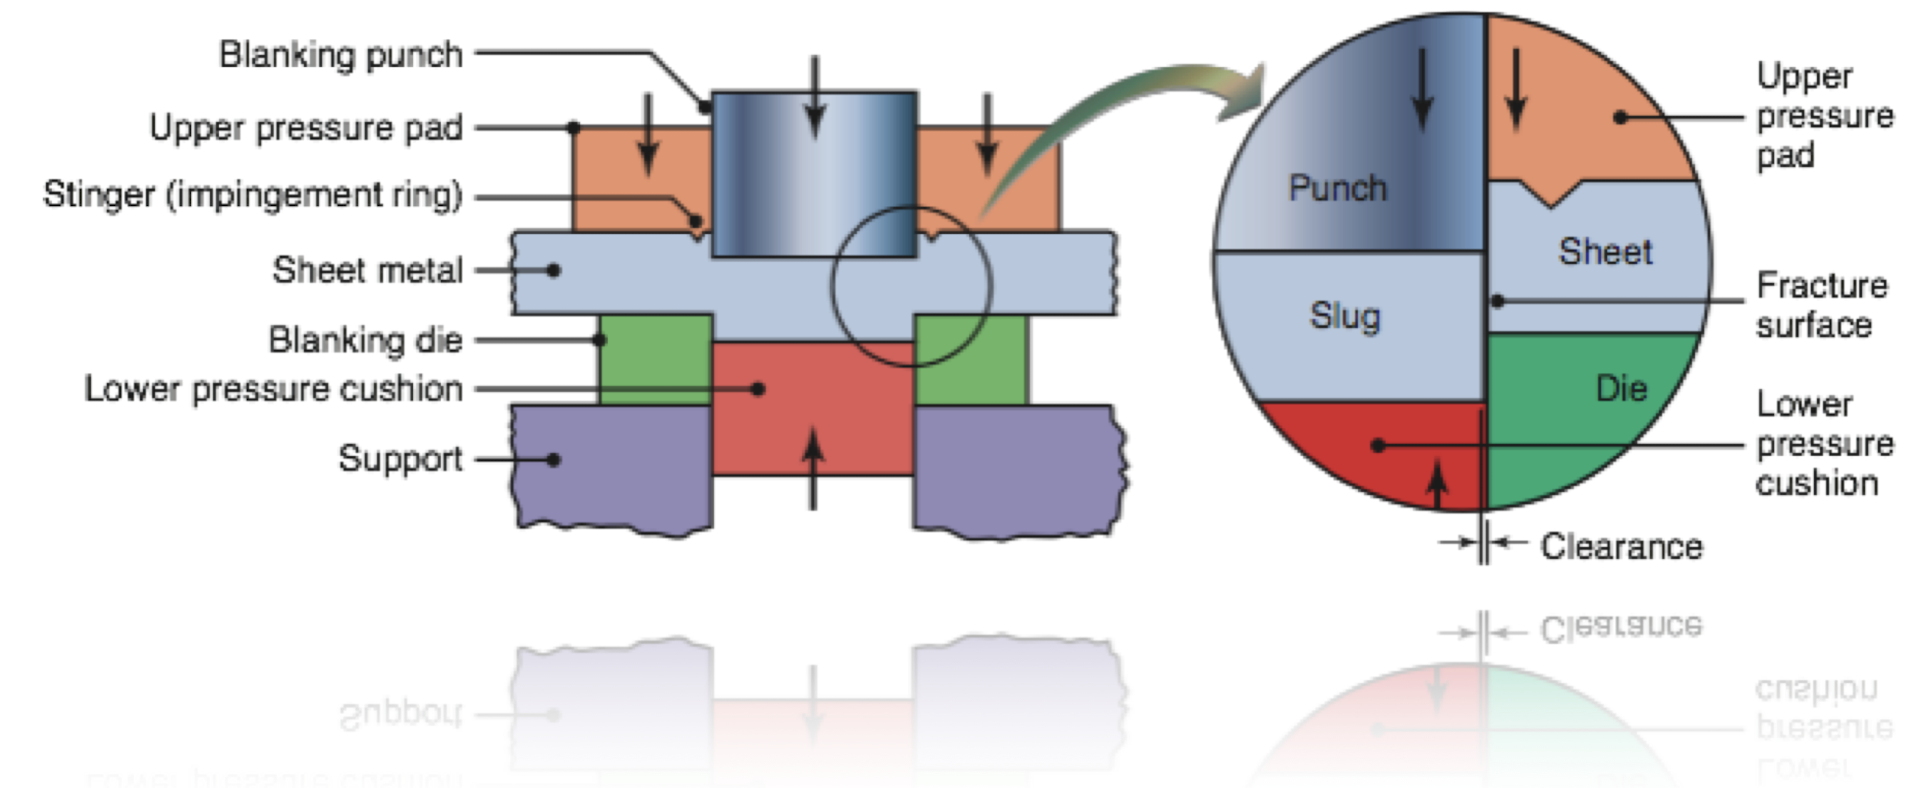
Slitting
- Carried out with a pair of circular blades
- Two types of slitting equipment
- Driven type : The blades are powered
- Pull-through type : The strip is pulled through idling blades
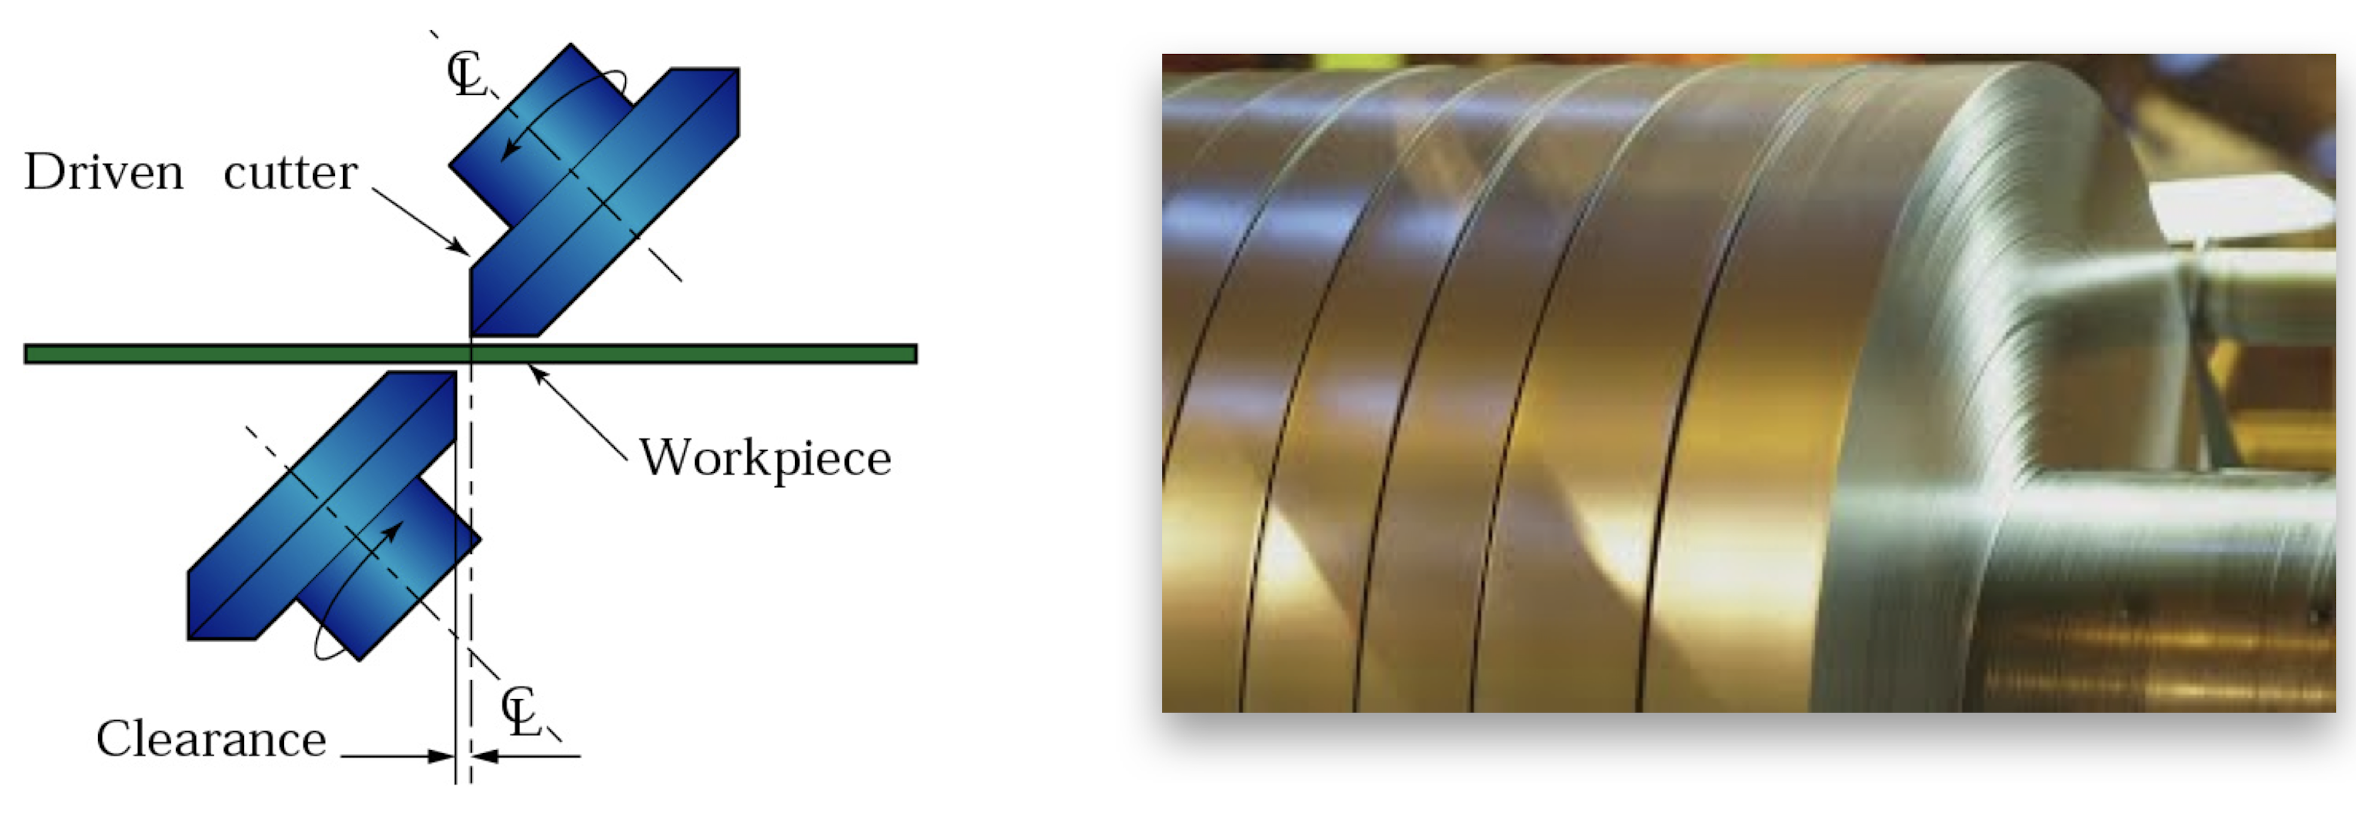
Shearing Die
- Qualities of a sheared part can be directly influenced by clearance
- The smaller the clearance, the better is the quality of the sheared edge
- Shaving : Extra material from a rough sheared edge is trimmed by cutting
- Part requiring multiple operations such as punching, bending, and blanking are made at high production rate using progressive dies

Bending of Sheet and Plate(판재의 굽힘작업)
- Bending : One of the most common metalworking operations
- Bending force is a function of the material’s strength, legnth and thickness of the part, and the width of the die opening
- Bend allowance($L_b$, 굽힘허용부) : The length of the neutral axis in the bend area and is used to determine the blank length for a bent part
- Bend radius($R$, 굽힘반경) is measured to the inner surface of the band
- Length of bend($L$, 굽힘길이) is the width of the sheet
- Minimum band radius : Crack appears on the outer surface of the band
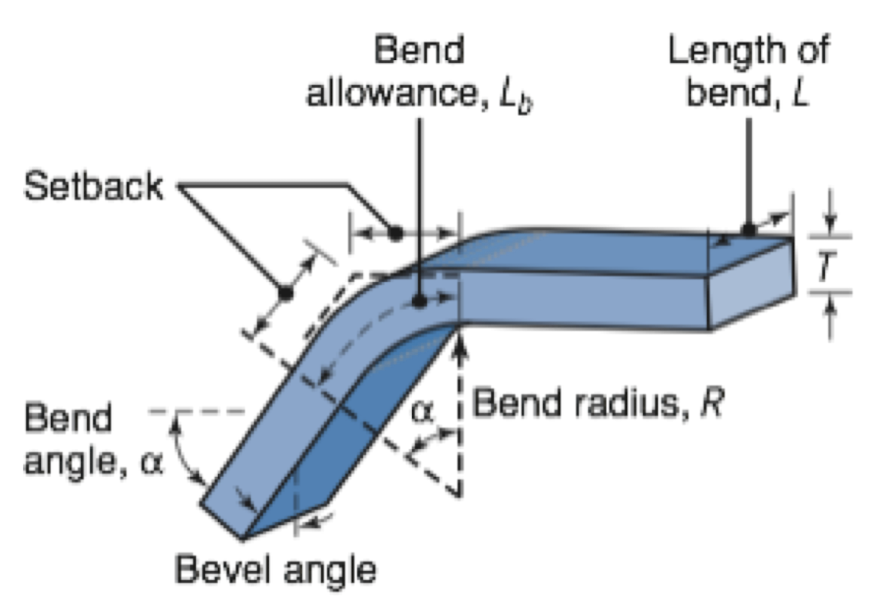
Bendability
Factors affecting bendability
- Bendability increases by increasing its tensile reduction of area
- As length($L$) increases, minimum bend radius increases(under 10t)
- Bendability decreases as edge roughness increases
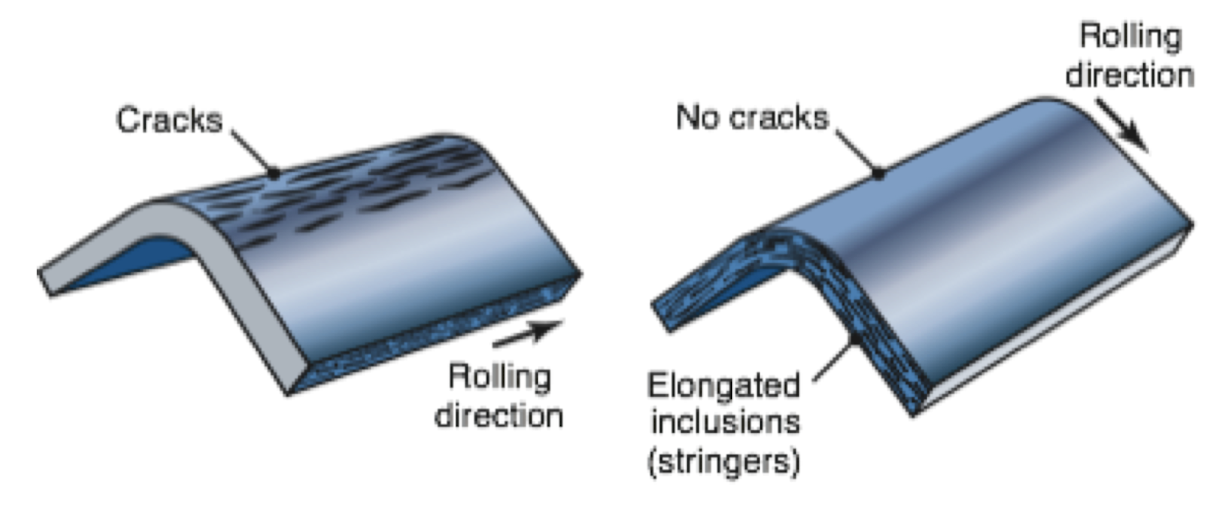
- Cold rolling direction : Anisotropy because of the alignment of impurities, inclusions, and voids(It is called “mechanical fibering”)
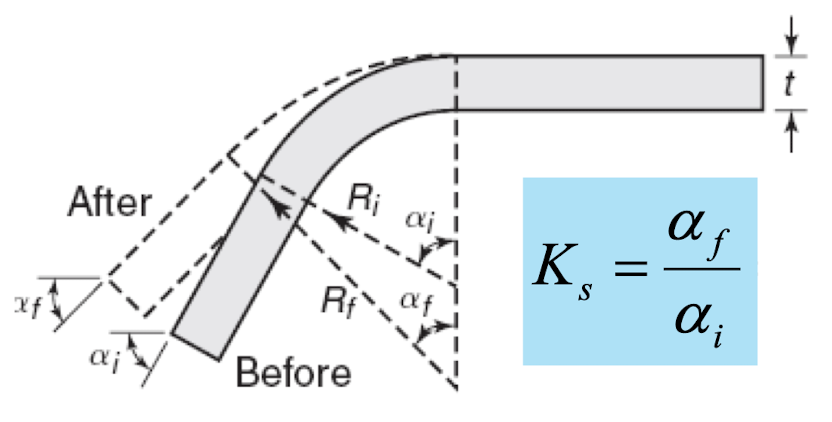
Springback
- In bending, elastic recovery is called springback
- Plastic deformation is always followed by elastic recovery upon removal of the load
- A quantity characterizing springback is the springback factor $K_s$(ex : $K_s=1$ is no springback and $K_s=0$ is full springback)
Compensation for Springback
- Springback is usually compensated by using
- Overbending
- Coining : High localized compressive forces between the tip of the punch and the die surface
- Strength bending : Applying tension while being bent
- Bending in high temperature : Springback decreases as yield stress decreases(Elastic region decreases)
Common bending operations
- Bending : The edge of the sheet is bent into the cavity of a die
- Flanging : Bending the edges of sheet metal, typically to 90 degree
- Dimpling : Hole is first punched and then expanded into a flange
- Hemming : Edge of the sheet is folded over
- Roll forming : Bending continuous lengths of sheet metal
- Tube bending
- Method is to pack the inside with loose particles(Typically sand)
- Prevent the tube from buckling inward
Miscellaneous Forming Processes
- Stretch forming
- Sheet metal is clamped around it edges and stretched over a die or form block
- Aircraft - wing skin panels, automobile door panels
- Bulging
- Expanding it with a rubber or polyurethane
- Embossing
Spinning
Forming of axisymmetric parts over a rotating mandrel, using ride tools or rollers
- Conbentional spinning
- Circular blank of flat or preformed sheet metal is held against the rotating mandrel
- Suitable for conical or curvilinear shape
- Shear spinning
- Basically the same as conventional spinning except for that the diameter keeps constant
- Tube spinning
- Tubes or pipes are reduced in thickness by spinning them on a cylindrical mandrel using rollers
- External or internal spinning
Peen forming
- Produce curvatures on thin sheet metals by shot peening
- Induced compressive surface residual stresses, thus improving the fatigue strength of the sheet
Deep Drawing
Flat sheet-metal blank is formed into a cylindrical or box-shaped part by means of a punch that presses the blank into the die cavity
- Variables in deep drawing
- Properties of the sheet metal
- Ratio of the blank diameter to the punch diameter
- Sheet thickness
- Clearance between the punch and the die
- Corner radius of the punch and die
- Blankholder force
- Speed of the punch
- Friction at the punch, die and workpiece interfaces
Ironing
- Thickness has to be reduced by a defromation when the thickness of the sheet as it enters the die cavity is more than the clearance between the punch and the die : It is called Ironing
- Producing a cup with constant wall thickness
- Correcting earing defect
Deep Drawing Practice
- Clearances and radius
- Clearances are 7 - 14% greater than the original thickness of the sheet
- Ironing increases as clearance decreases
- Radius is too small -> Fracture
- Radius is too large -> Wrinkle
- Draw beads
- Draw bead diameters may range from 13 to 20mm
- Draw bead help in reducing the blank holder forces
- Blankholder pressure
- 0.7 to 1.0% of the sum of the yield and the UTS of the sheet metal
- Too high pressure -> Tearing of the cup wall
- Too low pressure -> Wrinkle in the flange
- Equipment
- Punch speed : 0.1 ~ 0.3m/s(Punch speed in not important in drawability)
Material-Removal Process : Cutting
Machining(Cutting) is a general term to describe material removal on a workpiece and modification of its surfaces
Machining processes in manufacturing
- Advantage of machining
- Closer dimensional accuracy
- External and internal geometric features
- Special surface characteristics or textures
- Economical when the number of final product is low
- Disadvantage of machining
- Waste material
- Need more time to make something
Mechanics of Chip Formation(칩 형성역학)
- Material removal -> Chip production
- A chip is produced ahead of tool by shearing along the shear plane
| Input(Independent) variables(Controllable parameters) | Output(Dependent) variables |
|---|---|
| Type of cutting tool | Types of chip produced |
| Tool shape | Force and energy required |
| Workpiece material | Temperature rise |
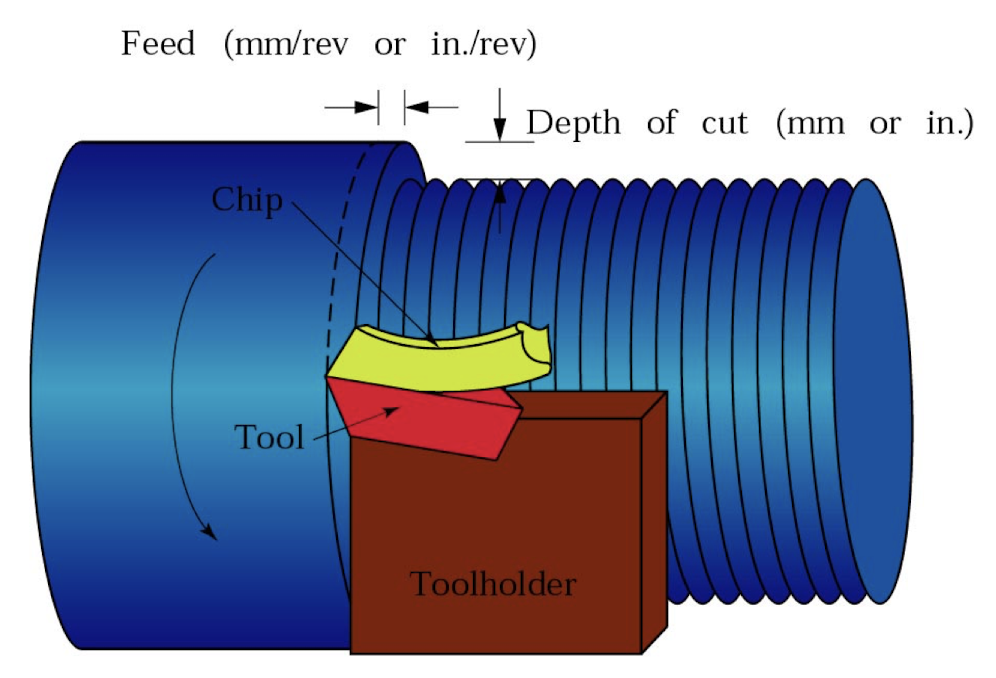
| Cutting condition(Speed, Feed, Depth of cut) | Wear, chipping and failure of tool |
| Type of cutting fluid | Surface finish of workpiece |
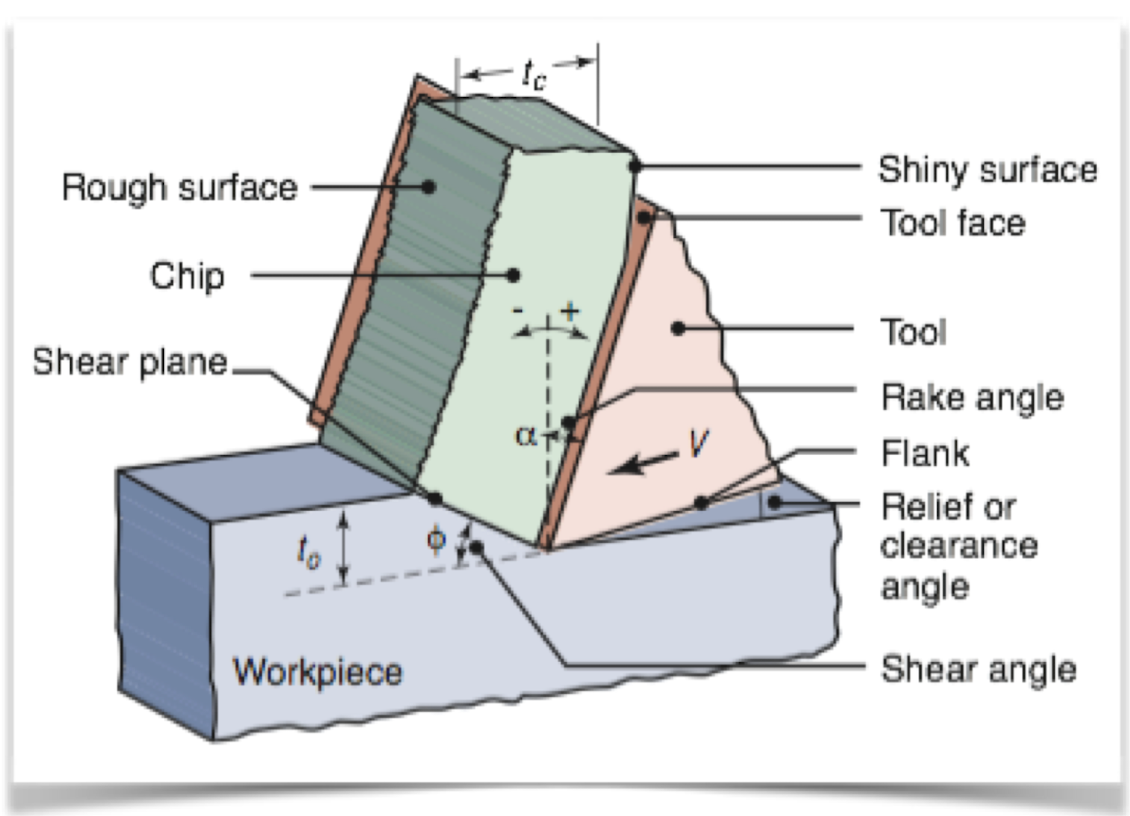
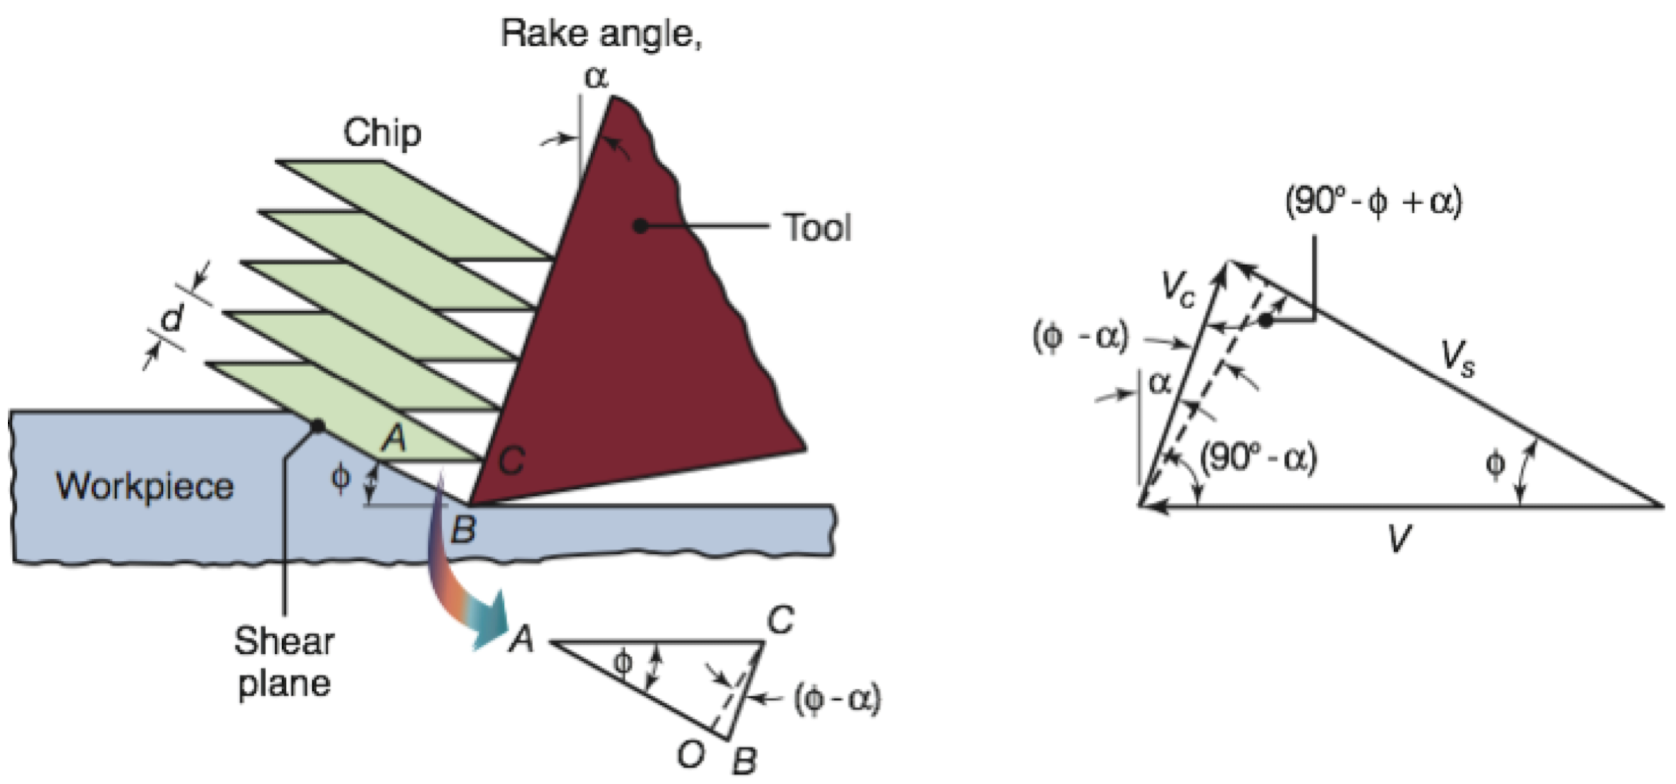
- Orthogonal cutting(Two dimensional model)
- Two-dimensional orthonogonal cutting : The edge of tool is perpendicular(Orthogonal) to cutting direction
- Tool has a rake angle, relief of clearance angle
Chip Morphology
- Type of chips produced influences surface finish, integrity and machining operation
- Actual chips are significantly different from the ideal model shown on previous slides
- The tool side of the chip surface is shiny(Burnished), which was caused by rubbing of the chip
- The other side of the chip surface has a jagged and steplike appearance
- Continuous chip
- Typically formed at high cutting speeds and high rake angles
- Generally produce good surface
- Chip usually becomes harder and stronger and less ductile than the original workpiece
- But continuous chips tend to get tangled around the tool
- Chip breaker can be used to solve this problem
- Built-up-edge(BUE) chip, 구성인선 - 시험
- Forms at the tip of the tool during cutting
- Built-up(구성) : material from the workpiece that are gradually deposited on the tool
- BUE has 3 times higher hardness than bulk workpiece
- BUE affects surface finish and integrity in machining
- BUE generally undesirable, but a thin stable BUE is regarded as desirable(It protects the tool surface)
- Major factors(BUE)
- Adhension of the workpiece material to the rake face of the tool
- Ceramic cutting tool have much lower affinity to form BUE
- Growth of the successive layers of adhenred metal on the tool
- Tendency of the workpiece material for strain hardening
- Build-up Edge decreases as
- the cutting speed($V$) increases
- the depth of cut($t_0$) decreases
- the rake angle($\alpha$) increases
- tip radius of the tool decreases
- an effective cutting fluid is applied
- Chip curl
- Possible factors contributing to chip curl
- Stresses distribution in shear zone
- Thermal gradients
- Work-hardening characteristics of the workpiece
- Geometry of rake face of the tool
- The radius of curvature decreases(The chip becomes curlier) with decreasing depth of cut, increasing rake angle, and decreasing frcition at the tool-chip interface -> Chip curl increases
- Possible factors contributing to chip curl
- Chip breaker
- Long chips needs to be broken since they tend to be entangled and interfere with machining operation
- It is troublesome in high speed automated machinery
Temperature
- As temperature increases, it will
- adversely affect the properties(Strength, Hardness, Wear resistance of the cutting tool) of the cutting tool
- adversely affect dimensional accuracy
- induce thermal damage to the machined surface, its properties and service life
- adversely affect dimensional control(distortion of the machine itself due to temperature gradients)
- Heat generation
- Shearing on the tool - chip interface
- Overcoming friction on the rake face of the tool - chip interface
- Tool tip rubbing against the machined surface when the tool is worn
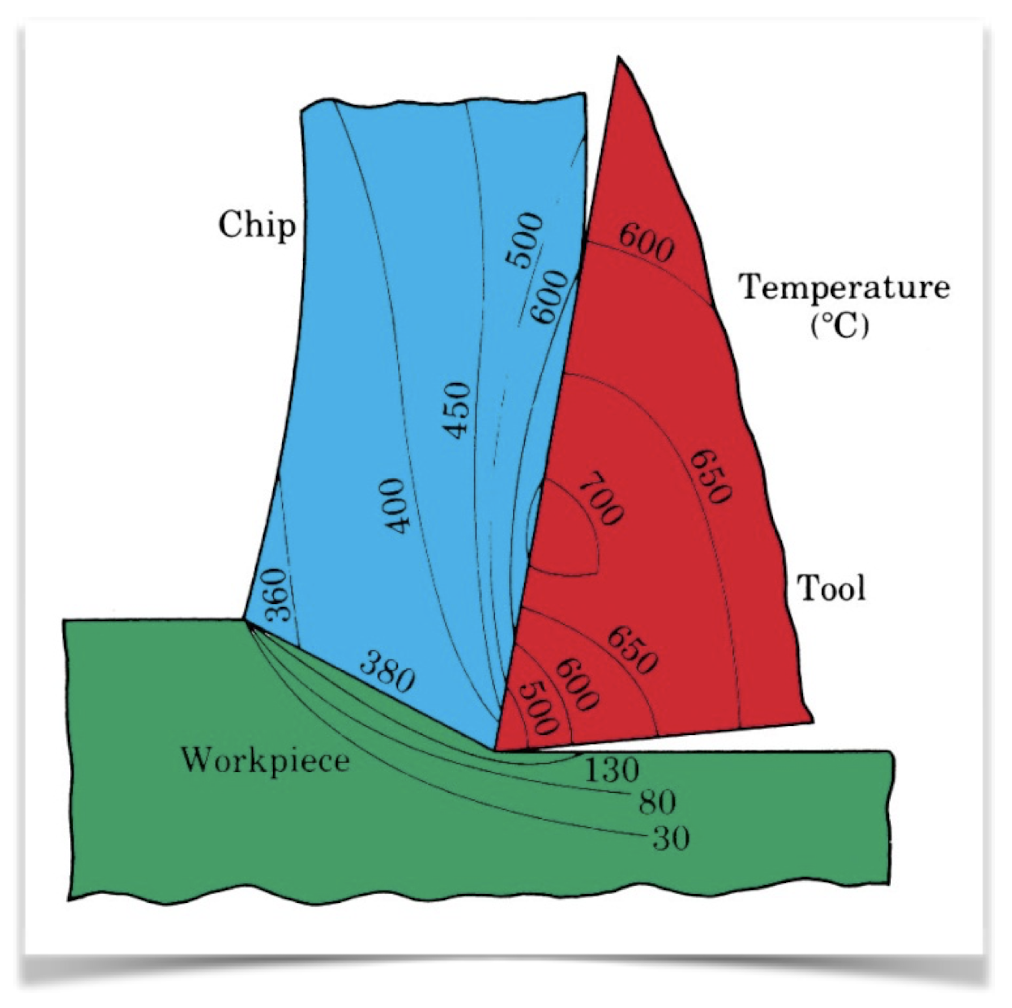
- Max temperature is away from the tool tip
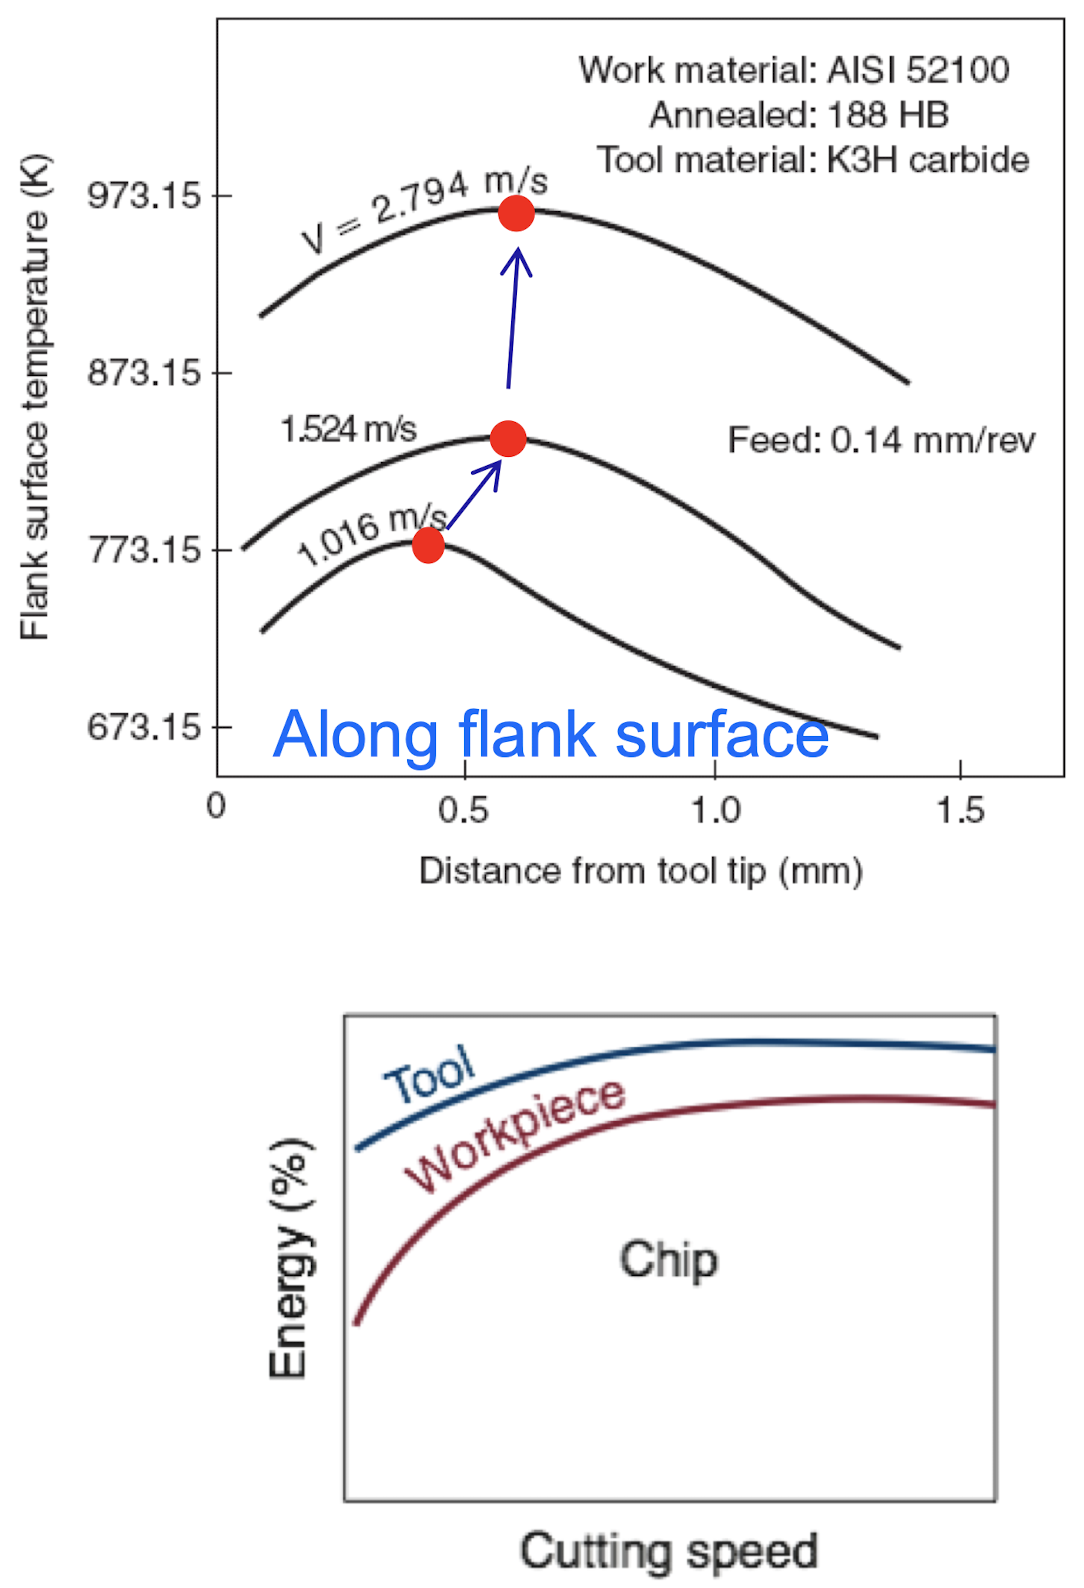
- temperature increases with cutting speed
- The chip plays a role of good heat sink in that it absorbs and carries away most of heat generated
- Large proportion of the heat generated is carried away by the chip(In the form of heat), as cutting speed
Tool Wear and Failure
- Cutting tools are subjected to high force, elevated temerature and sliding; all these conditions induce wear of the cutting tools
- Tool wear is one of the most important aspects of machining operations; because of its effect on the quality of the machined surface and the economics of machining
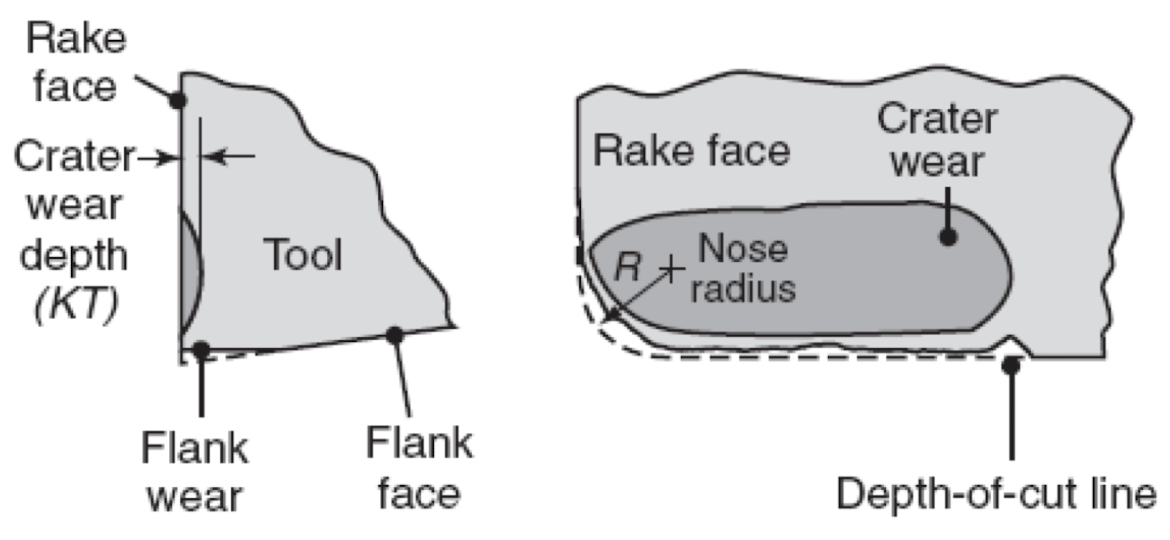
- The war behavior of cutting tools are flank wear, crater wear, nose wear, and chipping of the cutting edge; wear is generally a gradual process, chipping of the tool is a kind of catastrophic failure
Flank Wear
- Flank wear is due to
- sliding of the tool along the machined surface(depanding on materials involved)
- temperature rise(adverse effects on the tool material properties)
- Tool-life curves
- A tool life decreases as cutting speed increases
- The workpiece material influences the tool life
- The microstructures of the workpiece
Crater Wear
- Most significant factors are temperature and the degree of chemical affinity between the tool and the workpiece(The factor affecting flank wear also influence crater wear)
- The location of maximum depth of crater wear coincides with the location of maximum temperature at the tool - Chip interface
- Abrupt increase in crater wear rate above certain temperature is observed
Chipping
- Chipping is a phenomenon that results in sudden loss of tool material
- The breaking away of a piece from the cutting edge of the tool
- Microchipping : Chipped pieces are very small
- Gross chipping : Chipped pieces are large fragment
Surface Finish and Surface Integrity
- Surface influences a dimensional accuracy of machined parts as well as properties of the parts such as fatigue strength
- Surface finish describes the geometric features of surface
- Surface integrity pertains to properties such as fatigue life and corrosion resistance
- Major factors that influence surface integrity
- Temperatures generated during processing
- Residual stresses
- Metallurgical transformations
- Plastic deformation, tearing, and cracking of the surface
- Major factors that influence surface integrity
Dull Tool in Orthogonal Cutting and Feed Marks
- Dull tool : Lacks sharpness has a large radius along its edges
- Large radius along its edges
- Rake angle becomes negative
- Dull tool rub over the machine surface
- Friction heat
- Surface residual stresses
- Surface damages : Cracking, Tearing, etc.
- Feed mark : The tool leaves a spiral profile
- The higher feed rate and the smaller the radius(R), the more significant feed marks
Machinability
- One of material properties but difficult to express quantitatively
- Surface finish and integrity of the machined part
- Tool life
- Force and power requirements
- Chip contorl
- Good machinability
- Good surface finish and integrity
- Long tool life
- Low force and power
- Good elimination of the chip
Cutting-Tool Material
- Tool material is one of most important consideration in machining process
- A cutting tool must have the following characteristics
- Hot hardness
- Toughness
- Wear resistance
- Chemical stability or inertness
Carbon steels
- The oldest of tool materials since 1880s
- Inexpensive and easily shaped and sharpened
- Insufficient hot hardness for machining at high cutting speed
- Insufficient wear resistance for machining at high cutting speed
High-speed steels(HSS)
- Developed to machine at speeds higher than previously possible
- The largest number of tool materials
