Generative Adversarial Network (4)

DCGAN

  • ANN generator의 문제점
    • 부드러운 이미지가 아닌 고대비 픽셀로 이뤄진 불명확한 이미지
    • 완전 연결 신경망은 메모리를 많이 사용하고 큰 이미지에 적합하지 않음
  • 합성곱 GAN (Deep Convolutional Generative Adversarial Network, DCGAN)을 통해 극복

Localized Image Feature

  • 이미지 데이터의 특성: 머신러닝을 위한 유의미한 특성 (feature)은 이미지에서 지역화된 (localized) 특성
    • Ex) 눈과 코를 나타내는 픽셀은 서로 가까이 존재
  • ANN generator
    • 이러한 도메인 지식 (domain knowledge) 이용 불가
    • 이미지의 모든 픽셀 항상 고려 (이미지 특성의 지역성 고려 X) $\rightarrow$ 비효율적 훈련

Convolution Neural Network

  • 합성곱 (convolution): 합성곱 커널 (convolution kernel)을 통해 이미지의 정보를 새로운 격자에 요약하는 방법
    • 실제 이미지 픽셀과 요약된 이미지 픽셀 사이의 유사성 모색
  • 특성 맵 (feature map): 합성곱 커널 레이어가 모서리 혹은 점과 같은 디테일한 저수준 특성을 요약한 정보
    • 특성 맵에 다시 합성곱 커널의 레이어를 추가하여 더 추상적인 특성들의 조합으로 구성된 고수준 특성 취득 가능
  • 합성곱 신경망 (convolution neural network, CNN): 이웃한 픽셀들의 작은 패턴에서 비롯된 중수준의 특성으로부터 이미지 내용을 통해 분류에 용이
    • 커널의 형태를 네트워크로 훈련 (네트워크가 저수준, 중수준, 고수준의 이미지 특성 훈련)

MNIST CNN

Classifier.py
1
2
3
4
5
6
7
8
9
10
11
12
13
14
15
...
self.model = nn.Sequential(
nn.Conv2d(1, 10, kernel_size = 5, stride = 2),
nn.LeakyReLU(0.02),
nn.BatchNorm2d(10),

nn.Conv2d(10, 10, kernel_size = 3, stride = 2),
nn.LeakyReLU(0.02),
nn.BatchNorm2d(10),

View(250),
nn.Linear(250, 10),
nn.Sigmoid()
)
...
Train.py
1
2
3
4
5
6
7
8
9
10
C = Classifier()

epochs = 3

for i in range(epochs):
print('training epoch', i + 1, "of", epochs)
for label, image_data_tensor, target_tensor in mnist_dataset:
C.train(image_data_tensor.view(1, 1, 28, 28), target_tensor)
pass
pass
  1. nn.Conv2d(1, 10, kernel_size = 5, stride = 2): 합성곱 레이어
    • 입력 채널의 개수: 1 (단색 이미지)
    • 출력 채널의 개수: 10
    • 10개의 특성 맵으로 작동할 10개의 합성곱 커널 제작
    • kernel_size: 커널의 크기 설정
    • stride (보폭): 이미지를 따라 커널이 얼마나 움직일지 설정
    • $5\times5$ 커널이 2칸씩 이동
  2. nn.BatchNorm2d(10): 특성 맵 레이어의 전 채널 정규화
  3. nn.Conv2d(10, 10, kernel_size = 3, stride = 2)
    • 10개의 특성 맵에 $3\times3$ 커널을 stride = 2로 적용하여 $5\times5$인 10개의 특성맵 수집
  4. View(250)
    • $5\times5$ 크기의 특성 맵 10개 ($10\times5\times5=250$)를 받아 1차원 리스트에 할당
  • PyTorch의 합성곱 필터 요소: batch_size, channels, height, width (4차원 텐서)
    • MNIST 이미지는 단색이므로 channels = 1
    • (1, 1, 28, 28)

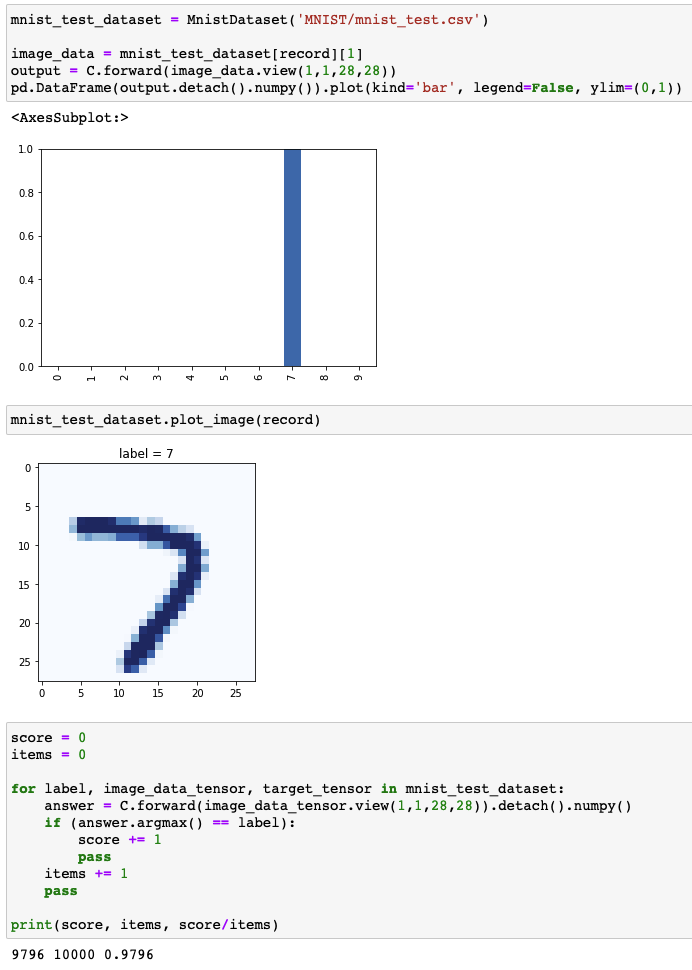
Results of CNN applied to MNIST dataset
results-of-cnn-applied-to-mnist-dataset

Montage DCGAN

1
2
3
4
5
def crop_center(img, new_width, new_height):
height, width, _ = img.shape
startx = width // 2 - new_width // 2
starty = height // 2 - new_height // 2
return img[starty:starty + new_height, startx:startx + new_width, :]
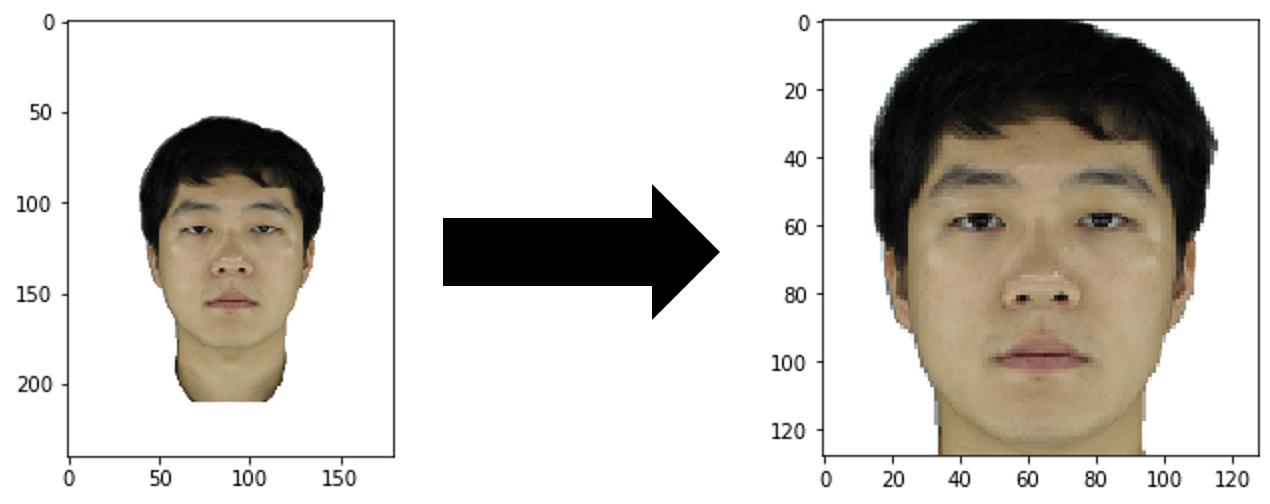
  • crop_center(): numpy 이미지 행렬을 받아 중앙에서부터 주어진 크기에 맞춰 절삭
MontageDataset.py
1
2
3
4
5
6
7
8
9
10
11
12
13
14
...
def __getitem__(self, index):
if (index >= len(self.dataset)):
raise IndexError()
img = np.array(self.dataset[str(index)+'.png'])
img = crop_center(img, 128, 128)
return torch.cuda.FloatTensor(img).permute(2, 0, 1).view(1, 3, 128, 128) / 255.0

def plot_image(self, index):
img = np.array(self.dataset[str(index)+'.png'])
img = crop_center(img, 128, 128)
plt.imshow(img, interpolation='nearest')
pass
...

crop_center(img, 128, 128)

crop-center-img-128-128-
  • __getitem__()
    • (height, width, 3) $\rightarrow$ (batch_size, channels, height, width)
      • permute(2, 0, 1): numpy 행렬 순서 변환 ((height, width, 3) $\rightarrow$ (3, height, width))
      • View(1, 3, 128, 128): 배치 크기 1 추가
    • Add crop_center()
  • plot_image()
    • Add crop_center()
Discriminator.py
1
2
3
4
5
6
7
8
9
10
11
12
13
14
15
16
17
18
19
20
21
...
self.model = nn.Sequential(
nn.Conv2d(3, 256, kernel_size = 8, stride = 2),
nn.BatchNorm2d(256),
# nn.LeakyReLU(0.2),
nn.GELU(),

nn.Conv2d(256, 256, kernel_size = 8, stride = 2),
nn.BatchNorm2d(256),
# nn.LeakyReLU(0.2),
nn.GELU(),

nn.Conv2d(256, 3, kernel_size = 8, stride = 2),
# nn.LeakyReLU(0.2),
nn.GELU(),

View(3*10*10),
nn.Linear(3*10*10, 1),
nn.Sigmoid()
)
...
Generator.py
1
2
3
4
5
6
7
8
9
10
11
12
13
14
15
16
17
18
19
20
21
22
23
24
...
self.model = nn.Sequential(
nn.Linear(100, 3*11*11),
# nn.LeakyReLU(0.2),
nn.GELU(),

View((1, 3, 11, 11)),

nn.ConvTranspose2d(3, 256, kernel_size=8, stride=2),
nn.BatchNorm2d(256),
# nn.LeakyReLU(0.2),
nn.GELU(),

nn.ConvTranspose2d(256, 256, kernel_size=8, stride=2),
nn.BatchNorm2d(256),
# nn.LeakyReLU(0.2),
nn.GELU(),

nn.ConvTranspose2d(256, 3, kernel_size=8, stride=2, padding=1),
nn.BatchNorm2d(3),

nn.Sigmoid()
)
...
  • 판별기: 데이터가 레이어를 통과하며 데이터의 크기가 줄어들게 설계
    1. Raw image: $128\times128$ $\rightarrow$ 256 Kernel: $8\times8$ & Stride: $2\ \rightarrow$ 256 Feature map: $61\times61$
    2. 256 Feature map: $61\times61$ $\rightarrow$ 256 Kernel: $8\times8$ & Stride: $2\ \rightarrow$ 256 Feature map: $27\times27$
    3. 256 Feature map: $27\times27$ $\rightarrow$ 3 Kernel: $8\times8$ & Stride: $2\ \rightarrow$ 3 Feature map: $10\times10$
  • 생성기: 데이터가 레이어를 통과하며 데이터의 크기가 커지게 설계
    • 전치 합성곱 (transposed convolution): nn.ConvTranspose2d
    1. Seed: $100$ $\rightarrow$ $3\times11\times11$ $\rightarrow$ 4D Tensor: $(1,\ 3,\ 11,\ 11)$
    2. 4D Tensor: $(1,\ 3,\ 11,\ 11)$ $\rightarrow$ 256 Kernel: $8\times8$ & Stride: $2$ $\rightarrow$ 256 Feature map: $28\times28$
    3. 256 Feature map: $28\times28$ $\rightarrow$ 256 Kernel: $8\times8$ & Stride: $2$ $\rightarrow$ 256 Feature map: $62\times62$
    4. 256 Feature map: $62\times62$ $\rightarrow$ 3 Kernel: $8\times8$ & Stride: $2$ & Padding: $1$ $\rightarrow$ 3 Feature map: $128\times128$ (generated image)
  • GELU (Gaussian Error Linear Unit): ReLU 함수와 비슷하지만 상대적으로 부드러운 곡선을 통해 개선된 기울기 제공

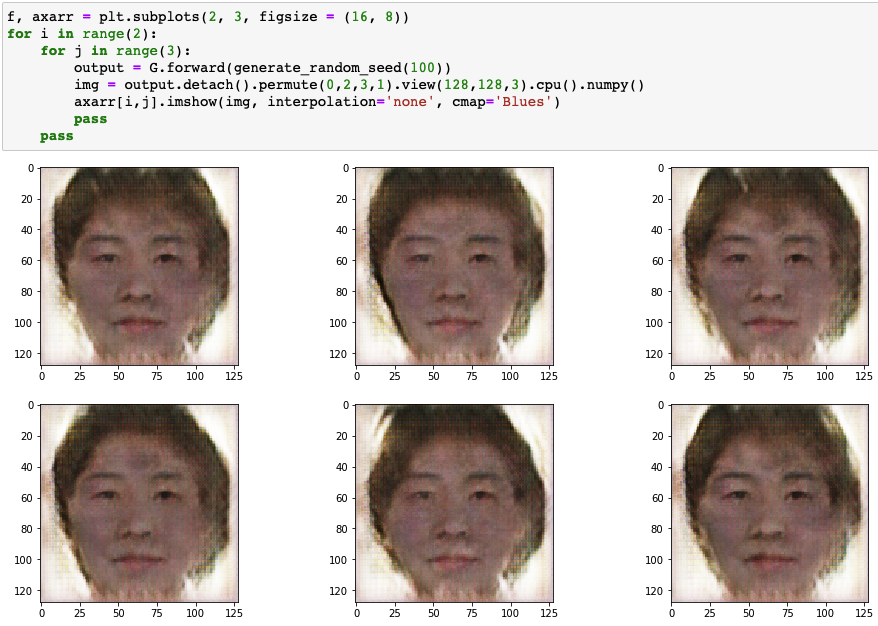
Results of DCGAN applied to montage dataset
results-of-dcgan-applied-to-montage-dataset


CGAN

  • 조건부 GAN (Conditional Generative Adversarial Network, CGAN): 클래스 레이블과 이미지 사이의 관계를 학습한 생산적 적대 신경망
    • 훈련 시 시드에 입력을 추가하여 생성기가 주어진 클래스에 해당하는 이미지 생성
    • 판별기 또한 클래스 레이블에 대한 정보 제공

Discriminator

Discriminator.py
1
2
3
4
5
6
7
8
9
10
11
12
13
14
15
16
...
self.model = nn.Sequential(
nn.Linear(784+10, 200),
nn.LeakyReLU(0.02),
nn.LayerNorm(200),
nn.Linear(200, 1),
nn.Sigmoid()
)
...
def forward(self, image_tensor, label_tensor):
inputs = torch.cat((image_tensor, label_tensor))
return self.model(inputs)
...
def train(self, inputs, label_tensor, targets):
outputs = self.forward(inputs, label_tensor)
...
  • forward(): 이미지 텐서와 레이블 텐서를 동시 입력
    • 레이블 텐서: 원핫 인코딩 필수

Generator

Generator.py
1
2
3
4
5
6
7
8
9
10
11
12
13
14
15
16
17
18
19
20
21
22
23
24
25
26
27
28
...
self.model = nn.Sequential(
nn.Linear(100+10, 200),
nn.LeakyReLU(0.02),
nn.LayerNorm(200),
nn.Linear(200, 784),
nn.Sigmoid()
)
...
def forward(self, seed_tensor, label_tensor):
inputs = torch.cat((seed_tensor, label_tensor))
return self.model(inputs)
...
def train(self, D, inputs, label_tensor, targets):
g_output = self.forward(inputs, label_tensor)
d_output = D.forward(g_output, label_tensor)
...
def plot_images(self, label):
label_tensor = torch.zeros((10))
label_tensor[label] = 1.0
f, axarr = plt.subplots(2,3, figsize=(16,8))
for i in range(2):
for j in range(3):
axarr[i,j].imshow(G.forward(generate_random_seed(100), label_tensor).detach().cpu().numpy().reshape(28,28), interpolation='none', cmap='Blues')
pass
pass
pass
...
  • forward(): 이미지 텐서와 레이블 텐서를 동시 입력

Training and Results

Train.py
1
2
3
4
5
6
7
8
9
10
11
12
13
14
15
16
17
%%time

D = Discriminator()
G = Generator()

epochs = 12

for epoch in range(epochs):
print ("epoch = ", epoch + 1)
for label, image_data_tensor, label_tensor in mnist_dataset:
D.train(image_data_tensor, label_tensor, torch.FloatTensor([1.0]))
random_label = generate_random_one_hot(10)
D.train(G.forward(generate_random_seed(100), random_label).detach(), random_label, torch.FloatTensor([0.0]))
random_label = generate_random_one_hot(10)
G.train(D, generate_random_seed(100), random_label, torch.FloatTensor([1.0]))
pass
pass
  1. 실제 데이터에 대해 참으로 판별기 훈련: D.train(image_data_tensor, label_tensor, torch.FloatTensor([1.0]))
  2. 생성 데이터에 대해 거짓으로 판별기 훈련: D.train(G.forward(generate_random_seed(100), random_label).detach(), random_label, torch.FloatTensor([0.0]))
    • 생성기에 임의의 시드와 임의의 레이블을 통해 이미지 생성
    • 판별기에 생성된 이미지를 거짓으로 훈련
  3. 생성기 훈련: G.train(D, generate_random_seed(100), random_label, torch.FloatTensor([1.0]))
    • 생성기에 임의의 시드와 임의의 레이블을 입력하여 이미지 생성
    • 판별기에 생성된 이미지와 임의의 레이블을 함께 입력하여 판별기의 결과 출력
    • 판별기의 loss_function에 출력된 결과와 실제 레이블을 입력하여 loss 값 출력

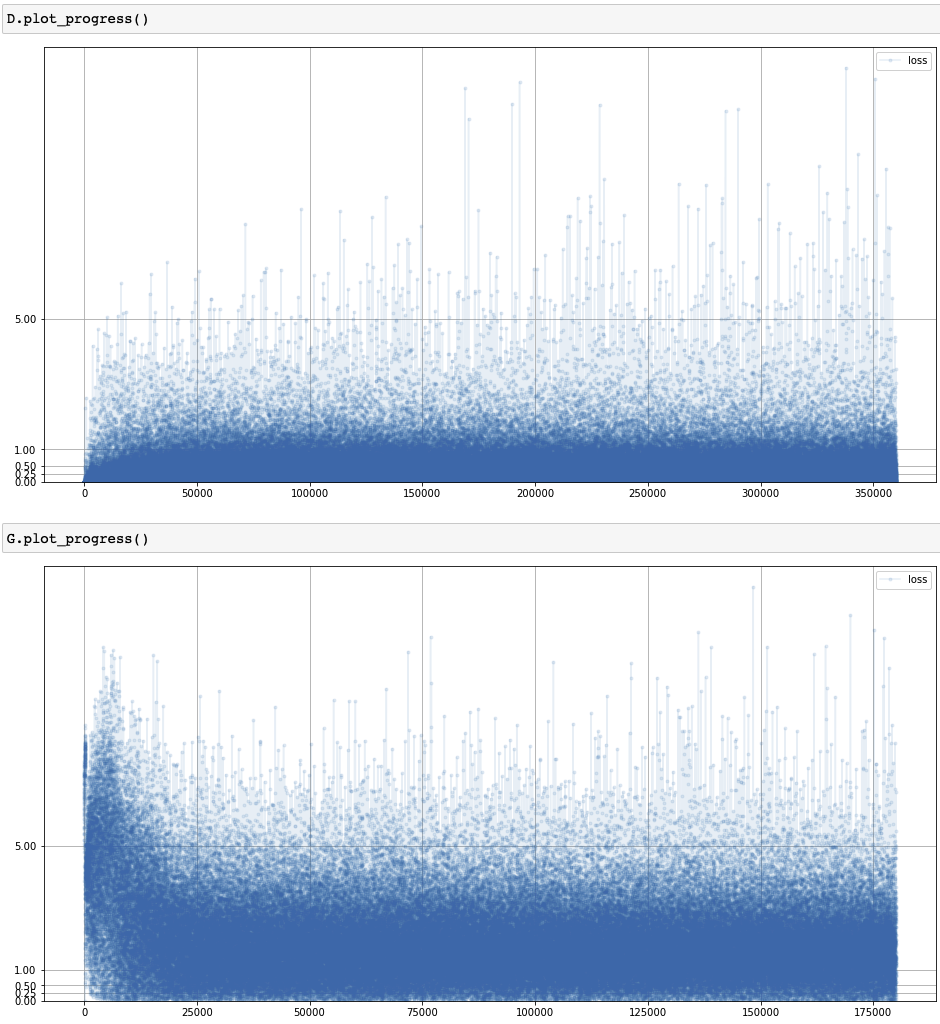
Loss of CGAN training process
loss-of-cgan-training-process

Results of CGAN applied to MNIST dataset: 0 ~ 9

results-of-cgan-applied-to-mnist-dataset